Update: Check the next part Creating a simple Voting control in Silverlight 2 which also runs on Silverlight 2
Update: We found an issue in the Voting control. When you click on the filled vote bar you actually give 2 votes because the mouse up event is handled by the two canvases that displays the vote. We've fix that so now you can download the fixed version.
Overview
We, at SilverlightShow.net, continue the series of articles focused on solving common tasks. In this article we will show you how to create a simple control that allows the user to vote by clicking on the answer.
The goal
Feedback from the site visitors is often needed. One way to get feedback is to allow the visitors to vote. We want to have a control, which can show the current results and at the same time can allow the user to give his/her vote for a certain answer by simply clicking on it.
The Solution
Data model
First we will start with making two classes - Vote and VoteOption.
The Vote class is used to store the descriptive text explaining for what the user is voting and also the list of options to vote.
public class Vote
{
private string text;
private Collection<VoteOption> items;
public string Text
{
get
{
return this.text;
}
set
{
this.text = value;
}
}
public Collection<VoteOption> Items
{
get
{
if ( this.items == null )
this.items = new Collection<VoteOption>();
return this.items;
}
}
public int TotalVotes
{
get
{
int totalVotes = 0;
foreach ( VoteOption voteItem in this.Items )
totalVotes += voteItem.Votes;
return totalVotes;
}
}
public VoteOption AddItem( string text, int votes )
{
VoteOption voteItem = new VoteOption( this );
voteItem.Text = text;
voteItem.Votes = votes;
this.Items.Add( voteItem );
return voteItem;
}
}
VoteItem – represents a single option related to a vote and includes text, number of votes and percentage based of all votes made.
public class VoteOption
{
private readonly Vote vote;
private string text;
private int votes;
public VoteOption( Vote vote )
{
this.vote = vote;
}
public Vote Vote
{
get
{
return this.vote;
}
}
public string Text
{
get
{
return this.text;
}
set
{
this.text = value;
}
}
public int Votes
{
get
{
return this.votes;
}
set
{
this.votes = value;
}
}
public void VoteForIt()
{
this.Votes += 1;
}
public decimal VotesPercent
{
get
{
return Math.Round(( ( decimal )this.Votes / ( decimal )this.Vote.TotalVotes ), 4) * 100;
}
}
}
The controls
Having the simple data model allows us to continue with the user interface representation.
VoteOptionControl
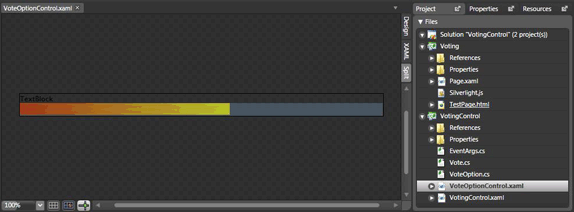
Because one vote will have more than one vote options, we will create separate controls for representing every vote option. In Expression Blend you can see the control – the
rootCanvas contains text block, where the vote option text will be displayed;
resultCanvas, where the result will be displayed and
percentValueRectangle that is used to show the current percentage based on all votes given for that option.
And the XAML:
<Canvas xmlns="http://schemas.microsoft.com/client/2007"
xmlns:x="http://schemas.microsoft.com/winfx/2006/xaml"
Width="625"
Height="38"
x:Name="rootCanvas"
Cursor="Hand"
>
<TextBlock Width="624" Height="16" Text="TextBlock" TextWrapping="Wrap" x:Name="tbTitle" Foreground="#FF000000" FontSize="12"/>
<Canvas Width="624" Height="22" Canvas.Top="16" x:Name="resultCanvas" Opacity="0.7" Background="#FF536676">
<Rectangle Width="361" Height="20" x:Name="percentValueRectangle" StrokeThickness="0">
<Rectangle.Fill>
<LinearGradientBrush EndPoint="1,0.5" StartPoint="0,0.5">
<GradientStop Color="#FFD03A0F" Offset="0"/>
<GradientStop Color="#FFF2FD29" Offset="0.99"/>
</LinearGradientBrush>
</Rectangle.Fill>
</Rectangle>
</Canvas>
</Canvas>
In VoteOptionContorl we make new properties for Width and Height, which calls base.Width and base.Height, but also calls private method InitializeLayout(). This method sets the positions and sizes of all elements depending on the size.
private void InitializeLayout()
{
this.tbTitle.SetValue( Canvas.TopProperty, 0 );
this.tbTitle.SetValue( Canvas.LeftProperty, 0 );
this.tbTitle.Width = this.Width;
this.tbTitle.Height = this.Height - this.voteResultCanvas.Height;
this.voteResultCanvas.SetValue( Canvas.TopProperty, this.Height -
this.tbTitle.Height );
this.voteResultCanvas.SetValue( Canvas.LeftProperty, 0 );
this.voteResultCanvas.Width = this.Width;
this.percentValueRectangle.SetValue( Canvas.TopProperty, 1 );
this.percentValueRectangle.SetValue( Canvas.LeftProperty, 1 );
this.Refresh();
}
The other important method is the public method Refresh(). It is used to refresh the control – the option value text and also to display the vote result.
public void Refresh()
{
this.tbTitle.Text = string.Format( this.Formatting, this.VoteItem.Text,
this.VoteItem.VotesPercent / 100, this.VoteItem.Votes );
decimal percent = this.VoteItem.VotesPercent;
if ( percent == 0 )
{
this.percentValueRectangle.Visibility = Visibility.Collapsed;
}
else
{
this.percentValueRectangle.Visibility = Visibility.Visible;
if ( percent >= 100 )
this.percentValueRectangle.Width =
this.voteResultCanvas.Width;
else
this.percentValueRectangle.Width = (
this.voteResultCanvas.Width / 100 ) *
( double )percent;
}
}
Of course, to allow the site visitors to click on certain vote option we need to handle mouse button up event. We do that for tbTitle, voteResultCanvas and percentValueRectangle. In the event handler we raise our events Voting and Voted:
private void VoteOnMouseLeftButtonUp( object sender, MouseEventArgs e )
{
VoteEventArgs voteEventArgs = new VoteEventArgs( null );
this.OnVoting( voteEventArgs );
if ( voteEventArgs.Cancel )
return;
this.VoteOption.VoteForIt();
this.OnVoted( voteEventArgs );
}
As you can see, our events work using custom event arguments VoteEventArgs:
public class VoteEventArgs : EventArgs
{
private bool cancel = false;
private readonly VoteOption voteItem;
public VoteOption VoteItem
{
get
{
return this.voteItem;
}
}
public bool Cancel
{
get
{
return this.cancel;
}
set
{
this.cancel = value;
}
}
public VoteEventArgs( VoteOption voteItem )
{
this.voteItem = voteItem;
}
}
Here the idea is to allow the consumer of the event to be able to perform some check and to cancel the voting if necessary. This might be used to check for example the IP address and to cancel the vote if it is from same IP.
The last thing we will do is to give a hint to the user that he/she is allowed to vote. This will be made by changing the opacity of voteResultCanvas on MouseEnter and MouseLeave of tbTitle, voteResultCanvas and percentValueRectangle. Also we set the cursor for rootCanvas to be Hand.
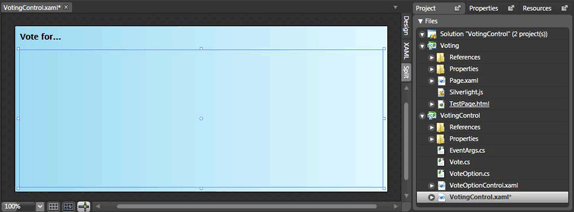
VoteControl
VoteControl is simply a container for vote options and a header where the vote text is displayed.
<Canvas xmlns="http://schemas.microsoft.com/client/2007"
xmlns:x="http://schemas.microsoft.com/winfx/2006/xaml"
Width="640" Height="480"
>
<Canvas.Background>
<LinearGradientBrush EndPoint="1,0.5" StartPoint="0,0.5" SpreadMethod="Pad" MappingMode="RelativeToBoundingBox">
<GradientStop Color="#FF80CCE8" Offset="0"/>
<GradientStop Color="#FFE0F7FF" Offset="1"/>
<GradientStop Color="#FF9CD9F0" Offset="0.005"/>
</LinearGradientBrush>
</Canvas.Background>
<Canvas Width="624" Height="431" Canvas.Left="8" Canvas.Top="41" x:Name="votingSpace"/>
<TextBlock Width="624" Height="29" Canvas.Left="8" Canvas.Top="8" Text="Vote for..." TextWrapping="Wrap" x:Name="votingTitle" Foreground="#FF040404" FontSize="14" FontWeight="Bold"/>
</Canvas>
Here you will find a property Vote which can be used to set an already created Vote object. Another option is to use the property Text and the method AddItem( string text, int votes ). In this case VoteControl will internally create an instance of type Vote and will set its text or add VoteOptions to it. Bellow we will show both ways of using it.
Here again we have private method InitializeLayout() dealing with proper element sizes and positions.
The private method InitializeVoteItems() is used to create VoteOptionControl for each VoteOption in Vote. It is called whenever the size of the control is changed or new VoteOption is added.
private void InitializeVoteItems()
{
double voteItemControlTop = this.ControlDistance;
double voteItemControlHeight = this.votingSpace.Height -
this.ControlDistance -
(this.ControlDistance * this.Vote.Items.Count);
voteItemControlHeight = voteItemControlHeight / this.Vote.Items.Count;
VoteOptionControl vic;
foreach ( VoteOption vi in this.Vote.Items )
{
if ( this.VoteItemsControls.ContainsKey( vi ) == true )
{
vic = this.VoteItemsControls[ vi ];
}
else
{
vic = new VoteOptionControl();
this.VoteItemsControls.Add( vi, vic );
this.votingSpace.Children.Add( vic );
vic.VoteOption = vi;
vic.Voting += new EventHandler<VoteEventArgs>( vic_Voting );
vic.Voted += new EventHandler<VoteEventArgs>( vic_Voted );
}
vic.SetValue( Canvas.TopProperty, voteItemControlTop );
vic.SetValue( Canvas.LeftProperty, this.ControlDistance );
vic.Width = this.votingSpace.Width - 2 * this.ControlDistance;
vic.Height = voteItemControlHeight;
voteItemControlTop += this.ControlDistance + voteItemControlHeight;
}
}
Here for each Vote.Item we create VoteOptionControl if not exist, attach to Voting and Voted events and add the control to the votingSpace. Also we set the proper size and position.
VoteControl has its own Voting and Voted events which are fired when the relevant events in VoteOptionControl are fired. The only difference is that when the voting is not cancelled, the VoteControl force updates to all VoteOptions in order to update the percentages.
Testing
For test we have a new project with two VoteControl on it just to show the 2 ways of using it. On page load event we just initialize the controls:
public void Page_Loaded( object o, EventArgs e )
{
// Required to initialize variables
InitializeComponent();
Vote v = new Vote();
v.Text = "Do you like the article for voting component?";
v.AddItem( "Excellent article", 75 );
v.AddItem( "Good article", 25 );
v.AddItem( "Bad article", 0 );
votingControl.Vote = v;
votingControl2.Text = "Do you like SilverlightShow.net?";
votingControl2.AddItem( "Yes, I do", 80 );
votingControl2.AddItem( "No, I don't", 15 );
votingControl2.AddItem( "I cannot say", 3 );
}
This first control shows how to make Vote object, to initialize it and then to set it to the votingControl.Vote property.
The second one directly sets the votingControl2.Text and calls AddItem multiple times. The control internally creates what is needed.
Summary
In this article we showed you how easy it is to put interactivity in such a common case as voting.
Combining this with Astoria services you are able to integrate this VotingControl in a real-world scenario pretty easy.
We hope you like it!