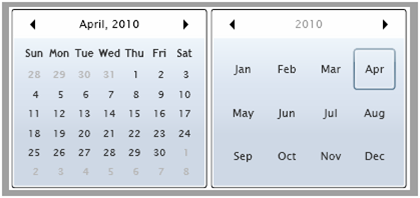
There are a few controls that was shipped in Silverlight 2 Beta 1 that was not available in WPF. Therefore I decided to write a starter guide to help you get started in using the controls. Here are some highlights of the Silverlight 2 Beta 1 Calendar and DatePicker control:
· Supports nullable DateTime
· Supports Silverlight's template model
· Ability to set which Month/Year to display by default
· Ability to select a single date
To get started with the Calendar and DatePicker:
1) Instantiate a Calendar or a DatePicker in XAML & C# (See Figure 1)
//XAML
<Calendar x:Name="cal" />
<DatePicker x:Name="datePicker" />
//C#
Calendar cal = new Calendar();
DatePicker datePicker = new DatePicker();


Figure 1 Preview in VS 2008 Figure 2 After setting display Month and Year
2) Setting which Month/Year to display by default (See Figure 2)
//C#
cal.DisplayDate = new DateTime(2010, 4, 15);
datePicker.DisplayDate = new DateTime(2010, 4, 15);
3) Setting which mode to display by default (See Figure 2)
//C#
cal.DisplayMode = CalendarMode.Year;
4) Setting the default Selected Date
//C#
cal.SelectedDate = new DateTime(2008, 1, 1);
5) Setting the range of dates that the Calendar or DatePicker can display
//C# Displaying only a few days within a month
cal.DisplayDateStart = new DateTime(2008, 4, 9);
cal.DisplayDateEnd = new DateTime(2008, 4, 15);
datePicker.DisplayDateStart = new DateTime(2008, 4, 9);
datePicker.DisplayDateEnd = new DateTime(2008, 4, 15);


//C# Displaying a few month within a year
cal.DisplayDateStart = new DateTime(2008, 2, 1);
cal.DisplayDateEnd = new DateTime(2008, 11, 1);
datePicker.DisplayDateStart = new DateTime(2008, 2, 1);
datePicker.DisplayDateEnd = new DateTime(2008, 11, 1);

6) Setting the range of dates that the Calendar or DatePicker can select
//C#
cal.SelectableDateStart = new DateTime(2008, 4, 11);
cal.SelectableDateEnd = new DateTime(2008, 4, 13);
datePicker.SelectableDateStart = new DateTime(2008, 4, 11);
datePicker.SelectableDateEnd = new DateTime(2008, 4, 13);

