Note: This article is submitted by David for Silverlight Contest: Write and Win.Thanks a lot, David! Hello All, Please drop a comment if you like it.
Silverlight sure has come a long way since the days of “WPF/E.” With its most recent release, Silverlight 2 Beta 2, it has truly proven itself to be one of the best toolsets for Rich Internet Applications, and has effectively achieved its original goal of being an Internet version of WPF. The power and possibilities behind Silverlight are endless. However, with the continuous stream of alpha and beta releases, there are many breaking changes that appear. Newcomers to Silverlight and developers upgrading to the newest versions may have trouble learning all the ropes of the new 2 Beta 2 version. In this article I will present a simple yet expandable scenario that will help new and existing Silverlight developers enhance their development experience.
Source Code: VideoPlayer.zip
Prerequisites
In order to use the features talked about in this article, there are just a few things you’ll need to download (or ensure you already have). Firstly, you need to have a version of Visual Studio 2008 (I will be using the Professional edition and will assume that is the version you have, too – other versions may work, however). Next, you will need the Silverlight Tools Beta 2 (which includes Visual Studio Silverlight support and the Silverlight SDK), which is available at http://www.microsoft.com/downloads/details.aspx?FamilyID=50a9ec01-267b-4521-b7d7-c0dba8866434&DisplayLang=en. Finally, you will need Silverlight 2 Beta 2, downloadable at the official Silverlight website (http://www.microsoft.com/silverlight/default.aspx#2_0). Once all this is taken care of, proceed to the next section!
Creating the UI
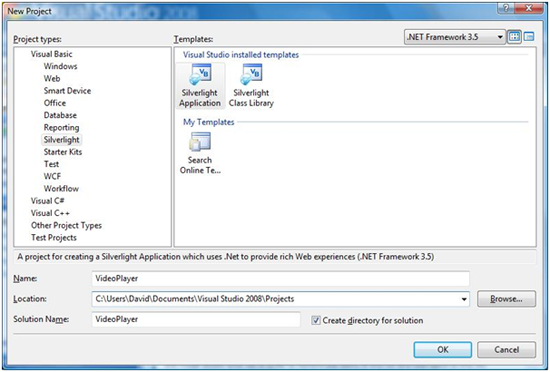
Let’s start out by designing the interface of our video player. To do this, first create a project in Visual Studio called “VideoPlayer” with the Silverlight Application template.

Creating a Silverlight Application in Visual Studio 2008
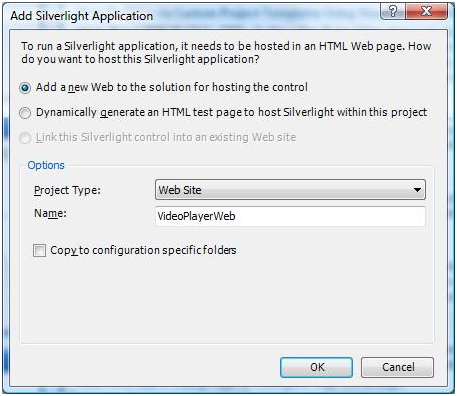
As the project is being created, you will see a prompt asking about a web application to host the Silverlight application. If you don’t have an existing web application to host your Silverlight application in, go ahead and leave the default settings and hit OK, like this:

Web Application Host prompt while creating a Silverlight Application
Once the project is created, the first file you will see is a split designer/code view of Page.xaml. Looking in the code view, note that the root XAML element is <UserControl>, whereas in some earlier Silverlight releases the root element was almost always <Canvas>. You can drag and drop controls into the code view to create our user interface – designer drag-and-drop isn’t supported yet – or you can just copy and paste the following code. We need a MediaElement for hosting our video, and three Buttons (for Play, Pause, and Stop).
1: <UserControl x:Class="VideoPlayer.Page"
2: xmlns="http://schemas.microsoft.com/winfx/2006/xaml/presentation"
3: xmlns:x="http://schemas.microsoft.com/winfx/2006/xaml"
4: Width="640" Height="550">
5: <Grid x:Name="LayoutRoot" Background="White">
6: <Canvas>
7: <MediaElement x:Name="mPlayer" Width="640" Height="480"
8: Source="http://www.example.com/video.wmv" />
9: <Button x:Name="bPlay" Background="Green" Width="100" Height="45"
10: Canvas.Left="8" Canvas.Top="497" Content="Play" />
11: <Button x:Name="bPause" Background="Yellow" Width="100" Height="45"
12: Canvas.Left="112" Canvas.Top="497" Content="Pause" />
13: <Button x:Name="bStop" Background="Red" Width="100" Height="45"
14: Canvas.Left="216" Canvas.Top="497" Content="Stop" />
15: </Canvas>
16: </Grid>
17: </UserControl>
You will notice a few things here. Firstly, there is the declaration of the root <UserControl> element. I still chose to throw in a <Canvas> element following this, for easily positioning the Buttons. You can see the size of the UserControl is quickly set within two attributes, along with the XAML namespaces references. The first child element after the <Canvas> is the MediaElement. The Source property should be replaced with whatever video you wish to display. Following the MediaElement, there are the three Buttonss which, respectively, are green (Play), yellow (Pause) and red (Stop). This is the general setup for the user interface. If you’d like to make changes or additions, go ahead! There is plenty of room for flexibility here – what about adding a video selection list, or a download feature?
Adding Control
We will continue with the core video player functionality. The video player will have no control with three mere Buttons alone! For this feat, we will need to wire the MouseLeftButtonDown events of these elements to functions in the page’s supporting code file (the defaults is Page.xaml.vb in VB.NET or Page.xaml.cs in C#). In the XAML file, we set the x:Name attributes of all the elements. This will give us access to the elements through code. Open the code file, which should look similar to the following:
1: 'VB.NET
2: Partial Public Class Page Inherits UserControl
3: Public Sub New()
4: InitializeComponent()
5: End Sub
6: End Class
7:
8: //C#
9: public partial class Page : UserControl
10: {
11: public Page()
12: {
13: InitializeComponent();
14: }
15: }
Between the End Sub of the Page_Loaded event handler and the End Class line (or between the last two brackets), add the following event handlers. Each function handles the appropriate MouseLeftButtonDown event for a Button element, and then calls the corresponding method in the MediaElement.
1: 'VB.NET
2: Public Sub Play_Click(ByVal sender As Object, ByVal e As EventArgs)
3: Handles bPlay.MouseLeftButtonDown
4: mPlayer.Play()
5: End Sub
6:
7: Public Sub Pause_Click(ByVal sender As Object, ByVal e As EventArgs)
8: Handles bPause.MouseLeftButtonDown
9: mPlayer.Pause()
10: End Sub
11:
12: Public Sub Stop_Click(ByVal sender As Object, ByVal e As EventArgs)
13: Handles bStop.MouseLeftButtonDown
14: mPlayer.Stop()
15: End Sub
16:
17: //C#
18: public void Play_Click(object sender, EventArgs e)
19: {
20: mPlayer.Play();
21: }
22:
23: public void Pause_Click(object sender, EventArgs e)
24: {
25: mPlayer.Pause();
26: }
27:
28: public void Stop_Click(object sender, EventArgs e)
29: {
30: mPlayer.Stop();
31: }
Note that in C#, you will have to go back to the XAML file and set the MouseLeftButtonDown attributes of each Button to the appropriate function name, as C# doesn’t have a Handles keyword. After typing all this, you should be able to compile the application and test it out! The video player should now work properly. The task of creating a fully functional video player is easily accomplished with Silverlight. Even in the time from the first few Alpha releases of it, we have seen Silverlight burst into popularity and power. Although the video player presented here seems to be a basic example, it does in fact cover all of the basic Silverlight techniques: creating a Silverlight application, using VS 2008 for designing in Silverlight, and the .NET Silverlight event handling system. Silverlight is a really useful new technology from Microsoft – one that is revolutionizing the way people use and develop the web as you read this. Now it’s up to you: what will you be inspired to create with this astounding new technology? Get out there, start coding, and have fun!