 Watch recordings of Brian's WCF RIA Services webinars:
This article is Part 9 of the series WCF RIA Services.
Introduction
In all the articles up to this point, I have been dumping all the domain service stuff into the single web project that also hosts the Silverlight application. Additionally, I've been putting a lot of functionality into the single Silverlight Application project on the client side. Granted it is only a couple of views so far. But if this app grew to a couple dozen views, I really would not want to be putting all those into a single project. In a real world app, too much code in one place, whether in a single method, a single class, or a single project is a maintenance liability. Additionally, on the server side you might want to start partitioning the code into logical layers, such as breaking out a separate data access layer project from the domain service code, and you might want separate projects for different sets of domain services.
In this article, I'm going to focus on how to break your solution up into multiple projects on both the server and client sides. I'll show how you can break things up into vertical slices that support different use cases in your application or different functional areas. You'll quickly learn how to use WCF RIA Services Class Library projects, as well as how to break things up into multiple XAP files on the client side. Using the Managed Extensibility Framework or Prism 4, you can break up your client application into multiple modules that get developed and built as separate XAP files, and then get downloaded asynchronously when needed by the client application. When you go down this path, unfortunately Visual Studio gets in your way a little bit for setting up your WCF RIA services link with the server project. I'll show you how to easily get past that limitation as well.
You can download the sample code for this article here.
Client-Server Project Relationships
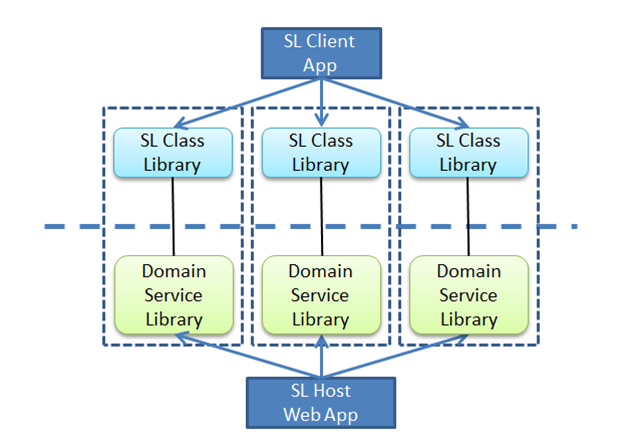
One thing to understand up front is that there are some architectural constraints implied by the use of WCF RIA Services. Because of the way the RIA Services code generation process works, if you want to consume a WCF RIA DomainService from a client project, that client project has to have a link to the server project that contains the domain services you want to consume. That means that a single client project can only point to a single server project. You can have multiple client projects that point to the same server project, and the code generation will happen in each client project. But then if those projects are all used in the same scope, you will have duplicate types defined in the same scope, and will run into problems there. So to keep things clean, you will want to maintain a one-to-one correspondence between a single server project where a set of domain services is defined and a single client project where the client code for those services gets generated. However, the client project can just be a class library that can be reused across multiple modules or client applications. So your architecture will tend to look like this as you start to partition things:
Adding a WCF RIA Services Class Library Project
The way to get started breaking things up is to add a new WCF RIA Services Class Library project to your solution. In this case, say I wanted to add some separable functionality to my application, such as the ability to add notes. I would select Add > New Project from Solution Explorer with the solution node selected, and pick the WCF RIA Services Class Library project type.
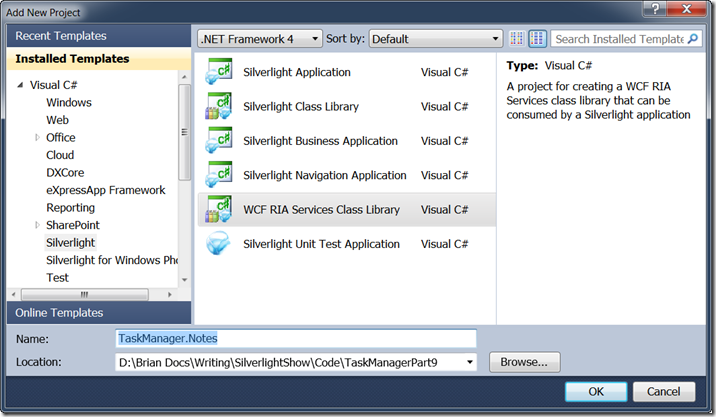
Once you add this project, you really are adding two projects, the client Silverlight Class Library and a server normal Class Library project. The RIA Services link will already be set between the projects, and it adds them to the solution under a new solution folder.
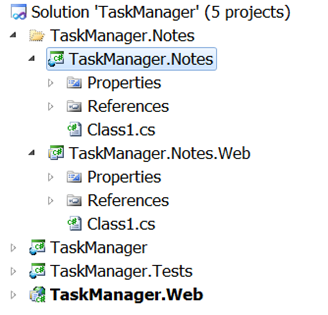
You do not really have to use this project type to get this architecture though. You could just add a new Silverlight Class Library to the solution, then add a normal Class Library as well. Then you would just go to the project properties of the Silverlight Class Library and set the WCF RIA Services link drop down to point to the new server class library project. Then you would just have to add the WCF RIA Services references to the client and server projects. This just gets you all that done in one fell swoop. And since the client and server projects are linked, having them in a solution folder is a decent way to group them.
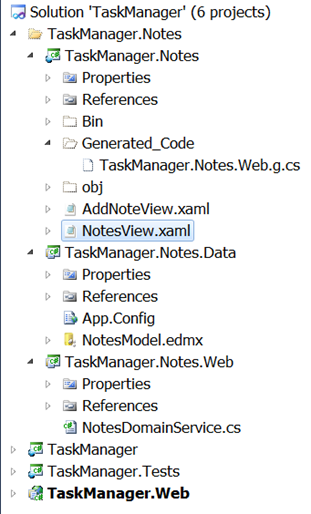
You would then add a new domain service to the TaskManager.Notes.Web project to get started defining your new service functionality and its associated entities. Its code generated client code will end up in the TaskManager.Notes client library. Then you would add a reference from the main client TaskManager Silverlight application to the TaskManager.Notes class library to start using those domain services in the main app. You could add new views and client functionality to that same class library as well. If you wanted to separate out your data access logic into its own class library, you would just add a new class library project and add your Entity Data Model into that project. Then add a reference to that class library from the class library that is going to contain your domain service. Remember to build before adding the new domain service so that it will see your entity framework model and let you pick from its entity types.
The resulting solution tree after adding some views and the data access library is shown below.
Using Entities Across Domain Services
In WCF RIA Services version 1, there is a limitation that you cannot have two domain services being used by the same client application that expose the same entity type. This is just a limitation of the way the client side code generation is done, because it will try to generate the same entity type once for each service and you will have duplicate definitions. This is fixed in WCF RIA Services SP1, which is available in beta form at the time of writing this here. But if you stick to the current release version, you will have to factor your vertical slices so that a given entity type is only used in one of the domain service vertical slices.
Breaking Your Client Application into Multiple Modules
As mentioned earlier, using MEF or Prism you can break your client architecture into modules – or separate chunks of functionality that can be downloaded asynchronously at runtime. For this article, I’ll just use MEF directly. I’ll be doing some articles on Prism 4 in the near future as well.
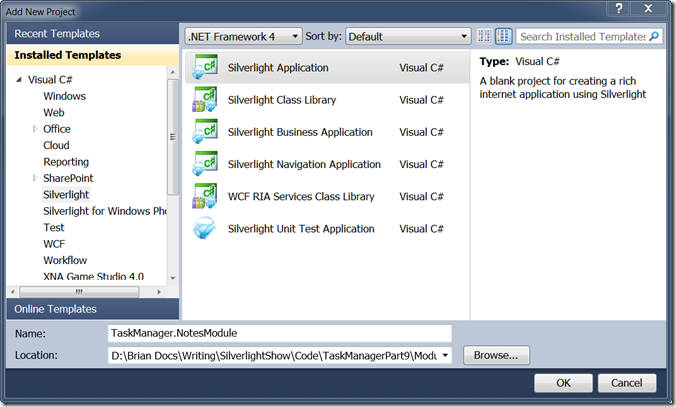
To do this, you need to put your functionality in a project that compiles to a separate XAP file from the main application. That requires you to pick the Silverlight Application template when creating the project, as opposed to a Silverlight Class Library or a WCF RIA Services Class Library project.
If I were going to do something similar to what I showed earlier in the article but wanted that new notes functionality to be downloaded separately as a module the first time it is used, the first step would be to create a new Silverlight Application project in my solution named TaskManager.NotesModule.
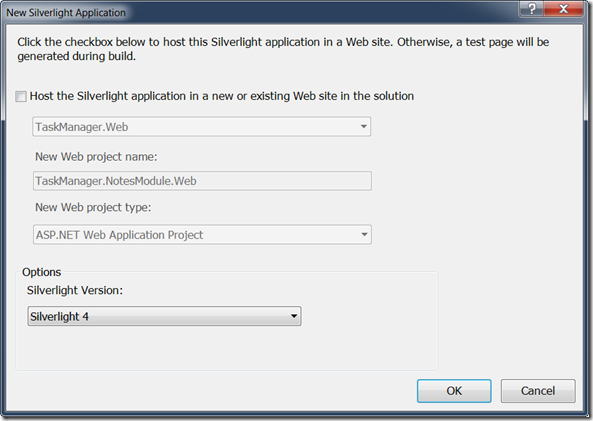
In the pop up that prompts for creating a server project, uncheck the box for hosting the application.
After the project is created, delete App.xaml and MainPage.xaml from the new project.
Next you will add the server class library where the domain service will live. Add a new Windows Class Library project and call it TaskManager.NotesModule.Services. You can delete Class1.cs from the new class library project as well. You could then add a domain service to that project, possibly using an entity data model defined in a separate class library as discussed earlier.
If you open the TaskManager.NotesModule Silverlight project settings at this point, the first thing you will need to do is set the startup object to (not set). That is because this project is not intended to be a standalone Silverlight application, but we are just using the Silverlight Application project type because its build output is to produce a XAP file with the contents of the project.
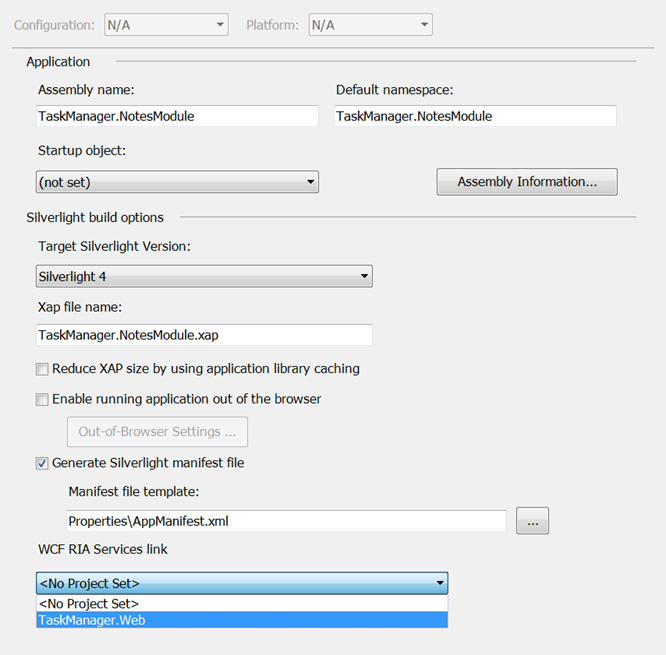
The trick comes when you go to set up the RIA Services link. If you drop down the WCF RIA Services link setting, you will not see the class library that contains your domain service listed as an option. This is really just a bug in the tooling. That drop down really just sets a relative path to the server project in the client project’s csproj file (or vbproj). Since the tool won’t let you set it correctly, you have to open the csproj file and edit it directly.
To do so, right click on the project and select Edit Project File.
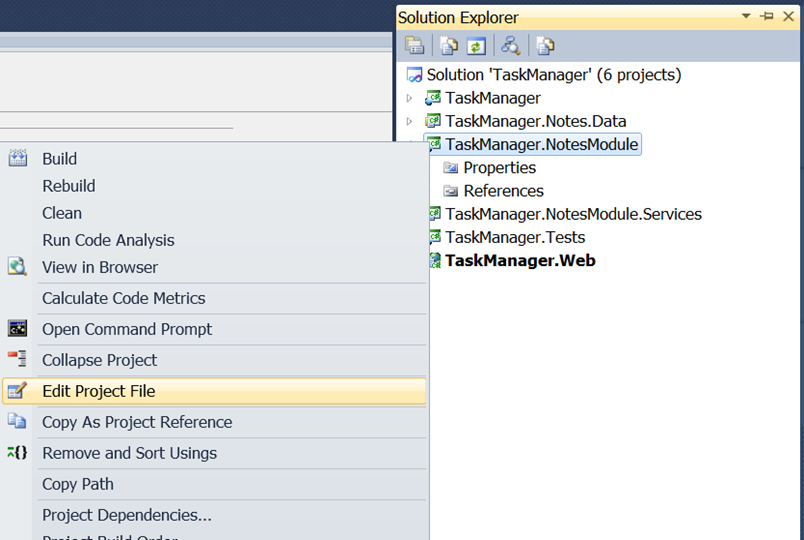
If that option is not available for you, you can also just open the .csproj in any text editor. The setting you are looking for.is called LinkedServerProject. You need to fill it in with the relative path to the .csproj file of the server project. For example, in my case, the path is:
After adding this and saving the file and closing it, you can then right click on the project in Solution Explorer and select Reload Project. If you then go look at the project settings again, you will see it is now showing the right server project. If you build, you will get the client generated code in your module project from the linked server project.
Using MEF To Dynamically Load the Module
Now all that is left is to load the module dynamically with MEF. I don’t have room for a full lesson on MEF, but what I am going to use here is MEF’s ability to download a separate XAP file asynchronously and then plug in the parts it finds in that XAP to the application dynamically. For a great overview of this capability, I recommend you check out this Silverlight TV Episode with Glenn Block.
The first step is to add the MEF System.ComponentModel.Composition reference to the TaskManager.NotesModule project. You can then mark the parts you want to plug in with appropriate Export attributes. In this case, I am going to plug in a single ChildWindow derived view called NotesView. So I add the following Export to the code behind of that view:
[Export(typeof(ChildWindow))]
public partial class NotesView : ChildWindow
{
}
Next, I need to add a little code the main app to download the separate XAP file asynchronously when appropriate. First step is to add references to the TaskManager project to System.ComponentModel.Composition.Initialization and System.ComponentModel.Composition. Then I add the following code to the code behind of the main page:
[Import]
public ChildWindow PlugInPopup { get; set; }
bool plugInsInitialized = false;
private void button1_Click(object sender, RoutedEventArgs e)
{
if (!plugInsInitialized)
{
plugInsInitialized = true;
var deployment = new DeploymentCatalog("TaskManager.NotesModule.xap");
deployment.DownloadCompleted += (s, e2) =>
{
CompositionInitializer.SatisfyImports(this);
ShowPopup();
};
CompositionHost.Initialize(new DeploymentCatalog(), deployment);
deployment.DownloadAsync();
}
else
ShowPopup();
}
private void ShowPopup()
{
if (PlugInPopup != null)
PlugInPopup.Show();
}
The PlugInPopup property will be populated by MEF after the extra XAP is downloaded. Constructing a DeploymentCatalog with a relative path to the XAP file in the host site of this application allows it to download that XAP file asynchronously when told to do so with the DownloadAsync call. You can see that the code subscribes to the completed event for that download, and then calls SatisfyImports to get the container to do dependency injection on this already existing view. At that point the PlugInPopup property gets populated, and is then shown.
The last part to making this work is to add the TaskManager.NotesModule project to the host Web site (it does not need a test page) so that it is in the ClientBin directory and can be downloaded.
The key point here is the need to manually edit the project file to point to the right server project where your domain services live. Just because Visual Studio doesn’t always let you point to any project in your solution (or outside of the solution for that matter), the only requirement is that the LinkedServerProject have a relative path to a compiled project that contains domain services. So a simple edit of the project file gets you want you want to organize your projects how ever you want, as long as you maintain that one-to-one relationship between client and server projects.
Summary
When it comes to organizing and structuring your solution, you can see that you have good flexibility to start breaking up chunks of functionality on the client and server sides into separate libraries and modules however it makes the most sense for your project. You should think in terms of breaking out vertical slices of functionality, composed of a server library project that contains a domain service or several that are related and all their supporting functionality and definitions on the server side. You will link that to a single client project, typically a Silverlight Class Library project or Silverlight Application project if you are trying to be more modular and download modules separately as separate XAPs. Even though you can have a single server project linked from multiple client projects, it will generally cause problems to do so within the same application because of duplicate definitions. So using client side class libraries that just contain the code generated RIA Services code and then referencing that class library from wherever that functionality is needed within the client application gives you flexibility to compose the client side however you want. Also remember that in WCF RIA Services SP1, the constraint on having one domain service “own” a single entity type is lifted.
You can download the sample code for this article here.
About the Author
Brian Noyes is Chief Architect of IDesign, a Microsoft Regional Director, and Connected System MVP. He is a frequent top rated speaker at conferences worldwide including Microsoft TechEd, DevConnections, DevTeach, and others. He is the author of Developing Applications with Windows Workflow Foundation, Smart Client Deployment with ClickOnce, and Data Binding in Windows Forms 2.0. Brian got started programming as a hobby while flying F-14 Tomcats in the U.S. Navy, later turning his passion for code into his current career. You can contact Brian through his blog at http://briannoyes.net/ or on twitter @briannoyes.