This article is compatible with the latest version of Silverlight.
Introduction
In Part 4 of this series I looked into creating a simple business object framework to manage our business objects, implementing the Product business object with some validation rules, creating some dictionaries (collection of items to populate our drop down lists), and implementing the CRUD (Create, Read, Update, and Delete) functions in the WCF service.
The scenario that we will target in this article is a continuation of the inventory management within the AdventureWorks company, in particular maintaining the product list. This incorporates the ability to view the details of a product, change and save the details of a product, add a new product to the product list, and delete a product from the product list (ie. standard CRUD functionality for a product). We’ll build a form (ie. user interface) to enable this that binds to our Product business object that we created in the previous article. We’ll also create a field validator control that will notify the user of any validation errors (from the rules in our business objects) based upon their input into the form, notifying them which fields have failed validation and why.
This functionality sounds easy to implement and no doubt as a developer a very common scenario. However simple functionality I took for granted would be available to support this scenario I found in actuality was not available, and various bugs I encountered in the Silverlight controls had me wondering from time to time whether Silverlight was actually suitable for line of business applications after all – my final judgement will be discussed in the conclusion of this article. Hopefully I can save you headaches and wasted time with my experiences documented in this article.
Source Code and Live Demo*
Instructions on setting up the sample project can be found in Part 1.
*To log into the sample application use the following Username: demo and Password: demo
Be sure to check all articles of the series: Part 1, Part 2, Part 3, Part 4, Part 5 and Part 6
Changes From Part 4
This application/framework is an evolving project – very rarely do you get anything perfect on the first iteration. Thus based upon some feedback I’ve received and various aspects I’ve identified myself, I’ve made a few changes to the project as follows:
- In the previous article I detailed how I was storing the rules in a dictionary, with the property name as the key (allowing fast access to the rule for a particular property). Feedback I received was that a property might have multiple rules, each with a different error message, which wouldn’t be supported by my existing structure. To allow this, I would need to store the rules as a List and look for all the rules in the collection with the matching property name and test each of them, throwing an exception if any one of them fails. Ultimately, based upon the number of expected rules in any one business object, storing the rules in a dictionary and searching by key would not provide any real speed benefit, so I have made the corresponding change to permit this scenario.
- I mentioned the possible need to turn off raising validation exceptions by default in the business objects (saves the potential issue of a validation exception occurring when loading the business object). Therefore I’ve added two new functions to the business object base class called EnableValidation and DisableValidation. By default, validation on property changes will be disabled, and if the business object is being used in a data entry form the EnableValidation function should be called on it first before assigning it to the DataContext of the form (or a control).
- There’s no need for a call to the base ValidatePropertyValue function in the property setters of your business objects any more – this will automatically be done with a call to the base OnPropertyChanged function (saves calling the two base functions with the same parameter).
- I changed the ToolbarButton control (which inherited from UserControl) to inherit from the ButtonBase control primitive class instead. This required some other changes in its control class to support it. My primary reason for this change was that clicking the Save button in the data entry form (soon to be discussed) did not remove the focus from the field that was currently active. Because its focus wasn’t removed, the control didn’t update the property on the business object class that it was bound to, leading to the change to this field not being saved. Inheriting from the ButtonBase class resolved this issue.
I’m always interested in what other developers would do differently (preferably the criticism will be constructive). Please leave comments as to what you liked, didn’t like, and what you would have done differently (and why). Note that I will be styling the application in an upcoming article so comments on the attractiveness of the user interface will be a touch pre-emptive. In addition I’d love to hear if you’ve used this framework for your own applications and see the work you’ve done yourselves (or screenshots) on building line of business applications in Silverlight.
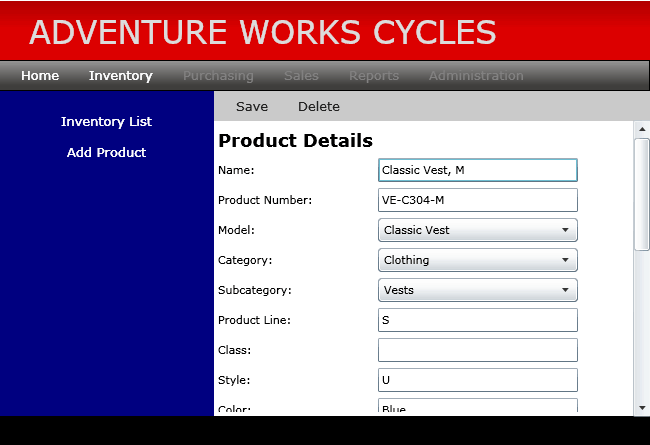
Generating the Data Entry Form
Our first task is to create the data entry form for a product, allowing the details of a product to be viewed and edited. Later we’ll bind this form to our product business object so that it automatically displays the data in the form, and updates the business object with any changes that the user makes.
If you’ve worked with ASP.NET before you will probably be familiar with the FormView and DetailsView controls. If not, essentially you start by creating an ObjectDataSource that points to the business object the form will be based upon. When you add a FormView/DetailsView control (they work in a similar manner but render differently) and point it to your ObjectDataSource it will automatically create the fields and labels (essentially a data entry form) for each property on the associated business object, along with the appropriate bindings. You can then rearrange the form to your liking, but by creating the fields and labels for this form automatically it takes a lot of the boring tasks out of manually creating the form, saving you a lot of time. Unfortunately in Silverlight however we don’t have the luxury of these controls. All is not lost though, as Karl Shifflett has come to the rescue and developed a Visual Studio add-in called XAML Power Toys to aid in creating the XAML for a data entry form. Essentially you right click on the class in the Solution Explorer of your business object to which your form will be bound, select the new XAML Power Toys menu, select Create Form, ListView, or DataGrid for Class, and a form builder will appear. It is important that you do this on the business object in your Silverlight business object class library and not the one for the full .NET framework. XAML Power Toys was designed to support building forms for both WPF and Silverlight, and selecting the business object in your full .NET framework class library will output the XAML for a WPF project which won’t work in your Silverlight project. That’s something that initially caught me out. When building the form, set the maximum lengths for the text box fields (usually will match the maximum length of the corresponding field in the database), the width for each control, and change the type of the fields that specify an ID (such as ModelID) to ComboBox (so the user can select the item from a drop down list). You’ll notice that the tool attempts to intelligently set the label for each field based upon the capitalisation in your property names (eg. the ProductName property will automatically have its label set as Product Name). Don’t worry about setting the format for fields (such as currency, etc) as the controls in Silverlight don’t support this so we’ll have to write our own converters for this purpose. Once you have defined the form as you want it, press OK. The generated XAML will be saved to the clipboard, and you can navigate to your XAML page and paste it into the appropriate place. The generated XAML includes a title, a grid for the form layout, field labels, and the field controls (with associated bindings). As a form building tool, XAML Power Toys isn’t quite perfect but it will still save you a lot of time. Karl has kindly open sourced the project so if it doesn’t quite work how you want you can always make changes to it yourself.
Once you’ve pasted the XAML into your page there are a few changes you will need to make. The height of the grid rows is set to Auto - change this to 30 (so the fields have a bit of space between them. You’ll also want to adjust the width of the column containing the field labels as this is set to an arbitrary 100 pixels by default – you’ll need to play with this to find a width that includes enough room for your longest label. For each label and field that has been generated you’ll need to set their VerticalAlignment property to “Center”. You’ll also need to set the height of the ComboBox and DatePicker fields as they fill the height of their containing grid row – a height of 24 pixels matches that of the TextBox control. A better option than setting these values on each field individually is to define a set of styles for each field type (including these and the values of other properties they have in common) in the UserControl.Resources and apply these styles to each control instead.
I pasted the XAML generated from the XAML Power Toys as the content of a ScrollViewer control, as the form may extend beyond the height of the page and the user will need a way to get to the fields lower than the bottom of the visible page area. This will introduce a vertical scroll bar on the right hand side of the page to scroll the form to display the lower controls. You may be wondering why I didn’t use more of the horizontal space available in the page. This was primarily because I didn’t want to increase the complexity of the form this early in the development – I will probably revisit the layout of this form in a future article when I discuss styling the application. By requiring a scroll bar it did raise some potential issues that need to be addressed for forms that extend beyond the bottom of the page (even if they have been reorganised to make the most of the width of the page). The first is that the scroll viewer control doesn’t natively support the mouse scroll wheel for scrolling, which isn’t particularly user friendly. There are a number of solutions to this out there that people have contributed to the community, and I decided to just pick one and use it – that one being the solution provided by Adam Cooper. This required a DLL to be referenced by the project and the following two lines to be added to the code behind the page:
ScrollViewerMouseWheelSupport.Initialize(LayoutRoot);
scrollViewer.AddMouseWheelSupport();
Simple as that we now have a scroll viewer that supports the mouse scroll wheel. The next issue I found is that when tabbing down the controls, once you have tabbed to a control that is below the bottom of the page the scroll viewer doesn’t move to ensure the focused control is visible, meaning that the user needs to manually scroll that control into view. This is really just a usability issue, but I haven’t come up with a solution to this problem as yet.
The final thing we need to do to complete our form layout is to add a Save button and a Delete button to it. I’m not particularly a fan of putting these buttons at the bottom of the form as it means that if the user makes a quick edit to a field at the top of the form then they would have to scroll down to the bottom of the form to find the button that will save this change. Instead I prefer locating these buttons at the top of the form in a toolbar so the location of these buttons is static, always available to the user no matter where the form is scrolled to. To implement this toolbar I decided just to use the same custom Toolbar control that I created earlier (see Part 1 for details) and locate it above the scroll viewer control in the XAML so it is not scrolled with the rest of the form.
We have now laid out our form and can run the application to see what it looks like. Of course it won’t work as it currently is, to do that we’ll need to move onto the next step and data bind it to our Product business object.
Data Binding
Now that we have laid out our form we need to populate it with data for a product (from our Product business object), and save the changes made by the user back to this object. We will accomplish this by data binding our Product business object to the fields in the form. By creating the form with the XAML Power Toys add-in the bindings for each field will already be set up. As an example, here is the binding for the Product Name field:
Text="{Binding Path=Name, Mode=TwoWay, NotifyOnValidationError=True, ValidatesOnExceptions=True}"
The binding is fairly verbose syntax, but in simple terms we are binding the field to the Name property on our Product business object, with a Mode of TwoWay so that changes made to the field in the form is applied back to the business object (as well as the value on the business object being displayed in the form which is all that you would get when using the OneWay mode), and by setting the validation properties on the binding any exception that occurs when assigning a value to the property on the business object will raise the BindingValidationError event on the field – we will investigate this functionality later in the article with field validation.
When the form is loaded we will need to know what product the user selected in the inventory list so we can request the data for it from the server and display it in the form. Alternatively the user may want to add a new product to the inventory, so we need to display an empty form (or one filled with predefined default values) for the user to fill in. Which of these we need to do is based upon what the user selected on the previous page they were on (most likely the Inventory List page) – if they clicked on a product in the list then we will be working with an existing product, and if they clicked on the Add Product button then a new product needs to be created. This action is determined in the constructor – if no parameter or a product ID of 0 is passed into the constructor then we will be creating a new product. Otherwise we will be working with an existing product that has the specified product ID, and we will need to go off to the server to retrieve the details of this product to populate the form with.
Before we request the data from the server for a product however, we will need to request the dictionaries from the server to populate the combo boxes on the form with. One of the advantages of Silverlight being a rich client is that it can easily store data on the client when moving between “pages”. Since the dictionaries should rarely change we can cache these values on the client, retrieving them from the server the first time they are required and storing them so that we don’t need to request them again the next time the user navigates to this page. Because calls to our WCF service are asynchronous and the combo boxes need to be populated before the Product business object is bound to the form I’ve implemented this in a somewhat queued manner, where a call to retrieve the product details is made once the call to retrieve the dictionary items returns (if the dictionaries hadn’t already been retrieved previously). Of course I could have made both calls at the same time and simply waited until both had returned before populating the form (probably allowing the form to be populated sooner after being displayed), and may change the code to do so in a future update.
Once we have retrieved a populated Product business object from the server (or created an empty one locally if creating a new product) we can now finally bind this to our data entry form. This is done by setting it as the value of the DataContext property on each of the fields in the form. Rather than assigning this to each field individually we can actually set it at a higher level in our control hierarchy and its value will propagate down the control hierarchy to each decendant control that inherits from FrameworkElement. For example this code sets the data context for our entire form:
LayoutRoot.DataContext = product;
That’s it! We now have a (mostly) working data entry form – of course the Save and Delete buttons need to be wired up but that’s fairly straightforward and I’ll skip over those details. Of more interest, the combo boxes won’t work yet (but I will discuss the trials and tribulations of this further in the next section). You may also note that I’m using the currency value converter I created back in Part 1 of this series to display the List Price and Standard Cost formatted as currency rather than just a decimal number.
The ComboBox Nightmare
In the Silverlight betas, Microsoft didn’t include a combo box (also known as a drop down list in ASP.NET) in the standard control library. It wasn’t until RC0 that we got our first look at it, and with the RTW so soon after RC0’s release there was no time for feedback and thus it has a few shortcomings. It’s missing one vital feature to be useful in LOB applications (the SelectedValuePath property), and has a bug with the drop down height that makes using it in a cascading drop down fashion (as is often required in LOB applications) a pain. I’ll describe these problems in detail shortly. It’s a shame that we didn’t have time to provide feedback on this control as its failings will really tarnish the use of Silverlight when building line of business applications for developers, and it has taken me many hours of experimentation (aka my ComboBox nightmare) to work around its problems on what should be fairly straightforward scenarios, and producing solutions that work but aren’t entirely satisfactory. To say I’m disappointed is an understatement, but I have come up with some alternative means to produce the same result without reverting to a custom built control or third party solution.
In Part 4 I discussed the use of dictionaries – as a short recap a dictionary is a list of items (key/value pairs) generally consisting of an ID and corresponding description. For example we might have a list of models each with an ID and description, where each product is of a specific model. On the Product business object we will store the ID of its model (the ModelID property), but in the data entry form we want to actually display the description of that model. In addition, this field should be a drop down list so if the user should need to change/set the model for that product they could select one from the list by its description and the ID corresponding to that item would be set as the value of the ModelID property on our business object.
This is a very common scenario in line of business applications, so it will probably come as a surprise (as it did to me) that the ComboBox control doesn’t actually support it. We can bind our dictionary to the combo box, and we can set the DisplayMemberPath property to the name of the property that will display as the item text (in our case the Value property) on the dictionary item objects. However unlike WPF, ASP.NET, or Windows Forms it does not have a SelectedValuePath property (or similar) to reference the Key property on our dictionary items as the property bound to our Product business object. There is a SelectedItem property but it can’t be bound to the key - it wants a reference to the actual object behind the list item instead (the key/value pair). Therefore the extent of the binding is to a list item, not just its corresponding ID. This had me pulling my hair out for quite some considerable time until just as I was about to throw it in at some ungodly hour of the morning (3am from memory) I had an epiphany. What I realised was required to make this work was a way to turn a given ID into the same type of object that defines a list item (which we will expect to be a generic KeyValuePair object) and we could then bind this to the SelectedItem property of the combo box. Then when the user selected a different item in the combo box we needed to turn the object behind the list item into just an ID before assigning it back to the business object. As a Value Converter is a means of intercepting the binding between the business object and the combo box, this might allow me to perform this conversion. This crazy idea might just work.
I set to work designing a generic value converter to do just this, which I called DictionaryConverter (under the ValueConverters folder). To describe how this will work, let’s use the Model field as an example again. We’ll bind the SelectedItem property of the Model field’s combo box to the ModelID property on our Product business object, and reference our DictionaryConverter as the value converter to use for this binding. We’ll also set the ConverterParameter for this binding to ‘ProductDictionaries.Models’. This tells the converter which dictionary group and dictionary to look in (it will need to be stored in the dictionary cache) and it will use this to find the information required to obtain the corresponding model dictionary item for the given model ID. When the Product business object is bound to the form, the SelectedItem property for the Model field will attempt to bind to the ModelID property on the business object. The value converter will kick in and convert the ModelID into a KeyValuePair<int, string> object to match that behind the corresponding item in the list (we will assume that the objects behind each list item will be either a KeyValuePair<int, string> or KeyValuePair<string, string>. It will do this by looking in the dictionary cache (via reflection) for a property with the name “ProductDictionaries” and obtain a reference to this object (ie. the dictionary group object). On this object it will look for a property called Models (again using reflection) and obtain a reference to the dictionary item collection object it references. This collection will consist of a set of key/value pairs, though as described in the next paragraph there is a little additional complexity involved here that we will skip over for now. We will look in the dictionary for an item matching the ModelID and retrieve its description. We now have enough information to recreate the KeyValuePair object behind the item in the list that we want to select. By creating the KeyValuePair object and returning it as the result of the converter, the combo box will search its ItemsSource collection for a KeyValuePair object with a key and value that matches that of the item we returned, and select this item. That solves the problem of selecting an item in the combo box, now we need to handle the situation of setting the ModelID property on the Product business object when the user selects a different model. This is a vastly easier problem to solve – the combo box will pass the converter a KeyValuePair object, and we simply need to return the key of this object (which will be the ID of the selected model).
Note that most dictionaries have an integer as the key and a string as the value, but not all. Some have a string as the key instead. In addition, when looking up the description matching an ID in a dictionary we need to take into account that the dictionary may contain simple ID and Description pairs, whilst some (as described in Part 4) will have a CascadingDictionaryItem object as the value (to permit the category/subcategory cascading drop down that I will discuss shortly). The code in the DictionaryConverter class handles each of these scenarios, but it is by no means pretty or elegant, though it does work and solves the problem at hand. Hopefully this solution makes sense, but it is a rather convoluted means of solving the problem – my advice is to just consider it as a black box and use it as is, the following XAML as an example:
<ComboBox x:Name="cboModel" SelectedItem="{Binding Path=ModelID,
Converter={StaticResource DictionaryConverter},
ConverterParameter='ProductDictionaries.Models', Mode=TwoWay,
NotifyOnValidationError=True, ValidatesOnExceptions=True}" />
The next challenge I had to face was implementing a cascading drop down for the category and the subcategory fields. In this scenario the user would select the category, and this action would repopulate the subcategory combo box with just the subcategory items that belonged to the selected category. This is a fairly common scenario and should have been no trouble to implement. I wrote a handler in the code behind for the SelectionChanged event on the category combo box to assign a new collection of subcategory items (a filter of the items using LINQ to those with a matching category ID) to the ItemsSource of the subcategory combo box when its selected item was changed. This worked, but exhibited some strange behaviour. The issue was that the combo box calculates the height of the drop down list the first time it is displayed (upon clicking the drop down arrow) but does not recalculate that once a new collection is assigned to its ItemsSource property. Therefore if the user drops down the list and there are no (or few) items to display (such as when a category hasn’t been selected), then selects a different category (which will repopulate the subcategory list), the drop down list will retain its previous height for when the user next attempts to view the list, leading to this effect:
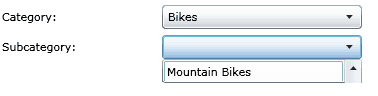
Instead of:
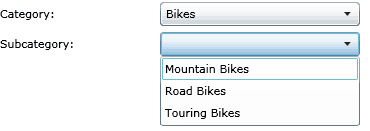
After spending time going through the various properties and methods of the ComboBox control it seems there is no way to force the control to recalculate the height of its drop down list. The only solution I could come up with is before updating the list item collection to remove the existing combo box from the form, create a new one, add it to the form, and finally set its ItemsSource property to the new collection. It’s a messy work around – you’ll see the code that does this in the cboCategory_SelectionChanged event handler function – but it does resolve the problem. It’s a bit like taking a sledgehammer to crack a nut really.
While I’m having a rant, there are some other issues with the combo box that I might bring to your attention, despite not being major issues. When you look at the form, the combo box looks right out of place. The default styling of the ComboBox control is for it to be rendered in grey, whilst the other data entry fields are rendered in white with a black border. This didn’t particularly perturb me initially, but other feedback I have received indicate that they look out of place and I have to agree. We should be able to style this to our liking however, and I will look at this when I come to styling the application in an upcoming article. The other issue I found is more of a useability issue – in applications built using other technologies (such as ASP.NET) you (as a user) can often find an item in the list by entering the first character of its display text when the list is dropped down. This is a useful feature for users, but has not been implemented in the Silverlight ComboBox control.
Sadly I’m not sure that the problems with the ComboBox control are problems that can easily be fixed. If you opened up the .xap file for this project you’ll note that one of the DLLs is System.Windows.Controls, so at first glance you might assume that all the controls ship with your .xap file and a fix to these issues could be released by Microsoft to the developers that are having problems. However upon inspection with Reflector you’ll see that this DLL only includes the extended control set (Calendar, DatePicker, GridSplitter, and TabControl) instead of the base controls. Thus the base controls (including the ComboBox) must be incorporated directly into the Silverlight Runtime, and it would not be feasible to release a service pack to every Silverlight runtime installation out there unless major bugs were found. Microsoft initially released the source code for the Silverlight controls when Silverlight 2 was at Beta 1 (back when the ComboBox control had not yet been developed), but there has been no update since. If the code was available we could fix the bugs ourselves and rename the control so we could use it as a replacement in our projects. The only other choice is to create your own ComboBox equivalent (some people did this pre RC0 when there was no alternative, though I have not found a fully featured one as yet), or use a third party solution (Telerik for example has one in their Silverlight controls that supports the missing features, though it might be considered an expensive solution to a small problem). Hopefully if you have no alternative you can use the workarounds I have described here in your projects.
Validation
In Part 4 I described how we could implement validation rules in our business objects. By implementing these rules we can stop (or at least minimise) invalid data going into our database. These rules could include ensuring a minimum amount of information has been entered, that values fall within a specific range, and various tests against other miscellaneous rules. We also need to notify the user if the data they entered is not in the correct format (such as text characters being entered into a field that is bound to an integer property).
If you’ve previously worked with Windows Forms or ASP.NET you are probably familiar with the validation controls that each provide. Unfortunately Silverlight doesn’t have its own validation controls, so we need to look for a solution someone else has created (third party or open source), or otherwise create our own. Essentially what we need is when data is entered into the data entry form that doesn’t pass the validation rules on our business object, the user needs to be notified about the error and the reason for it. A common means of implementing this is to display a little icon next to the field when its value fails, where the reason for the failure is displayed as a tooltip when the user moves the mouse cursor over the icon.
In looking for existing solutions I didn’t find anything I particularly liked – I didn’t want to define the validation rules in the user interface but merely respond to validation errors from my business object. By defining the rules in the user interface I would be creating additional work for myself by having to define the rules twice – in the business object and then again in the user interface. Apart from additional work, this could also mean that the two could get out of sync if a change was made to one but not the other. After a bit of research I decided I was better off creating my own custom control to handle field validation.
When the value of a property is updated on a business object, we are raising an exception from within the business object (as there is no IDataErrorInfo interface we could implement on our business object such as WPF has). By setting the NotifyOnValidationError=True and ValidatesOnExceptions=True properties in the binding of each field this exception is handled by the field control and it raises the BindingValidationError event as a response. We can write a custom control to attach to a field control and handle this event when it is raised. It will display the icon when a binding error is raised with a tooltip that displays the reason for failure. From this description you can see that the control is very simple – it just responds to an event on another control.
The main problem I encountered when writing this control was how to get a reference to the control to validate. In my first attempt I didn’t think in a particularly XAML manner so I simply added a property to which you could set the name of the field control to validate, and it would search the form for the control with that name and attach itself to it. In fact on afterthought I realised there are multiple ways of implementing a validator control like this in a XAML use scenario – you could make the control requiring validation a child of the validation control, or make the validation control a child of the control to validate. In either of these you wouldn’t need to set the name of the field control to validate – potentially a much nicer way to do this. Ultimately I decided to support two scenarios – you could set the name of the control to validate by setting its TargetControlName property, or make the control to validate a child of the validator control. The following XAML demonstrates both methods.
Referencing control to validate by name:
<TextBox x:Name="txtWeight" Text="{Binding Path=Weight, Mode=TwoWay,
NotifyOnValidationError=True, ValidatesOnExceptions=True}"
Style="{StaticResource TextBoxStyle}" Width="75" />
<validators:FieldValidator x:Name="valWeight" TargetControlName="txtWeight"
PropertyName="Weight" Margin="5,0,0,0" />
Control to validate as child of field validator control:
<validators:FieldValidator x:Name="valName" PropertyName="Name" Grid.Column="1" Grid.Row="1">
<TextBox x:Name="txtName" Text="{Binding Path=Name, Mode=TwoWay,
NotifyOnValidationError=True, ValidatesOnExceptions=True}"
Style="{StaticResource TextBoxStyle}" MaxLength="50" />
</validators:FieldValidator>
Having the control to validate as the child of the field validator control is possibly my preferred method, but by still enabling the referencing by name means that the validation error icon can be located on the form by the designer rather than automatically placed at runtime by the field validator control.
The main issue that I have encountered validation is that when you implement a value converter and the value entered doesn’t conform to the rules there is no binding validation error raised. I haven’t found a solution to this problem as yet.
Note that just because a validation error is not displayed next to a field does not mean that its value is not in error. The binding validation error is only raised when the value of the property is changed by that control. Therefore you will note that I call the Validate function on the business object when the user clicks the Save button. If the validation fails then I loop through each FieldValidator control on the form and request that it attempts to validate – displaying itself if it fails.
An example of the Class property value failing a business rule is demonstrated below:

Known Issues
I thought I might take this opportunity to mention a few additional issues that I came across when developing this data entry form. The primary issue I encountered was that a lot of controls were not being assigned to their corresponding control variable in the code behind. Therefore when I attempted to reference them in code I received a null reference exception. What each of these had in common were that they were child controls within my own custom controls – ie. buttons in my Toolbar control, and field controls within my FieldValidator controls. Upon investigation I found that this is due to the child controls existing in a separate namescope (namescopes are used to avoid control name collisions), and thus the FindName method on each control that inherits from FrameworkElement will not recurse into a different namescope. This is my understanding of the issue, though you may wish to investigate it yourself further to find out more information. Ultimately the InitializeComponent function can’t match the control variables to some of the elements defined in the XAML file, and they therefore are left as null. Whilst there may be valid reasons for this issue it does create major problems for those who create custom content controls. In my research I even noticed it was an issue in Microsoft’s Silverlight Toolkit project (on CodePlex) with the controls they were creating there (such as the Viewbox control). The only way to resolve this issue is to assign the control variables manually in code by drilling down into the child controls of the custom controls and assigning each control reference to the appropriate control variable. If you look at the Loaded event handler for the page you will see how I have done this for those controls that I need to reference in the code behind.
There is another issue associated with this that I found – in order to find the child control to retrieve the reference for I tried using the FindName method on the custom control and passing it the name of the control to return the reference for. The funny thing is that it worked – but only some of the time. For example, in obtaining the reference to the SaveButton button and the DeleteButton button in my Toolbar control (whose control variables were not being assigned automatically), FindName always returned a reference to the SaveButton control correctly but occasionally wouldn’t return a reference to the DeleteButton control (though it would other times). So it worked intermittently, but with no perceivable reason as to when it would and when it wouldn’t. When it didn’t, I would receive a null reference exception when I attempted to use its control variable.
Also you might note in the demo application that attempting to delete an existing product will fail. This is due to most products having associated data in other tables in the database (such as the ProductListPriceHistory table and the ProductInventory table amongst others) that need to be deleted before the record in the Product table can be deleted. Since I’m not doing this currently, it has the side effect of existing products not being able to be deleted, though products you create yourself (which won’t have these related records) can be deleted.
Conclusion
It was a struggle at times, but we now have working data entry form for products, complete with drop down lists and validation error notifications. I stated in the introduction that I would pass down judgement on whether I believe Silverlight is suitable for developing line of business applications in at the conclusion of this article, and we are now at that point. Ultimately you are going to encounter problems that will incur much head scratching and pain when developing a LOB application in Silverlight, but I believe the advantages that Silverlight provides overcomes the various pains you might experience in development, and the issues are nothing that using a good think or third party library couldn’t fix or work around. Hopefully this series of articles (and particularly this one) will provide you with solutions to the common problems that you may encounter.
We now have the core functionality of a line of business application – the ability to maintain data in our database. If you’re following along with this series as a learning aid now would be a good time to do a workshop to demonstrate what you’ve learnt and put it into practise. Follow through the steps in the articles so far to implement some basic sales or purchasing functionality, and I’d love to see what you produce. Stay tuned for my next article which will cover methods to implement reporting (including HTML DOM interoperability).
Resources
XAML Power Toys:
http://karlshifflett.wordpress.com/xaml-power-toys/
Dropdown retains height issue:
https://silverlight.net/forums/t/48520.aspx
Alternative validation:
http://www.codeplex.com/SilverlightValidator
http://www.damonpayne.com/2008/11/22/TowardsAValidationFrameworkForSilverlight.aspx
Namescope issue post:
http://silverlight.net/forums/p/40017/114669.aspx