This article is compatible with the latest version of Silverlight.
Introduction
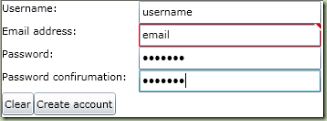
So what is this about? To those of you who are not familiar with the SqlMembership model, this is basically a Microsoft's default implementation of an authentication and authorization model, in this case storing its information in Sql Server. In this article we will look into the steps of setting up a database, creating a WCF service to actually work with the SqlMembershipProvider and then will create some Silverlight UI to interact with that. It may seem like a lot of work, but stay with me here. Here is how it should look like when we are done:

You can download the source code to go with this article here.
Step 1: Setting up the database
You can do this in two ways. You can use an existing database (or create one up front, with your own preferred settings) or you can have the tools create one for you. The process is pretty similar. Open the Visual Studio Command Prompt (under Visual Studio Tools in the Visual Studio start menu folder) and type:
aspnet_regsql
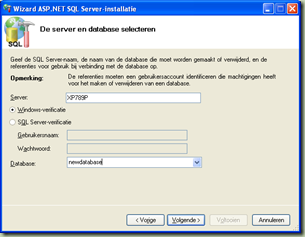
This will open up a wizard that takes you through the steps of setting up a membership database. If you want to create a database through the wizard, all you have to do is to type the name you want for your new database on the third screen, instead of selecting an existing database. Once the wizard has completed your database is ready to go.

Step 2: Building a WCF service around SqlMembershipProvider
One of the first things I always do when starting a new WCF Service application is renaming the Service class to something a little more useful. One tip I’d like to give on that is to always use the Refactor tools to rename your service class. This will ensure that your services markup is updated as well.
Step 2.1: Configuration
The second thing to do on a WCF service is its configuration in web.config. As we plan to use this service for Silverlight, we obviously need to update the binding of the service from wsHttpBinding to basicHttpBinding in the default endpoint. There are a lot of examples on that, so I won’t discuss it here.
In this case we also need to put in some configuration for our SqlMembershipProvider. To make it all work, we need three things:
- A connection string to point to our membership database
- Tell ASP.NET we want to use Forms authentication
- Add the SqlMembershipProvider as a provider to our membership configuration and make it the default
Adding a connection string to the web.config is easy:
<connectionStrings>
<add name="MembershipConnection"
connectionString="Data Source=localhost;
Initial Catalog=MyMembershipDatabase;Integrated Security=True"/>
</connectionStrings>
The next step is to change the authentication mode from Windows to Forms:
<authentication mode="Forms"/>
And finally we can add the SqlMembershipProvider:
<membership defaultProvider="SqlProvider" userIsOnlineTimeWindow="60">
<providers>
<add name="SqlProvider"
type="System.Web.Security.SqlMembershipProvider"
connectionStringName="MembershipConnection"
applicationName="MyApplication"
enablePasswordRetrieval="false"
enablePasswordReset="true"
requiresQuestionAndAnswer="false"
requiresUniqueEmail="true"
passwordFormat="Hashed"
maxInvalidPasswordAttempts="5"
passwordAttemptWindow="10"
/>
</providers>
</membership>
Note that the authentication and membership configuration are placed inside the system.web element. The SqlMembershipProvider has extensive configuration options, which are described in the MSDN documentation.
Step 2.2: Defining the service contract
To keep things simple, we will focus on a single operation. In this case creating a new user sounds like the right starting point. So we need an operation that allows us to create a new user. Look at the SqlMembershipProvider documentation. It has a CreateUser method that we want to use, which takes some parameters:
- A Username
- A Password
- An Email address
- A Password question
- A Password answer
- A flag indicating whether or not this user is approved right away
- A unique key to identify the user
As we have configured our SqlMembershipProvider to not require a Password question and answer, we don’t need these in the contract. In this case we want the user to be able to login right after the account has been created. That is why we simply set the flag for that to true all the time and this will generate a unique key for the user in the service, so we don’t need those in the contract.
That leaves us with a username, a password and an email address as parameters for our operation. The CreateUser method also has an out parameter of the enum type MembershipCreateStatus, which we would like to return. This gives us the following interface:
[ServiceContract]
public interface IMembershipService
{
[OperationContract]
MembershipCreateStatus CreateUser(string username, string password, string email);
}
Step 2.3: Implementing the services functionality
To make everything work, we obviously need to implement the CreateUser operation in the service. All it has to do is to get the default MembershipProvider in the application and call the CreateUser method on it with the parameters provided (and some defaults), catch the status output and return that to the client. So here is the implementation:
public class MembershipService : IMembershipService
{
#region IMembershipService Members
public System.Web.Security.MembershipCreateStatus CreateUser(string username, string password, string email)
{
MembershipCreateStatus status;
Membership.Provider.CreateUser(username, password, email, null, null, true, new Guid(),
out status);
return status;
}
#endregion
}
Note that after the username, the password and the email we pass two null values for the password question and answer, followed by true for the approval and a new Guid as the provider key.
I’ve included a small console app to test the services functionality in the solution for the service. To prevent running into cross domain issues, I tend to deploy my services to my local IIS as soon as I start using them in Silverlight. In this case I did the same, so the reference in the Silverlight client points to a different URL from the console app.
Step 3: Building the Silverlight client UI
It's time to actually build something that we can see. First I added a Silverlight Application project to the solution and I let Visual Studio create a new Web project for me to host the Silverlight project in. Next I added a service reference to my newly deployed service in IIS. So what do we need to provide to the user when creating a new account? We need the user to give us a username, a password and an email address. To make sure the user knows what he or she typed for a password, we want to ask for a password confirmation as well. To make getting and checking the input a lot easier, I wrote a class to which we can bind from the UI:
using System;
using System.Net;
using System.Windows;
using System.Windows.Controls;
using System.Windows.Documents;
using System.Windows.Ink;
using System.Windows.Input;
using System.Windows.Media;
using System.Windows.Media.Animation;
using System.Windows.Shapes;
using System.ComponentModel;
using System.ComponentModel.DataAnnotations;
using System.Text.RegularExpressions;
namespace SLMembershipClient
{
public class User : INotifyPropertyChanged
{
private string _username;
private string _password;
private string _passwordConfirmation;
private string _emailAddress;
public string Username
{
get
{
return _username;
}
set
{
_username = value;
DoPropertyChanged("Username");
}
}
public string Password
{
get
{
return _password;
}
set
{
_password = value;
DoPropertyChanged("Password");
}
}
public string PasswordConfirmation
{
get
{
return _passwordConfirmation;
}
set
{
CheckPasswordConfirmation();
_passwordConfirmation = value;
DoPropertyChanged("PasswordConfirmation");
}
}
public string EmailAddress
{
get
{
return _emailAddress;
}
set
{
CheckEmail(value);
_emailAddress = value;
DoPropertyChanged("EmailAddress");
}
}
private void CheckPasswordConfirmation()
{
if (!Password.Equals(PasswordConfirmation))
{
throw new ArgumentException("Password and password confirmation don't match.");
}
}
private static void CheckEmail(string email)
{
if (!Regex.IsMatch(email, @"^\w+?@\w+?\.\w+?$"))
{
throw new ArgumentException("Email address has an invalid format");
}
}
#region INotifyPropertyChanged Members
private void DoPropertyChanged(string propertyName)
{
if (PropertyChanged != null)
{
PropertyChanged.Invoke(this, new PropertyChangedEventArgs(propertyName));
}
}
public event PropertyChangedEventHandler PropertyChanged;
#endregion
}
}
To make all this work, I’ve added a reference to System.ComponentModel.DataAnnotations. As you can see I’ve implemented INotifyPropertyChanged to provide an event for databinding and I’ve implemented some check methods that are called in property setters to do validation. They throw exceptions which can be catched by the validation engine in Silverlight 3.
Next I’ve defined a user interface to input the four properties of the User object and I have two buttons, one to clear the fields and one to create the user. Finally I’ve added a textblock to display a message based on the returned status:
<TextBlock Text="Username:" />
<TextBox x:Name="usernameTextBox" Text="{Binding Username, Mode=TwoWay, ValidatesOnExceptions=True}"
Grid.Column="1"/>
<TextBlock Text="Email address:" Grid.Row="1"/>
<TextBox x:Name="emailTextBox" Text="{Binding EmailAddress, Mode=TwoWay, ValidatesOnExceptions=True}"
Grid.Column="1" Grid.Row="1"/>
<TextBlock Text="Password:" Grid.Row="2" />
<PasswordBox x:Name="passwordPasswordBox" Password="{Binding Password, Mode=TwoWay, ValidatesOnExceptions=True}"
Grid.Column="1" Grid.Row="2" />
<TextBlock Text="Password confirumation:" Grid.Row="3" />
<PasswordBox x:Name="passwordConfirmationPasswordBox"
Password="{Binding PasswordConfirmation, Mode=TwoWay, ValidatesOnExceptions=True}"
Grid.Column="1" Grid.Row="3" />
<StackPanel Grid.Row="4" Grid.ColumnSpan="2" Orientation="Horizontal">
<Button x:Name="clearButton" Content="Clear" Click="clearButton_Click" />
<Button x:Name="createButton" Content="Create account" Click="createButton_Click" />
</StackPanel>
<TextBlock x:Name="resultTextBox" Grid.Row="5" Grid.ColumnSpan="2" />
And finally I’ve implemented some code to tie it all together:
public partial class MainPage : UserControl
{
MembershipServiceClient _client;
User _user;
public MainPage()
{
InitializeComponent();
this.Loaded += new RoutedEventHandler(MainPage_Loaded);
}
void MainPage_Loaded(object sender, RoutedEventArgs e)
{
CreateNewUser();
_client = new MembershipServiceClient();
      _client.CreateUserCompleted +=
             new EventHandler<CreateUserCompletedEventArgs>(_client_CreateUserCompleted);
}
void _client_CreateUserCompleted(object sender, CreateUserCompletedEventArgs e)
{
if (e.Error != null)
{
MessageBox.Show(string.Format("An error occurred: {0}", e.Error.Message));
}
else
{
HandleCreateUserStatus(e.Result);
}
}
private void CreateNewUser()
{
_user = new User();
this.DataContext = _user;
}
private void WriteResult(string message)
{
resultTextBox.Text = message;
}
private void HandleCreateUserStatus(MembershipCreateStatus status)
{
switch (status)
{
case MembershipCreateStatus.Success:
WriteResult("User created");
break;
case MembershipCreateStatus.InvalidUserName:
WriteResult("Invalid username");
break;
case MembershipCreateStatus.InvalidPassword:
WriteResult("Invalid password");
break;
case MembershipCreateStatus.InvalidEmail:
WriteResult("Invalid email");
break;
case MembershipCreateStatus.DuplicateUserName:
WriteResult("Username already exists");
break;
case MembershipCreateStatus.DuplicateEmail:
WriteResult("Email address already exists in our database");
break;
case MembershipCreateStatus.ProviderError:
WriteResult("An unkown error occurred");
break;
default:
WriteResult("An unkown error occurred");
break;
}
}
private void clearButton_Click(object sender, RoutedEventArgs e)
{
CreateNewUser();
}
private void createButton_Click(object sender, RoutedEventArgs e)
{
_client.CreateUserAsync(_user.Username, _user.Password, _user.EmailAddress);
}
}
As you can see I’ve implemented the Loaded event that creates a new user object to hold the user input and validate it. The clear buttons click event calls the same code. The create user button makes a call to the WCF service, which results in a callback to the completed event of the create user. That completed event writes a string to a textblock to show the result to the user.
Summary
So to enable your Silverlight application to use the SqlMembership model through WCF you should follow these steps:
- Create a database through aspnet_regsql
- Create a WCF service and configure it to use the SqlMembershipProvider
- Define an interface for the operations you’ll need on the SqlMembershipProvider
- Implement the interface by passing parameters into the calls to the MembershipProvider
- Create a Silverlight application with a web reference to the WCF service
- Call any operations you need
About the Author
Jonathan van de Veen has been working as a software developer in the Netherlands since 2001 and he has been focusing on Microsoft technology since 2004. His experiences range from product development to consulting and from project member to department manager and team lead. The technologies he has worked on range from basic data entry and retrieval systems to GIS and from CMS to enterprise search. As of 2008 he also runs the Developers 42 Blog.