Note: This article is submitted by Pencho Popadiyn for Silverlight: Write and Win contest.Thanks a lot, Pencho! Hello All, Please drop a comment if you like it.
This article is compatible with the latest version of Silverlight.
1. Introduction
In the previous article I showed you how Silverlight and the Model – View – Presenter pattern (MVP) can interact with each other. Today I decided to move on ahead in the world of Object Oriented Programming and to present you another big player on scene – the Model – View – Controller (MVC) pattern. Actually the MVC is a MVP’s ancestor, and I think it must be studied first, but that is another topic. Before I start, I want to mention that the purpose of that article is not to compare both of the “brothers”, but to present you the world through the MVC eyes. I will start with a little theory, and after that I will show you a practical example (implemented on Silverlight), where I will put the pattern into practice.
Source code
2. Introducing the Model - View - Controller pattern
2.1 Little history
The Model – View – Controller pattern was first described in 1979 by Trygve Reenskaug, then working on Smalltalk at Xerox PARC. The original implementation is described in depth in the influential paper “Applications Programming in Smalltalk-80: How to use Model – View – Controller”. After that, numerous derivatives of the MVC pattern appeared. Probably one of the most known of them is the Model – View – Presenter pattern, which appeared in the early 90s and was designed to be an evolution of MVC. However MVC still remains very widely used.
2.2 Definition
Model – View – Controller is an architectural pattern used in software engineering. Nowadays such complex patterns are gaining more and more popularity. The reason is simple: the user interfaces are becoming more and more complex and a good way of fighting against this complexity is using architectural patterns, such as MVC.
The MVC pattern is an OOP pattern which separates the User Interface (the view) from the business logic (the model). The pattern separates the responsibilities across three components; each one has only one responsibility.
- The view is responsible only for rendering the UI elements. It gives you a presentation of the model. In most implementations the view usually gets the state and the data it needs to display directly from the model.
- The controller is responsible for interacting between the view and the model. It takes the user input and figures out what it means to the model.
- The model is responsible for business behaviors, application logic and state management. It provides an interface to manipulate and retrieve its state and it can send notifications of state changes to observers.
2.3 Common Workflow
The common workflow of the pattern is shown on the next diagram.
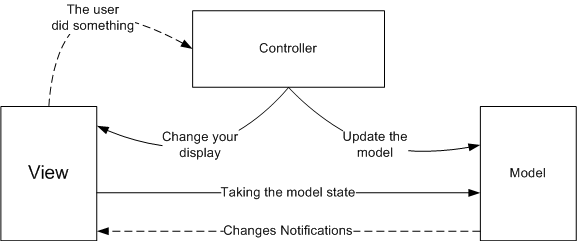
Control flow generally works as follows:
- The user interacts with the user interface in some way (e.g. presses buttons, enters some input information, etc.).
- A controller handles the input event from the user interface.
- The controller notifies the model of the user action, possibly resulting in a change in the model state.
- A view uses the model to generate an appropriate user interface. The view gets its own data from the model. The model has no direct knowledge of the view.
- The user interface waits for further user interactions, which then start a new cycle.
A few things must also be added to the described workflow.
The model exposes events to keep interested objects updated when state changes occur. That keeps the model completely independent of the views and the controllers. It allows us to use different views with the same model, or even multiple views at once.
The view is concerned only with the visual aspect of the application, and delegates to the controller for any decisions about the interface behavior. The controller is responsible for interacting with the model to carry our user requests. The view doesn’t know anything about how this is done. There is possibility for the controller to tell the view to update its interface. The view consists of a nested set of panels, buttons, labels, text boxes and so on. Each display component is a composite. When the controller tells the view to update, it only has to tell the top view component, and the composite takes care of the rest.
Enough theory, let’s put the pattern into practice.
3. Diet Calculator
3.1 User Requirements
Let’s say that a client comes to us and wants from us to develop a diet calculator. The user requirements are listed in the attached document.
3.2 The Calculator Model
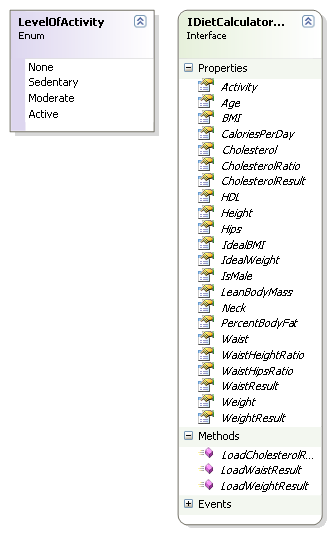
You know that the model is responsible for maintaining all the data, state and any application logic. So what’s the Calculator Model got in it? Its main job is to manage the data, to perform calculations, to load results from the database and so on. It also exposes an interface that lets the view and the controller to obtain the model’s state. Let’s check out the model interface before looking at the implementation:
The IDietCalculatorModel exposes properties for all of the data that will be visualized on the user interface. Also events are exposed for all of the observers that want to be notified for any change in the model. There are three additional methods that are responsible for the data loading from the database.
Now let’s take a look at the concrete DietCalculatorModel: we must implement the IDietCalculatorModel interface.
There are implementations for all of the exposed properties and for the three methods which are responsible for the data loading. There are added numerous helper methods. The get accessors are straightforward, that’s why they don’t need any additional explanations. Let’s take a look at any of the set methods. For example, we can examine the Height property.The set accessor is the way the controller manipulates the model. It does the following things:
1. Sets the height instance field only if the new value is different than the old one
2. Updates all of the fields which depend on the Height in one way or another (in our example they are 6 in number)
3. Notifies all CalculatorModel observers that the Height property has changed.
The same logic is implemented for all of the other properties.
The code is listed in the next snippet:
public double Height
{
get{ .... }
set
{
if ( this.Height == value )
return;
height = value;
this.IdealWeight = this.CalculateIdealWeight();
this.IdealBMI = this.CalculateIdealBMI();
this.BMI = this.CalculateBMI();
this.WaistHeightRatio = this.CalculateWaistHeightRatio();
this.PercentBodyFat = this.CalculatePercentBodyFat();
this.CaloriesPerDay = this.CalculateCaloriesPerDay();
this.OnHeightChanged( new DietCalculatorEventArgs( this ) );
}
}
3.3 The Calculator View
The next task is to visualize the model. It is important to distinguish between the interface that contains the view of the model and the rest of the interface that contains the set of user controls. But our entire calculator is not the best example, where the difference is emphasized.
The view contains references to both the model and the controller. The references must be initialized. This can be done through the constructor or through separate set methods. Also the view must attach to any of the events of the model it is interested in.
private IDietCalculatorController controller;
private IDietCalculatorModel model;
public void SetController( IDietCalculatorController controller )
{
this.controller = controller;
}
public void SetModel( IDietCalculatorModel model )
{
this.model = model;
model.IdealWeightChanged += new EventHandler<DietCalculatorEventArgs>( model_IdealWeightChanged );
model.IdealBMIChanged += new EventHandler<DietCalculatorEventArgs>( model_IdealBMIChanged );
model.WaistHipsRatioChanged += new EventHandler<DietCalculatorEventArgs>( model_WaistHipsRatioChanged );
model.WaistResultChanged += new EventHandler<DietCalculatorEventArgs>( model_WaistResultChanged );
model.WeightResultChanged += new EventHandler<DietCalculatorEventArgs>( model_WeightResultChanged );
model.CholesterolRatioChanged += new EventHandler<DietCalculatorEventArgs>( model_CholesterolRatioChanged );
model.CholesterolResultChanged += new EventHandler<DietCalculatorEventArgs>( model_CholesterolResultChanged );
model.BMIChanged += new EventHandler<DietCalculatorEventArgs>( model_BMIChanged );
model.WaistHeightRatioChanged += new EventHandler<DietCalculatorEventArgs>( model_WaistHeightRatioChanged );
model.PercentBodyFatChanged += new EventHandler<DietCalculatorEventArgs>( model_PercentBodyFatChanged );
model.LeanBodyMassChanged += new EventHandler<DietCalculatorEventArgs>( model_LeanBodyMassChanged );
model.CaloriesPerDayChanged += new EventHandler<DietCalculatorEventArgs>( model_CaloriesPerDayChanged );
tbAge.TextChanged += new TextChangedEventHandler( tbAge_TextChanged );
cbIsMale.Checked += new RoutedEventHandler( cbIsMale_Checked );
cbIsMale.Unchecked += new RoutedEventHandler( cbIsMale_Unchecked );
tbWeight.TextChanged += new TextChangedEventHandler( tbWeight_TextChanged );
tbHeight.TextChanged += new TextChangedEventHandler( tbHeight_TextChanged );
tbWaist.TextChanged += new TextChangedEventHandler(tbWaist_TextChanged);
tbHips.TextChanged += new TextChangedEventHandler( tbHips_TextChanged );
tbIdealWeight.TextChanged += new TextChangedEventHandler( tbIdealWeight_TextChanged );
tbIdealBMI.TextChanged += new TextChangedEventHandler( tbIdealBMI_TextChanged );
tbCholesterol.TextChanged += new TextChangedEventHandler( tbCholesterol_TextChanged );
tbHDL.TextChanged += new TextChangedEventHandler( tbHDL_TextChanged );
tbNeck.TextChanged += new TextChangedEventHandler( tbNeck_TextChanged );
rbSedentary.Checked += new RoutedEventHandler( rbSedentary_Checked );
rbModerate.Checked += new RoutedEventHandler( rbModerate_Checked );
rbActive.Checked += new RoutedEventHandler( rbActive_Checked );
}
The view exposes an additional property which allows enabling and disabling the Hips text box in user interface. We will see that the controller will also be notified for any changes in the model state. Depending on the current state of the model, the controller will enable or disable some parts of the user interface.
public bool HipsReadOnly
{
get{ return tbHips.IsReadOnly; }
set{ tbHips.IsReadOnly = value; }
}
3.4 The Controller 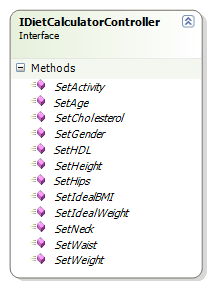
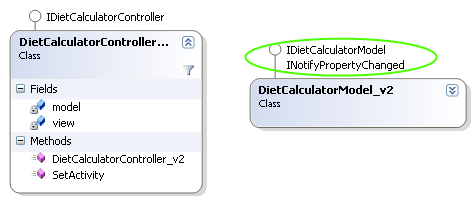
Next we have to build the missing piece – the controller. The controller is the stuff in the middle of the MVC, which glues the view and the model together. You should remember that the controller is the strategy we plug into the view to give it some smarts. That’s why we should first create an interface for the controller. I will call it IDietCalculatorController and its structure is shown on the left diagram.
The interface exposes all the methods that the view can call on the controller. If you know the ICalculatorModel interface then these methods must be very familiar to you. Few things must be mentioned for the controller implementation. First, the model and the view are passed to the controller's constructor and then the controller sets the model to the view.
public DietCalculatorController( DietCalculatorView_v1 view, IDietCalculatorModel model )
{
this.model = model;
this.view = view;
view.SetModel( model );
view.SetController( this );
model.HipsEnabledChanged += new EventHandler<DietCalculatorEventArgs>( model_HipsEnabledChanged );
}
Second, when the user sets any of the properties from the user interface, then the controller is notified for the user actions and calls the corresponding property (or method) of the model.
Third, the controller is making intelligent decisions for the view. The view only knows how to set any field; it doesn’t know the situations in which some parts of the user interface must be disabled.
private void model_HipsEnabledChanged( object sender, DietCalculatorEventArgs e )
{
view.HipsReadOnly = e.HipsEnabled == false;
}
3.5 Testing the Application
Now we are ready to build and start our application. We have got everything we need. Just some lines of code must be added and we are going to see how well they work together.
IDietCalculatorModel model = new DietCalculatorModel();
IDietCalculatorController controller = new DietCalculatorController( calculatorView_v1, model );
4. Improving the Application
Let’s make a little summary for what we have covered up to now. I showed you the classical implementation of the Model – View – Controller pattern. It is important to remember the flow of the pattern:
- You are the user and you interact with the application. Your view is your window to the model. If you perform some action to the user interface then the view tells the controller what has happened.
- The controller takes actions and asks the view to change its state.
- The controller may also ask the view to change its state. For example to enable or disable some parts of the user interface.
- When the controller changes the model state, the model must notify all observers (must notify the view).
- And finally the view gets the model state and updates its interface.
Next I will show how the application can be improved. The improvement will reduce the code with approximately 50 %. I will escape the usage of events, thus we will be carefree for updating the model and the opposite process – updating the user interface.
I will use the power the .Net Framework has given to me – I will use a data binding. In a few words – the binding establishes the relationship between the data source (the model) and the target (the view). It is important for the model to provide change to notifications to allow the binding system to respond when the data is modified. There are three options in WPF: (1) to implement the INotifyPropertyChanged interface; (2) to add events that report changes to properties (we have already added in our model, but unfortunately we cannot use them); (3) to create Dependency Property – based properties. Unfortunately in Silverlight only the first option can be used for creation of data binding, the other two are not supported. In order our view to be notified when the model changes, the model must implement the INotifyPropertyChanged interface. It is not enough only to create Dependency Property or custom events.
So let’s back again to the application. First we should change the model and force it to implement the INotifyPropertyChanged interface. Second we can remove all events and event handlers from the user interface and use a markup for data binding.
<TextBox x:Name="tbHips" TextAlignment="Right"
Text="{Binding Path=Hips, Mode=TwoWay}"
IsReadOnly="{Binding Path=HipsEnabled, Mode=OneWay}" Grid.Row="5"
Grid.Column="4"/>
Using the data binding in Silverlight has one major drawback: when the user updates any of the text boxes from the user interface, he has to tab out of the text box to see the update. By default, TextBox updates the data when it loses the keyboard focus. There is a solution of the problem in WPF. You could use the UpdateSourceTrigger property of the data binding, but in Silverlight it is not supported.
5. Questions and Answers
- When to use the MVC pattern? – there are no valid rules. For me, when you have to implement a more complex logic, then it is the appropriate time to use the MVC. For a simple application, using the MVC will be a suicide.
- What are the differences between the MVC and MVP? – it is coming soon. This will be the main topic of the next article. So be patient.
- I see your view is an observer of the model. Does the controller ever become an observer of the model? – Shortly – yes. In some designs the controller is notified for model changes. This can be in the case when something in the model directly affects the user interface controls. For instance, certain states in the model may dictate that some in the user interface can be enabled or disabled. In my example, the controller is notified for any changes in the person’s gender. When the person is male, then it disables the Hips text box. When the person is female, the Hips text box is enabled. It is really controller’s job to ask the view to update its display accordingly.
- Does the controller ever implement any application logic or everything must be concentrated in the model? – No, it should not implement any application logic. It implements behavior for the view; it translates the user action to actions on the model. The model takes these actions and implements the application logic. The controller may have some work to determine what methods will be called on the model, or in what order these methods will be called, but that is not considered as application logic.
- I don’t understand something. Why all that complexity is needed? Why don’t we concentrate the whole logic in the user interface (it is simple and natural)? – Ok, it can be done, you can write the program just to work, put the whole code in the user interface and to wait for the next bullet. What will you win? – You will escape the needless complexity, no additional interfaces, events, classes and so on, no additional efforts. But this is not the case. You don’t want to do this for several reasons:
- First, you will complicate the view because now it will have two responsibilities: managing the user interface and dealing with the bussiness logic. Thus, one of the most basic principle (Single Responsibility Principle) is not confirmed. The SRP principle is one of the simplest of the principles but also one of the most difficult to get right. Conjoining responsibilities is something that we do naturally. Finding and separating those responsibilities is much of what software design is really about.
- Second, you are tightly coupling your view to the model. If you want to reuse the view or the model, then forget it. The controller separates the logic of control from the view and decouples the view from the model. By keeping the view and the model loosely coupled your application is closed for modifications and opened for extensions. I think this is the heart of object – oriented design. Conformance to this principle is what yields the greatest benefits claimed for object-oriented technology: flexibility, reusability, and maintainability.
6. References
- http://www.scientificpsychic.com/fitness/diet.html
- http://www.hsph.harvard.edu/nutritionsource/index.html
- http://www.bmi-calculator.net/