1. Introduction
Sometimes creating user interface for Silverlight application can be tricky. The reason – the different users may have different screens, resolutions, some of them may have installed multiple toolbars in their browser (that will cause less space for our Silverlight application), or maybe some of them don’t like maximized windows. The purpose of that article is to show you how to create a Silverlight custom control, which will allow you to create applications with dynamic layout, that are easy for use on any screen and will use the screen area in the most optimal way. You can see the demo here.
Download source code.
2. Developing custom control that is independent on the screen size
The idea behind the control is pretty simple. It is a custom control that allows you to associate a collection of templates with it. Depending on its size, the control selects the appropriate template. Whenever you resize your browser to any dimensions, the control will dynamically re-layout the content and will use the screen area in the most optimal way, thus offering you a better viewing experience. For better understanding the concept of the idea, I suggest to download the sources.
First let’s take a quick look at the TemplateSizeMetadata class. It is used to describe the template dependencies of the control size. In a few words, it describes at what dimension the template is applicable.
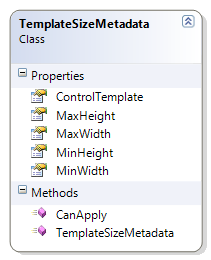
The class contains four properties that define the minimum width/height and maximum width/height at which the associated template is applicable. The class also contains a reference to the ControlTemplate which will be applied for the described area. A single method – CanApply is defined which checks whether the ControlTemplate can be applied or not for the selected area.
public bool CanApply( Size area )
{
return
TemplateSizeUtility.LessThenOrEqual( this.MinWidth, area.Width ) &&
TemplateSizeUtility.LessThenOrEqual( this.MinHeight, area.Height ) &&
TemplateSizeUtility.GreaterThenOrEqual( this.MaxWidth, area.Width ) &&
TemplateSizeUtility.GreaterThenOrEqual( this.MaxHeight, area.Height );
}
The TemplateSizeMetadataCollection is a custom generic collection of TemplateSizeMetadata objects. It doesn’t add any additional actions.
The other important piece in our solution is the TemplateSizeControl. It is a custom control that allows you to associate a collection of templates with it. The TemplateSizeControl defines a dependency property for the TemplatesCollection associated with the control. The control defines few methods where the miracle happens.
The ApplyTemplate method searches for an applicable template from the collection with templates associated with the control based on the passed dimension.
protected virtual void ApplyTemplate( Size area )
{
ControlTemplate newTemplate = this.GetTemplateBySize( area );
if ( Object.ReferenceEquals( this.Template, newTemplate ) == false )
this.Template = newTemplate;
}
And the GetTemplateBySize method:
protected virtual ControlTemplate GetTemplateBySize( Size area )
{
if ( this.Templates == null || this.Templates.Count == 0 )
return null;
foreach ( TemplateSizeMetadata metadata in this.Templates )
if ( metadata.CanApply( area ) )
return metadata.ControlTemplate;
return null;
}
In order to arrange its layout after the size is changed, the control overrides the ArrangeOverride method.
protected override Size ArrangeOverride( Size finalSize )
{
this.ApplyTemplate( finalSize );
return base.ArrangeOverride( finalSize );
}
In order to determine the required size, also overriding the
MeasureOverride method is needed. Inside the method a check whether the control size is valid or not is done. The only limitation is that infinity doubles are not allowed.
3. Using the TemplateSizeControl in applications
In order to use our custom control in a real application, the only thing you need to do is to create a new custom control which inherits it.
public class DemoControl :
TemplateSizeControl.TemplateSizeControl
{
}
3.1. Associating a collection of templates with the TemplateSizeControl
To use the TemplateSizeControl first you should define a TemplateSizeMetadataCollection in the XAML.
<TemplateSizeControl:TemplateSizeMetadataCollection
x:Key="TemplateCollection">
<TemplateSizeControl:TemplateSizeMetadata
MinWidth="0" MinHeight="0"
MaxWidth="800" MaxHeight="500"
ControlTemplate="{StaticResource WindowSmallTemplate}"/>
<TemplateSizeControl:TemplateSizeMetadata
MinWidth="800" MinHeight="500"
MaxWidth="1000"
ControlTemplate="{StaticResource WindowMediumTemplate}"/>
<TemplateSizeControl:TemplateSizeMetadata
MinWidth="1000" MinHeight="700"
ControlTemplate="{StaticResource WindowLargeTemplate}"/>
</TemplateSizeControl:TemplateSizeMetadataCollection>
After that you should associate it with your instance of the TemplateSizeControl.
<local:DemoControl
x:Name="DemoControl"
Templates="{StaticResource TemplateCollection}"/>
4. Running the demo
For our demo I will use a FloatableWindow. This is a custom control which inherits from the ChildWindow control (available in Silverlight 3 SDK) and allows resizing. For more information about the FloatableWindow you can read the Tim Heuer’s article. Also the dll containing the FloatableWindow is available on Codeplex for download.
I will create three templates: one that will be applied when the window is small; one that will be applied when the window has medium size and one that will be applied when the window is very large. After that I will associate these templates with my DemoControl (which inherits from the TemplateSizeControl). You can run the demo from here.
When the application is started, initially the window has small dimensions and the first template is applied.
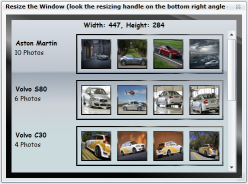
If you use the popup on the bottom right side of the window to resize it, you will note that when the window is large enough the second template (for medium windows) is used and the layout is dynamically changed.
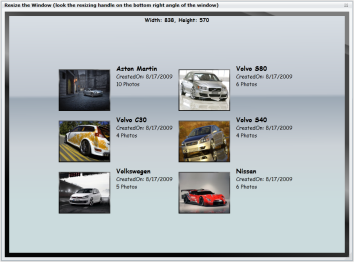
And for very large windows the third template is applied.

5. Conclusion
So that’s it, with very little effort and extremely simple programming techniques I succeeded to develop a control which can adapt dynamically to various screen sizes. I hope you will find that approach useful. If you have any further ideas or remarks, please do not hesitate to share them with us.
6. References
- http://timheuer.com/blog/archive/2009/07/08/silverlight-floatablewindow-updated-with-resizing-capabilities.aspx
- http://floatablewindow.codeplex.com/