In this article we will learn the navigation system integrated in Sharepoint and we will use Silverlight to put together an alternative solution to the one that Sharepoint offers out of the box. In order to carry out this project we will use the Silverlight custom Web Part that I already described in the second part of the first article in this series.
As for the Silverlight menu I will use the open source project Menu4U slightly adapted in order to utilize Sharepoint as datasource for the menu nodes.
We will compare two distinct approaches to retrieve the necessary data: one fully client-side and the other requiring a bit of development server side. Obviously, this has to be taken as an training exercise to become familiar with Sharepoint and to understand advantages and limits of using Silverlight in this platform. Probably a javascript menu using a xml file containing the hierarchy of the site and server side generated would ensure the same results with a smaller effort but this is not the point.
Throughout this article I will introduce some basic concepts of Sharepoint to help Silverlight developers who are unfamiliar with this environment to get a better understanding of this scenario. These sections will be marked with a special icon. People who are experienced Sharepoint users can skip them.
The built-in navigation system of Sharepoint
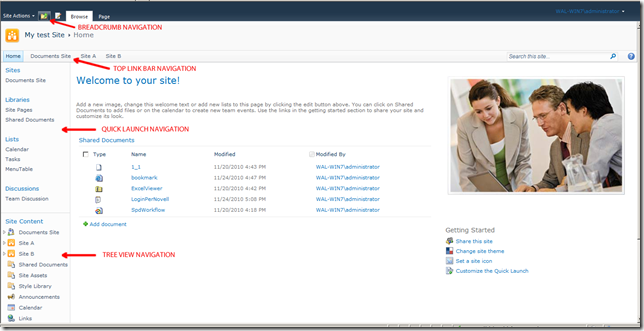
Sharepoint provides several navigation controls out of the box. They are essentially :
-
Top link bar navigation
-
Quick launch navigation
-
Breadcrumb navigation
-
Tree view navigation
Each control relies on a site map provider for the data structure to be displayed. The following image shows their disposition in a tipical Sharepoint page:

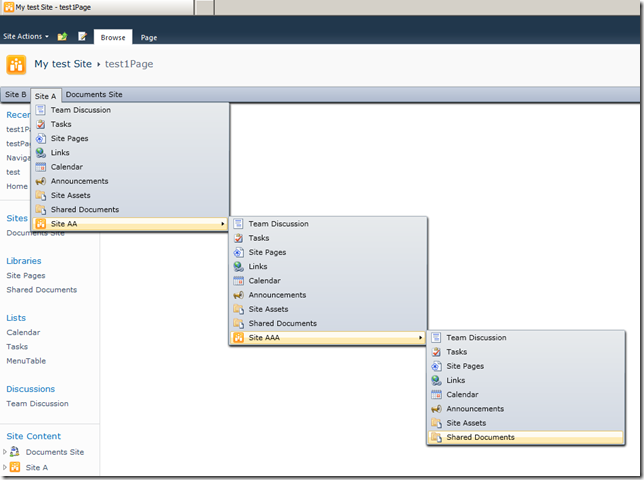
In our example we will focus on the top link bar navigation. By default this bar displays a series of tabs corresponding to the sites that are one level below the current site. Each tab is provided with a flyout menu displaying the underlying hierarchy of sites and pages.

In Sharepoint there is a logical structure called “site collection” that works as container of sites. Every Sharepoint website is made of a site collection containing at least one root site and any or more sub-sites organized in a multilevel hierarchy. Each subsite can have specific features or inherit automatically those of parent. For instance, a site like this, SilverlightShow, could be conceived as a single site or a set of sites starting from a root site.
The navigation links in the top link bar are customizable in the “site settings” available to the site administrators. There is a major difference between Sharepoint Foundation and the other versions (Server, Enterprise etc). In fact, in Foundation the menu is simplified and displays just a flat list of links without fly out menus. This is a good reason to try and create an alternative solution based on a menu in Silverlight which is capable of displaying all the items in the hierarchy.
A Silverlight menu for Sharepoint
Once I decided to use Silverlight in order to make the Sharepoint Foundation top bar navigation more useful (than its older brothers) the dilemma was: shall I create a new solution from scratch or take into account an existing open source project? A quick googling gave me the answer. The Silverlight Menu 4U was exactly what I was looking for. It is nice, flexible and templated, and overall it is simple to assign a datasource to it.
I would just like to anticipate the final result in this image:

In the next paragraph we will see two different approaches to achieve the same result: one that I called “client approach” and the other “server approach”.
The “client approach”
One of the things to be clarified before you build a menu is: where to get the data hierarchy? In this case the logic suggests looking at the data provider used by the top link bar navigation. However, we are in a client Silverlight application and how can we get access to a resource that is on the server side? Investigating the Silverlight Client Model we can find that one of the objects exposed by the Client class library i.e. Microsoft.SharePoint.Client.Web has a property called “Navigation” which represents the navigation structure of the site. This property includes a “NavigationNodeCollection” called “TopNavigationBar” and it is exactly what we need since it contains all the menu items of the Web object. To rebuild the hierarchy of our site we can recursively traverse all the sub sites using the member property “Webs” of “Web” and retrieve each “TopNavigationBar” collection of nodes. Then we can save the hierarchy in a xml file and cache it to the isolated storage. In the code snippet below:
// runs in a separate thread
private void ClientFillMenuThreaded(object objData)
{
    try
    {
        ClientContext locClientContext = GetObjectPropertyValue(objData, "ClientContext") as ClientContext;

        Web rootWeb = locClientContext.Web;
        WebCollection subWebs = rootWeb.Webs;

        locClientContext.Load(rootWeb);
        locClientContext.Load(subWebs);
        locClientContext.Load(rootWeb.Navigation);
        locClientContext.Load(rootWeb.Navigation.TopNavigationBar);

        locClientContext.ExecuteQuery();

        XElement xmenu = new XElement("menu", new XAttribute("Url", ""), new XAttribute("ServerRelativeUrl", ""));
        XDocument doc = new XDocument(new XDeclaration("1.0", "utf-8", "yes"), xmenu);
        Navigation nav = locClientContext.Web.Navigation;
        List<NavigationNode> navList = nav.TopNavigationBar.ToList();


        foreach (NavigationNode navNode in navList)
        {
            XElement xeItem = new XElement("MenuItem", new XAttribute("Title", navNode.Title),
                                                       new XAttribute("Url", navNode.Url),
                                                       new XAttribute("ServerRelativeUrl", rootWeb.ServerRelativeUrl));
            doc.Element("menu").Add(xeItem);
        }

        TraversingSubSites(locClientContext, subWebs, doc);

        Deployment.Current.Dispatcher.BeginInvoke(m_mainUIXMLFunction, doc);

    }
    catch (Exception ex)
    {
        Console.WriteLine(ex.Message);
        Deployment.Current.Dispatcher.BeginInvoke(m_mainUIXMLFunction, null);
        return;
    }
}
We ask the ClientContext (previously initialized with the Url of the website) for more information about some client objects, in particular on Web, Webs of web and Navigation and Navigation.TopNavigationBar using the method Load(…) and then we fire the request using the ExecuteQuery(). This method is normally not allowed in a Silverlight application since it performs a synchronous web request but this is not the case here because the code above runs in a separate thread.
With the recursive function TraversingSubSites() below, we fire a request regarding the object TopNavigationBar of each sub web of our site collection to obtain the NavigationNode collection.Then we save the attributes Title and Url of the node together with the ServerRelativeUrl property of the traversed Web as a node in the xml file and we recall the function again passing the current client context, the Webs collection of the Web and the Xdocument .
private void TraversingSubSites(ClientContext context, WebCollection Webs, XDocument doc)
{
    foreach (Web subweb in Webs)
    {
        context.Load(subweb.Webs);
        context.Load(subweb.Navigation.TopNavigationBar);
        context.ExecuteQuery();

        Navigation nav = subweb.Navigation;
        List<NavigationNode> navList = nav.TopNavigationBar.ToList();
        var menuItems = doc.Descendants("MenuItem");

        foreach (NavigationNode navNode in navList)
        {
            XElement xeItem = new XElement("MenuItem", new XAttribute("Title", navNode.Title),
                                                       new XAttribute("Url", navNode.Url),
                                                       new XAttribute("ServerRelativeUrl", subweb.ServerRelativeUrl));

            var items = menuItems.Where(i => i.Attribute("Url").Value == navNode.Url);

            if (menuItems.Where(i => i.Attribute("Url").Value == navNode.Url).Any() == false)
            {
                var parentItems = menuItems.Where(i => i.Attribute("Url").Value == subweb.ServerRelativeUrl);
                if (parentItems.Any())
                {
                    XElement xParentItem = parentItems.First();
                    if (xParentItem != null)
                        xParentItem.Add(xeItem);
                }
                else
                {
                    doc.Element("menu").Add(xeItem);
                }
            }
        }
        // recursion
        TraversingSubSites(context, subweb.Webs, doc);
    }
}
When all the sub webs are traversed, a method in the main thread is invoked. This method simply reads the XDocument and reconstructs the hierarchy initializing the various MenuItem object of the Menu4U library above mentioned.
public bool FillMenuUsingXml(XDocument doc)
{

    FillMenuRecursive(doc.Root.Elements("MenuItem"), null);

    return true;
}

private void FillMenuRecursive(IEnumerable<XElement> nodes, MenuItem pmParent)
{
    if (nodes.Any())
    {
        foreach (XElement node in nodes)
        {
            var pmiNode = new MenuItem()
            {
                Text =  (string)node.Attribute("Title").Value,
                NavigateUrl = siteSPUrl + node.Attribute("Url").Value
            };

            if (pmParent == null)
            {
                menuItems.Add(pmiNode);
            }
            else
            {
                pmParent.Children.Add(pmiNode);
            }

            FillMenuRecursive(node.Descendants("MenuItem"), pmiNode);
        }
    }
}
All the MenuItems objects are added to an Observable collection “menuItems” that it is used as datasource of the Menu4U object and it is defined in the xaml of the MainPage as below:
<Grid x:Name="LayoutRoot" >
    <ctrl:SLMenu x:Name="mnu" Grid.Row="0" MenuItemClick="mnu_MenuItemClick"/>
</Grid>
Pitfalls of the client approach
The main defect of this approach is that it does not work if you are not logged in, i.e. if you are surfing the site as anonymous user. Why that? Just because as anonymous user you don’t have access to most of the Client objects defined in the Silverlight client library for Sharepoint; in particular you cannot ask for information about the TopNavigationBar object as we did in the previous paragraph.
In one of my previous articles I explained what happens behind the scenes when Silverlight contacts Sharepoint. Basically it first contacts the Site Web Service of Sharepoint ( http://<server-url>/_vti_bin/sites.asmx ) to obtain a security validation value that will be used for all the subsequent requests performed to the Client Web Service (http://<server-url>/_vti_bin/client.svc). If you are anonymous you won’t get any security value and you will get access only to the objects that you as administrator have decided that are available to the anonymous user. Unfortunately, there are no means to make predefined objects like TopNavigationBar available to anonymous.
So what? For websites which are essentially intranet sites this is not a problem, but if you want to let anonymous surfers enjoy a Silverlight menu in your Sharepoint site you need to adopt another approach.
The “server approach”
We have seen that using the Silverlight client object model we have to be authenticated in order to get all the information that we need. In case of anonymous users, we can get the same information but without using Silverlight. How? With a Sharepint Web Part. Essentyally, the idea is to develop a web part which saves the menu hierarchy of the site in a Sharepoint custom List that we can make readable also for an anonymous using Silverlight. For all the details of this approach I would remind you of the second part of this article.
Summary
In this article we faced the problem of adding a Silverlight menu to a Sharepoint site. Although it could probably be done in an easier way by using Javascript, it is a good training exercise to have a better understanding of the compatibility map between Silverlight and Sharepoint. In this first part we have briefly discussed the built-in navigation system in Sharepoint and we found a way to build the menu by using a so called “client approach”. Then we have highlighted the main weak point of this approach (the fact of not being available for anonymous users) and we have anticipated a new “server approach” that will be explained in the second part of the article.