Note: This article is submitted by Damon Payne for Silverlight: Write and Win contest.Thanks a lot, Damon! Hello All, Please drop a comment if you like it.
If you have used Amazon.com or Flickr you may be familiar with Image Hotspots or Hot Regions. This is a region on an image where clicking or hovering the mouse reveals some additional information in a callout or popup. By providing extra information your photographs become more interactive and appealing. In this article we'll build a Hotspot Designer that allows the user to draw Hot Regions on an image, a preview and display control, and a way to save their work.
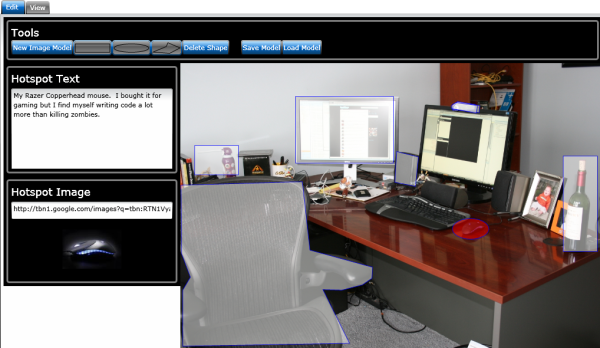
Here's a finished example, using a photo of the "gear closet" from my home theater. Following that is a screenshot of the Design and Edit view; you can check out a live demo of the editor here. There are also another finished example here. The demo below uses a picture of my typically un-organized home office:
You can also download the entire solution here and follow along.
Before getting started
This article assumes you have some basic familiarity with Silverlight Controls, XAML, Data Binding, and the Dependency Property system. Familiarity with classic and contemporary design patterns is helpful but the patterns used in this article will be briefly explained as they are introduced.
Representing the Image and Hot Regions
We are going to draw Rectangles, Ellipses, and Polygons on top of an image that we'll choose from within the Editor. For each shape, we'll be able to enter a text description and an extra thumbnail image if we want. In order to simplify the image selection, we'll ask the user to enter a fully-qualified URL to the target image and display it on the design surface. This is a quick UML look at the Model we'll be building up using the UI.
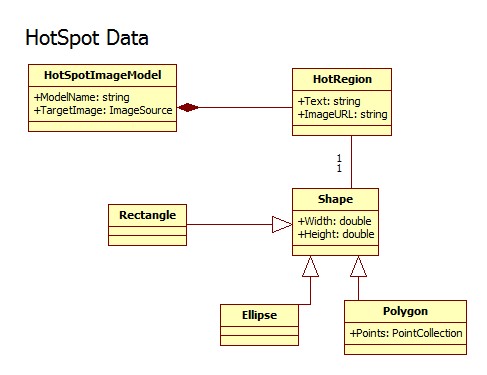
We'll create HotSpotImageModel and HotRegion as data types in the application and implement INotifyPropertyChanged and INotifyCollectionChanged where appropriate to allow Data Binding. Later when we talk about serializing the model we create we'll add some additional functionality to these data objects.
Building the UI Shell
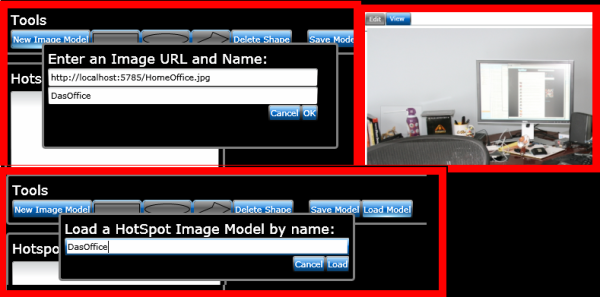
The user will be able to choose a JPG or PNG image using a fully qualified URL, load a Model they've already saved, and be able to preview the Model as they build it. There are three straight-forward Silverlight UserControls as shown here:
These UserControls, as well as the RootVisual (Page) will need to communicate somehow as changes are made to the Model. Rather than building an Event Aggregator we can use a combination of Silverlight Data Binding and the Director Pattern to keep things clean. The Director Pattern is a technique allowing modules to communicate with each other through itself rather than all modules needing references to each other.
UIDirector
public class UIDirector
{
static UIDirector()
{
_views = new List<IView>();
}
public static void AddView(IView view)
{
_views.Add(view);
view.ModelCreated += (s, e) =>
{
foreach (var v in _views)
{
if (v != s) { v.Model = e.Model; }
}
};
}
private static List<IView> _views;
}
IView
public interface IView
{
HotSpotImageModel Model { get; set; }
/// <summary>
/// A View fires this event if it creates an entirely new HotSpotImageModel
/// </summary>
event EventHandler<ModelEventArgs> ModelCreated;
}
public partial class HotSpotEditor : UserControl, IView
{
public HotSpotEditor()
{
InitializeComponent();
UIDirector.AddView(this);
}
}
Changes to the Model are then handled via Data Binding.
Drawing Hot Regions on the Image
We are going to allow the drawing of Rectangles, Ellipses, and arbitrary Polygons on top of the chosen image. In order to perform simple 2D drawing operations, using the Canvas control is often the most straightforward approach. Since the Canvas does basic X,Y layout for its Children we can use the mouse to provide a drawing experience that should be familiar to just about anyone. The Image chosen by the user is also a child of the Canvas, and anything added after the Image will be on top of the Image in the z-order. This will allow us to draw semi-transparent shapes over interesting regions of the source image.
By looking at the first screenshot or the example application, you can easily identify the three ToggleButtons that allow the user to select a drawing tool. In order to encapsulate the logic behind drawing each shape there is a DrawingBehavior base class and four derrived classes: NullDrawingBehavior (when no choice is selected), as well as Rectangle-,Ellipse-, and Poly- DrawingBehavior classes. It's worth looking at the DrawingBehavior base class:
public abstract class DrawingBehavior
{
public DrawingBehavior(Canvas surface)
{
Surface = surface;
}
/// <summary>
/// The surface we're drawing on
/// </summary>
public Canvas Surface { get; private set; }
/// <summary>
/// Mouse click point relative to Surface
/// </summary>
public Point StartPoint { get; set; }
public abstract void StartDrawing(Point s);
/// <summary>
/// Give derrived classes a chance to determine if they can or should return a valid
/// Shape in their current state
/// </summary>
/// <param name="g"></param>
/// <returns></returns>
public virtual bool ShouldStopDrawing(DrawingGestures g)
{
return (g == DrawingGestures.MouseLeftUp);
}
/// <summary>
/// Stop drawing and return the final Shape
/// </summary>
/// <returns></returns>
public abstract Shape StopDrawing();
/// <summary>
/// Pass Mouse events through to the DrawingBehavior
/// </summary>
/// <param name="e"></param>
public abstract void MouseMove(MouseEventArgs e);
public virtual void ApplyShapeStyle(Shape s)
{
var style = (Style)Application.Current.Resources["DrawingShapeStyle"];
s.Style = style;
}
}
The HotSpotEditor UserControl uses the Mouse and Keyboard events attached to its DrawingCanvas member to feed the currently selected DrawingBehavior. When a new Shape is created or destroyed, a HotRegion object is added to or removed from the Model. The text and image that will appear in the final "display" view when a users mouses over the drawn region is edited by data binding to the newly created HotRegion object. Once a shape is drawn, the user can also edit it by clicking within its bounds. Here's the code for drawing a Rectangle using the mouse:
public class RectangleDrawingBehavior : DrawingBehavior
{
public RectangleDrawingBehavior(Canvas surface):base(surface)
{
}
public Rectangle CurrentRect { get; set; }
public override void StartDrawing(Point s)
{
StartPoint = s;
CurrentRect = new Rectangle
{
Width = 5.0,
Height = 5.0,
};
ApplyShapeStyle(CurrentRect);
CurrentRect.SetValue(Canvas.LeftProperty, s.X);
CurrentRect.SetValue(Canvas.TopProperty, s.Y);
Surface.Children.Add(CurrentRect);
}
public override Shape StopDrawing()
{
var rVal = CurrentRect;
CurrentRect = null;
return rVal;
}
public override void MouseMove(MouseEventArgs e)
{
Point localMousePos = e.GetPosition(Surface);
if (StartPoint.X < localMousePos.X)
{
double width = localMousePos.X - StartPoint.X;
double height = localMousePos.Y - StartPoint.Y;
if (width > 0 && height > 0)
{
CurrentRect.Width = width;
CurrentRect.Height = height;
}
}
else // northwest drag
{
double width = StartPoint.X - localMousePos.X;
double height = StartPoint.Y - localMousePos.Y;
if (width > 0 && height > 0)//need this safety here in case a resize rectangle "crosses" itself.
{
CurrentRect.Width = width;
CurrentRect.Height = height;
CurrentRect.SetValue(Canvas.LeftProperty, localMousePos.X);
CurrentRect.SetValue(Canvas.TopProperty, localMousePos.Y);
}
}
}
}
Showing the Preview
The TabControl on the main Page shows both Edit and View tabs, where View obviously allows us to preview how the image will behave. While at first glance it may appear that data binding will make quick work of this funciton, there are some quick trips into the Pit of Failure here that demand closer inspection.
The HotSpotImageModel object contains a list of HotRegions, each one containing a Shape defining the HotRegion boundaries. Since the shape is already a Child of DrawingCanvas on the HotSpotEditor Control it can't also be a child of the display Canvas on HotSpotViewer. We get around this by creating a shallow clone of each Shape in HotSpotViewer as it's added to the Model.
public HotSpotImageModel Model
{
get
{
return (HotSpotImageModel)DataContext;
}
set
{
UnhookOldHandlers();
DataContext = value;
foreach (var r in value.Regions)
{
var shape = r.Shape;
if (null != shape)
{
AddShape(shape);
}
}
Model.Regions.CollectionChanged +=
new System.Collections.Specialized.NotifyCollectionChangedEventHandler(Regions_CollectionChanged);
}
}
private void AddShape(WS.Shape shape)
{
//We have to clone shapes since they can't be a child of two visual elements at once
var s = shape.Clone();
SetShapeProperties(s);
HotSpotCanvas.Children.Add(s);
s.MouseEnter += new MouseEventHandler(shape_MouseEnter);
s.MouseLeave += new MouseEventHandler(shape_MouseLeave);
_cloneMap[shape] = s;
}
Shape is not actually Clonable, this is a Member of the ShapeExtensions class you will find in the source code. The cloned shape can now be added to the HotSpotViewer. Cloning the shape also means we can change the Opacity, Stoke, and Fill of the shape to new values without affecting what is seen in the HotSpotEditor.
You will also note that any event handlers attached to a previous Model are removed in order to prevent objects from being ungarbagecollectable. Since the Regions property of HotSpotImageModel is of type ObservableCollection, the HotSpotViewer can respond to elements being added or removed and the preview is always in sync.
Seralizing the results
Since the end goal is a user-interactive image we will need to address the issue of serialization. While there are any number of ways to communicate with a persistent store in Silverlight, the visual classes we're using are not serializable in the traditional sense. An attempt to use, say, XmlSerializer with a System.Windows.Shapes.Rectangle will fail. Luckily we can create a serializable version of each Shape containing enough data to re-create the Shape when loaded from a persistent store. Using the example of Rectangle we can see that we need its Width, Height, Canvas.Top, and Canvas.Left properties.
In DamonPayne.HotspotDesigner.Shapes, then, we create a basic data type that will be serializable. When then perform some sleight of hand in HotRegion:
public class HotRegion
{
public HotRegion()
{
Text = "<Enter Description>";
ImageURL = "http://";
}
public string Text { get; set; }
public string ImageURL { get; set; }
public DamonPayne.HotspotDesigner.Shapes.Shape SerializableShape
{
get
{
return Shape.ToSerializable();
}
set
{
Shape = value.FromSerializable();
}
}
[XmlIgnore]
public WS.Shape Shape { get; set; }
}
The System.Windows.Shapes.Shape property is decorated with [XmlIgnore] so XmlSerializer doesn't choke on it. The SerializableShape property is visible, and uses two more methods from the ShapeExtensions class to translate to and from our custom serialization-friendly Shape classes.
Server-side storage
Persistance for the Model in the sample application is accomplished in the simplest way imaginable: an ASP.Net endpoint (.ashx generic handler) that takes care of persisting the model on disk using the raw Http request stream. The interested reader could provide their own implementation of IHotSpotImageModelRepository using WCF or any other applicable method. For the sample appplication published at http://www.damonpayne.com/HotSpot/HotSpotDesigner.html saving new models has been disabled to prevent any comedy at the author's expense. You are encouraged to experiment locally using the source solution.
Displaying the Final Product
With everything else done we can provide a mechanism to display the final product on a web page. It seems reasonable to make the HotSpotViewer control serve double-duty for the final display as well as edit-time preview. For the purposes of this article we check for an optional query string parameter at startup and display only the viewer when applicable:
private void Application_Startup(object sender, StartupEventArgs e)
{
if (HtmlPage.Document.QueryString.ContainsKey("mode"))
{
string mode = HtmlPage.Document.QueryString["mode"];
if ("display".Equals(mode))
{
RootVisual = new HotSpotViewer();
}
}
else
{
this.RootVisual = new Page();
}
}
The final bit of logic happens as HotSpotViewer is loaded:
private void UserControl_Loaded(object sender, RoutedEventArgs e)
{
if (null == Model)//We are not in Edit/Design mode
{
var repo = new HotSpotImageModelRepository();
if (HtmlPage.Document.QueryString.ContainsKey("model"))
{
repo.GetModel(HtmlPage.Document.QueryString["model"], m =>
{
Model = m;
ModelCreated(this, new ModelEventArgs(m));
});
}
else //We'll try to load a default model, or bomb!
{
repo.GetModel(null, m =>
{
Model = m;
ModelCreated(this, new ModelEventArgs(m));
});
}
}
//If we are in Edit/Design mode, we'll get our Model from UIDirector
}
This now allows us to build URLs containing a previously stored model name.
Conclusion
Using some well-known design patterns and basic 2D drawing techniques, Silverlight can be used to create some fun and appealing Visual Tools inside the browser. Because the built-in Silverlight Image control is not subject to the usual cross-domain restrictions we can annotate abitrary images and use sources like Google Images to provide additional thumbnails. With the power of Visual Studio and the .NET CLR, all of this can be made to dance in the browser in a way many developers will find much more comfortable and enjoyable than writing Javascript. Hey Flickr, when are you moving your tools to Silverlight?