This article is compatible with the latest version of Silverlight.
Introduction
The most common scenario for a Silverlight application is to deploy it to the web. However, when building an application that is going to be used by companies, who need to deploy it to their own servers, a decent Setup is a must have. This article will take you through the steps of building a Web Setup to deploy your Silverlight application and allow you to configure it from the Web Setup.
You can download the full project here.
Step 1: Setting up the Web Setup project
As a starting point I’ve used a simple Silverlight application which has a connection to a very basic WCF service. This way we can test if everything works as expected (which will be the homework assignment :-) ). I’ve chosen to let Visual Studio create a Web Application for me, which we will use in the setup project. To avoid the whole cross-domain issue, I’ve published the service to my local IIS server, which is already setup for allowing cross-domain requests.
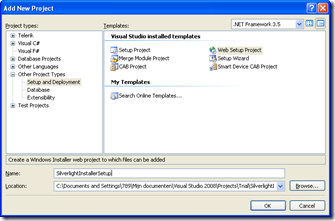
The first thing to do is to add a Web Setup project. You can do this by right-clicking your solution and clicking Add > New Project…. In the Project types tree, you select Other Project Types and then Setup and Deployment. You can then select Web Setup Project. Simply give it a name and hit OK.

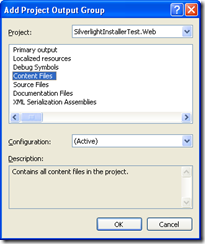
As a default you end up with an empty setup. It’s time to add some content to it. After you’ve created the project, you’re now presented with the File System window for the setup. There are four windows like this, all covering different parts of installing your solution. In the File System window, you can see the Web Application Folder. This is the folder that will hold your Silverlight Application. To add the Silverlight project to the Web Application Folder, you simply right-click it and choose Add > Project Output…. You can then choose for which project you want to add output and what type of output you want to add. In this case we want to select the Web project that was created by Visual Studio and we want it’s content.

If you don’t have anything to configure for your Silverlight Application, this is it. You can tweak some settings in the Web Setup Project in order to make it fit your needs better, but technically you’re done. If you need to configure, let’s say, a Service Reference, please read on.
Just one more tip when using Setup projects. These projects are not built automatically when building the solution. In order to get the Setup to build with new code, you need to explicitly build the Setup project.
Step 2: Adding a custom action to configure your service references
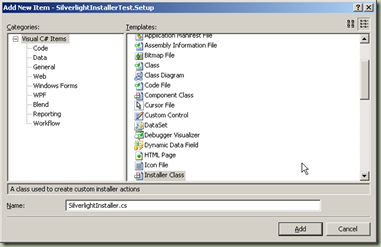
To actually extend the setup to handle configuration for you, you need to have somewhere to put your code. Within the setup this can be done with an Installer Class. I’ve added a standard Class Library to the solution to hold the Installer Class and then I added an Installer Class.

Now whenever a setup wants to execute an Installer it will call the Install method. So the logical next step for us is to override this method. Then we want to prepare some things for debugging. The first thing is to get the setup project to call the Installer. To do this we need to select the setup project in the solution explorer and then click the Custom Actions Editor button.

We then are presented with a simple tree that contains the various stages a setup can have. In this case we want our Installer to run in the Install stage of the setup, so we right click the Install folder and click Add Custom Action. In the dialog that follows we navigate into the Web Application Folder and then we click the Add Output button. Like before we can then add the output of some project in our solution. In this case we want the primary output from the Class Library project that contains our Installer. The setup will now execute our Installer.
Step 2.1: Writing code for our custom action
Another thing I do when building an Installer is to add some code for debugging. The reason for this is that you can’t just hit F5 and debug. Attaching to a setup is not so easy, so I tend to just have the Installer attach to a debugger:
#if DEBUG
Debugger.Launch();
#endif
Now we want to do a couple of things inside the Install method:
- Open up our .xap file to get to our config file
- Read the config file so we know what to configure
- Change the configuration and write it back into the config file
- Put the config file back into the .xap file
Obviously we need some way to open up our .xap file. As this is technically a .zip file we need some library to deal with this for us. I’ve done some research on this and choose DotNetZip. Licensing was one of the reasons, but also the capability of simply replacing a files content right back into the .zip archive, instead of heaving to unzip to some folder and repackage the whole thing. Combined with the fact that this is a relatively small library and doesn’t require things like the J# libraries and that his appears to be a stable and well maintained open source project got me across.
In order to open the .xap file, first we need to find out where it is. In order to do that, we can use the currently executing Assembly to find the path. Here is what I wrote:
Assembly executingAssembly = Assembly.GetExecutingAssembly();
string location = executingAssembly.Location;
DirectoryInfo clientRootDirectory = Directory.GetParent(location);
string clientBinPath = Path.Combine(clientRootDirectory.Parent.FullName, "ClientBin");
string xapFilePath = Path.Combine(clientBinPath, "SilverlightInstallerTest.xap");
The next step is to actually open the .xap file using the ZipFile class in the DotNetZip library and retrieve our config file. To get to the actual decompressed contents of the config file, we need to go through the ZipEntry instance that holds the config file:
ZipFile zipFile = new ZipFile(xapFilePath);
ZipEntry zipEntry = zipFile.Entries.First(e => e.FileName.Equals("ServiceReferences.ClientConfig"));
Stream configStream = new MemoryStream();
zipEntry.Extract(configStream);
configStream.Seek(0, SeekOrigin.Begin);
StreamReader configReader = new StreamReader(configStream);
string config = configReader.ReadToEnd();
Notice that on line 6 we reset the configStream to go back to the beginning, so that we can be sure to start reading from the start after loading the stream from the .xap file.
Now that we have the contents of the config file we can load it into an XDocument instance so we can use Linq To XML to find the right element and the right attribute to change the configuration:
StringReader reader = new StringReader(config);
XmlReaderSettings xmlSettings = new XmlReaderSettings();
XmlReader xmlReader = XmlReader.Create(reader, xmlSettings);
XDocument configDocument = XDocument.Load(xmlReader);
XName clientName = "client";
var client = from element in configDocument.Elements().Elements().Elements()
where element.Name.Equals(clientName)
select element;
Obviously we want to use a parameter to configure the right service URL, so we can then have the user input the URL through the setups UI. I have not included the steps to add such a UI to the setup as this is well documented and beyond the scope of this artice. To get to a parameter called serviceurl, we write the following:
string serviceUrl = Context.Parameters["serviceurl"];
if (string.IsNullOrEmpty(serviceUrl))
{
throw new ArgumentNullException("serviceurl", "You must supply a service url");
}
If no input was given by the user running the setup we want to throw an exception. This will abort the setup process. You can put in more advanced error checking if needed, for example to check for a valid URL format.
And finally all we need to do is write the new XML into the existing ZipEntry and save the ZipFile back to the file system:
if (!client.Any())
{
return;
}
var securityEndPoint = from element in client.First().Elements()
where element.Attribute("name").Value.Equals("BasicHttpBinding_IService1")
select element;
if (securityEndPoint.Any())
{
XElement element = securityEndPoint.First();
XAttribute attribute = element.Attribute("address");
attribute.SetValue(serviceUrl);
}
zipFile.UpdateEntry("ServiceReferences.ClientConfig", configDocument.ToString());
zipFile.Save();
Notice the zipFile.Save() at the end. This will actually update the .xap file so that it now contains the correct configuration.
Conclusion
We have seen that it’s easy to create a web setup project that will install a Silverlight application in IIS if there is no configuration involved. Once the configuration becomes an issue you’ll need a custom action to do that configuration. Unzipping the configuration and replacing the configuration in the .xap file is easy with the DotNetZip library.