This article is compatible with the latest version of Silverlight.
Whenever a new version of Silverlight is released, I start examining its features from two perspectives: how would my current (and planned) LOB applications benefit from using these new features, and what cool new things can I build to entertain my children.
This article will guide you through the process of creating a doodling application (you know, for kids ;)), while covering some of the most visible (or not) new features, coming with Silverlight 4. But this is not just about new features, it’s about how they are prepared and served. Interested? Let’s begin then.
Webcam support / WebcamBehavior / CompositeTransform
One of the most requested Silverlight feature was Webcam support so I’m starting with that. I want go deep on showing how to enable Webcam capturing; to make this sample different from the ones you may have already seen, I baked the basic Webcam support into a behavior. The WebcamBehavior can be attached to any Shape you want, rendering the video being captured by a Webcam.

To capture the above image, I only needed to attach the WebcamBehavior to the rectangle on the left. The other two shapes were both getting the feed from the rectangle (serving the original VideoBrush):
<Rectangle Margin="8" Width="200" Height="200" x:Name="source">
<i:Interaction.Behaviors>
<local:WebCamBehavior />
</i:Interaction.Behaviors>
</Rectangle>
<Ellipse Grid.Column="1" Margin="8" Width="200" Height="200"
Fill="{Binding Fill, ElementName=source}" />
<Polygon Grid.Column="2" Margin="8" Width="200" Height="200"
Fill="{Binding Fill, ElementName=source}"
Points="0,200,100,0,200,200" />
Webcam is not on by default, we need to turn it on from code. And how exactly could we actually start capturing the video if Webcam is controlled by the behavior?
Some of the readers may not be familiar with this very convenient Blend 3 feature so I’m explaining it here: you can add commands to any behavior by exposing the properties of type ICommand. For each such property, Blend 3 will show a special property editor, where user would define the trigger(s) for executing that command.

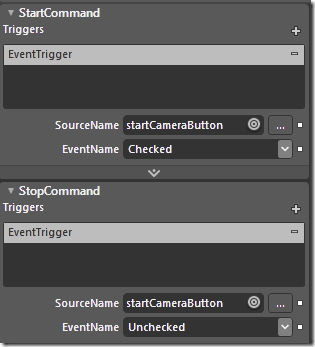
For example: I created two commands to control the state of a Webcam. StartCommand would start capturing the camera, while StopCommand will stop it. Both commands get executed by the same ToggleButton - the StartCommand is called on button’s Checked event, while StopCommand is triggered by it’s Unchecked event. You can implement the commands however you like, as long as they implement ICommand [if you don’t feel like creating your own implementation, check out the ActionCommand from Expression Behaviors library].
<Rectangle x:Name="camera" Stretch="Fill" RenderTransformOrigin="0.5,0.5">
<Rectangle.RenderTransform>
<CompositeTransform ScaleX="-1" />
</Rectangle.RenderTransform>
<i:Interaction.Behaviors>
<li:WebcamBehavior >
<i:Interaction.Triggers>
<i:EventTrigger SourceName="playCameraButton" EventName="Checked">
<i:InvokeCommandAction CommandName="StartCommand"/>
</i:EventTrigger>
<i:EventTrigger SourceName="playCameraButton" EventName="Unchecked">
<i:InvokeCommandAction CommandName="StopCommand"/>
</i:EventTrigger>
<i:EventTrigger SourceName="showCameraButton" EventName="Checked">
<i:InvokeCommandAction CommandName="ShowCommand"/>
</i:EventTrigger>
<i:EventTrigger SourceName="showCameraButton" EventName="Unchecked">
<i:InvokeCommandAction CommandName="HideCommand"/>
</i:EventTrigger>
</i:Interaction.Triggers>
</li:WebcamBehavior>
</i:Interaction.Behaviors>
</Rectangle>
See the RenderTransform value up there? I used it to flip the webcam capture image horizontally, to look like you’re looking into a mirror. But instead of using ScaleTransform, I used CompositeTransform, which is another new Silverlight 4 feature that lets you set many transform values at once and keep the object count down (no need for separate TranslateTransform, ScaleTransform, RotateTransform and SkewTransform).
The webcam feed will serve as a canvas for our doodling. The version shown above features additional commands, enabling user to hide/show the feed.
DataBinding enhancements / DrawingBehavior
This is the main part of the application. Again, I wrapped all of the drawing logic into a DrawingBehavior. Any Grid can be turned into a drawing container by simply attaching this behavior to it. Upon attaching, the behavior adds an InkPresenter control on top of other Grid’s children and hooks up various mouse events to draw the strokes.
The user should be allowed to choose a drawing color. The DrawingBehavior exposes a Color dependency property, which can be set to any color value. But not only that - Silverlight 4 now allows data binding to DependencyObject! With Behavior being a DependencyObject, you now can bind any of its properties and it simply works. For example, something like this isn’t possible with Silverlight 3:
<Grid>
<i:Interaction.Behaviors>
<li:DrawingBehavior
SelectedColor="{Binding SelectedValue, ElementName=palette}" />
</i:Interaction.Behaviors>
</Grid>
In the above snippet, the SelectedColor property is bound to the palette’s SelectedValue property. If the SelectedValue property sounds familiar to you, you’re right - the color palette is just a restyled ListBox, having a number of basic colors set through the ViewModel:
Colors = new List<Color>()
{
System.Windows.Media.Colors.Black,
System.Windows.Media.Colors.Gray,
System.Windows.Media.Colors.Brown,
System.Windows.Media.Colors.Blue,
System.Windows.Media.Colors.Cyan,
System.Windows.Media.Colors.Green,
System.Windows.Media.Colors.Red,
System.Windows.Media.Colors.Purple,
System.Windows.Media.Colors.Magenta,
System.Windows.Media.Colors.Orange,
System.Windows.Media.Colors.Yellow,
System.Windows.Media.Colors.White,
};
|
 |
Yet another DrawingBehavior feature is that it automatically changes mouse pointer to a small circle with the same fill color as the one selected in the palette. Similarly to SelectedColor, DrawingBehavior exposes the PointerSize property, which can also be bound to some other data source, controlling the size of the mouse pointer.

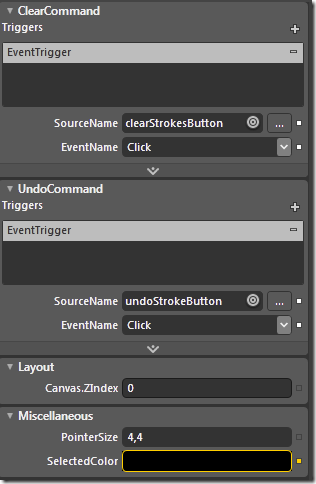
Oh, and let’s not forget that this behavior also exposes two ICommands – ClearCommand simply clears the canvas of all strokes, while UndoCommand undoes the last stroke. I used a little trick here – because a single ”user” stroke is composed of many actual strokes (every MouseMove creates a new stroke), the DrawingBehavior keeps a history of user strokes by storing the actual strokes’ indexes on the stack. The UndoCommand just clears the last set:
public void OnUndo(object state)
{
int lastStroke = history.Pop();
for (int i = lastStroke; i < canvas.Strokes.Count; i++)
{
canvas.Strokes.RemoveAt(lastStroke);
}
}
Behaviors vs. standalone controls
Ok, so why did I choose behaviors over creating standalone controls for webcam feed and drawing canvas? Well, both behaviors contain logic only, without any visual representation. There’s no templates, no content, … – they only need a specific host to attach to.
Printing / Commanding / MVVM
Printing was another Silverlight 4 feature in a high demand – and now it’s here: it’s got a very simple API, but you can print virtually anything you want. For example, these few lines will print the current state of the doodle. Webcam turned on or off: it doesn’t matter - it’s going to get printed.
private void OnPrint(object sender, RoutedEventArgs e)
{
PrintDocument document = new PrintDocument { DocumentName = "Camdoodle image" };
document.PrintPage += (s, args) => args.PageVisual = printElement;
document.Print();
}
Now let’s use this printing example to show another Silverlight 4 feature: commanding. Buttons in Silverlight 4 have a new set of properties (namely Command and CommandParameter), which let you declaratively associate a button with a command, which will execute when that button is clicked. Native commanding support coming to Silverlight is great news for everyone doing MVVM, as 3rd party implementations will no longer be required. When moving the above printing code into the ViewModel, we need to expose a command that will trigger printing and pass the element to print as its parameter:
public ICommand PrintCommand { get; private set; }
private void OnPrint(object parameter)
{
PrintDocument document = new PrintDocument { DocumentName = "Camdoodle image" };
document.PrintPage += (s, e) => e.PageVisual = parameter as UIElement;
document.Print();
}
The declaration in XAML couldn’t get simpler than:
<Button Command="{Binding PrintCommand, Source={StaticResource viewModel}}"
CommandParameter="{Binding ElementName=image}"
Style="{StaticResource ButtonStyle}" >
<Image Source="Resources/printer.png"/>
</Button>
Implicit styling
I’m going to just quickly mention this one. See the Style declaration in that last piece of XAML above? With Silverlight 4, you can define a default style for a certain type of control (by not specifying the x:Key attribute), and that style would be automatically applied to every control of that type, without having to specify it explicitly. Using implicit styling, the above button could be declared as:
<Button Command="{Binding PrintCommand, Source={StaticResource viewModel}}"
CommandParameter="{Binding ElementName=image}">
<Image Source="Resources/printer.png"/>
</Button>
Drag’n’Drop
This one’s big too. OpenFileDialog has been around in Silverlight since v2, but Silverlight 4 now provides a much more convenient way for user to send files to application – by dragging it from the file system and dropping it over some control. How about using this feature to let the user drag some pictures on the drawing canvas? Let’s create a PanelDropBehavior, that will extend any kind of Panel by letting the user drop her pictures right onto the doodling canvas.
Upon attaching, the hosting control should have its AllowDrop property set to true. This will enable the Drop event to be raised.
protected override void OnAttached()
{
base.OnAttached();
AssociatedObject.AllowDrop = true;
AssociatedObject.Drop += OnDrop;
}
In the OnDrop event handler, an Image control is created, displaying the picture that was dropped on the hosting panel.
private void OnDrop(object sender, DragEventArgs e)
{
IDataObject dataObject = e.Data as IDataObject;
if (e.Data == null)
{
return;
}
FileInfo[] files = dataObject.GetData(DataFormats.FileDrop) as FileInfo[];
try
{
foreach (FileInfo file in files)
{
Point dropPoint = e.GetPosition(AssociatedObject);
Image image;
using (Stream stream = file.OpenRead())
{
string name = file.Name;
BitmapImage bitmapImage = new BitmapImage();
bitmapImage.SetSource(stream);
image = new Image { Source = bitmapImage };
}
image.Width = MaxDropWidth;
image.Height = MaxDropHeight;
image.Stretch = Stretch.Uniform;
image.VerticalAlignment = VerticalAlignment.Top;
image.HorizontalAlignment = HorizontalAlignment.Left;
double x = Math.Min(dropPoint.X,
AssociatedObject.ActualWidth - image.ActualWidth);
double y = Math.Min(dropPoint.Y,
AssociatedObject.ActualHeight - image.ActualHeight);
if (AssociatedObject is Canvas)
{
image.SetValue(Canvas.LeftProperty, x);
image.SetValue(Canvas.TopProperty, y);
}
AssociatedObject.Children.Add(image);
}
}
catch (Exception ex)
{
AssociatedObject.Children.Add(new TextBlock { Text = ex.Message });
}
}
Maximum width and height of dropped object can also be set on the behavior:

Copy / Paste
You probably have a lot of clipart laying stored on the disk somewhere, and you might have also created your own. Wouldn’t it be nice if you could add it to the doodle mix? This last feature will show how to transfer objects from Expression Design over to the doodling canvas by using the Copy/Paste Silverlight 4 feature. The feature is – again, you guessed it – wrapped into a behavior.
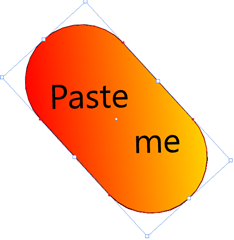
To try the PasteAsChildBehavior, create a drawing in Expression Design:
 … hit Ctrl+Shift+C (Edit | Copy XAML), then click the Paste button in the doodling application – the image will be added to the background.
The behavior implementation is, again, very straightforward:
public class PasteAsChildAction : TriggerAction<Panel>
{
protected override void Invoke(object o)
{
string text = Clipboard.GetText();
if (string.IsNullOrWhiteSpace(text))
{
return;
}
UIElement element = XamlReader.Load(text) as UIElement;
if (element != null)
{
AssociatedObject.Children.Add(element);
}
else
{
AssociatedObject.Children.Add(new TextBlock { Text = text });
}
}
}
The first line gets the text content of the clipboard, If there is any, the behavior tries to deserialize it into the UIElement and adds it to associated panel’s Children collection. If that fails, a simple TextBlock is added.
Dude, where’s my codebehind?
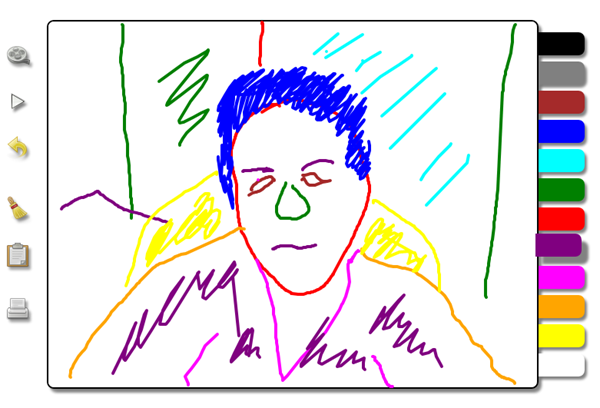
We now have a working doodling application. Having a pen tablet as the input device, my 3yo simply loves to play with it. Here’s a quick hand-traced image of myself, with Webcam capture turned off afterwards. 
With Silverlight 4 features wrapped into behaviors, there’s no code left in main page’s codebehind. I put the printing logic into the ViewModel to show the new commanding options for MVVM developers, but even printing could be wrapped into a PrintAction – a sample of that one is provided with the source code (see the link to source code below).
Review of behaviors, written for this article:
DrawingBehavior turns any Grid into a drawing canvas.
PanelDropBehavior turns graphic files, dropped over the attached panel, into nice images.
PasteAsChildAction turns a valid XAML object construct into an element and adds it to the attached panel.
PrintAction prints the attached element;
WebCamBehavior turns any Shape into a camera capturing canvas.
Again, what was done in this article, is just a starting point. Many more features are being added to the application, but are not necessarily Silverlight 4 related.
Now excuse me, I have to go; my kids have been waiting patiently for their turn to draw on the computer…
Try Camdoodle for yourself
Source code is available to download from here.