In the first article of this series on background processing in Windows 8, we looked at how applications in Windows 8 execute. We learned that Windows itself is taking care of the process lifecycle instead of the user and that it is the job of the developer to include code that saves state so that the user isn’t aware of the fact that the application gets suspended or terminated by the system. Understanding this new lifecycle is vital in learning how we’ll need to write code that runs in the background: an application that’s not in the foreground (running as the main application) isn’t capable of executing any code. The latter is something we used to have in Windows.
In this second part, we’re going to learn how we can extend applications with background tasks, so that they can execute code in the background. Don’t expect this feature to be related to a Windows Service! We’ll learn that while it’s possible to execute code in the background, the amount (in terms of time) that the code can execute is pretty limited.
Background processing options in Windows 8
Before we take a look at how we can create background tasks, it’s a good idea to give an overview of the possible options we have to write code that executes when the application isn’t in the foreground.
First, there’s a difference between client and server-side background processing. It may seem weird, but it is possible to have background processing happening on the server. Remember that an application can’t run any code when it’s not in the foreground. But what if this application needs to show an update on a tile or notify the user about an incoming message via IM? If the server-side permits (in other words, if we are capable of changing the server-side code), we can extend that server-side to send push notifications in combination with WNS (Windows Notification Service) and register our application to receive these. These will be shown (in the tile, as a badge or as a toast message) even if the application isn’t running as the main app on screen. So while they’re not a real form of running code in the background on the system, push notifications can be seen as a way to do some background processing. In fact, this is Microsoft’s preferred way of doing this; however, we know that this option will not be enough for all scenarios, so we need more flexibility on the client.
Secondly, there’s background processing on the client. In this area, we have a couple of options:
- The first option is a regular background task. This is the focus of this article. With regular background tasks, we extend our application with code that we register to run in the background.
- The second option is writing a lock screen app. Lock screen apps are apps that are permitted to run on the lock screen and even send updates to that lock screen. When the user places an application on the lock screen, he indicates that this application is important for him, and this is a signal to Windows that this application’s background code shouldn’t be too constrained. We’ll learn about the constraints that apply on background tasks soon. Lock screen applications will be the focus of the next articles.
- It’s also possible to write code that downloads or uploads files when the application isn’t running. Transferring files really isn’t easy when the application gets suspended when not in the foreground. A specific API, the background transfer API, is available to do this.
- Finally, applications can also register to play audio in the background. This is otherwise another limitation for applications since we wouldn’t be able to play audio while not in the foreground. There’s another API available for this, and we’ll learn about this API in a later article as well.
But first things first, let’s start by looking at creating a regular background task.
Creating a background task
As mentioned before, we can “extend” a Windows 8 application to support background processing by including a background task. A background task is nothing more than a class that implements a specific interface and gets registered with the system to run when a specific event is taking place.
Take a look at the following diagram.

The code we want to execute in the background is located in the MyBackgroundTask class. This class implements an interface called IBackgroundTask. This interface is pretty simple: it has just one method: Run. It’s the code in this very method that will execute when the background task runs. The background task should also be in a separate project.
From our main application, we need to create a reference to the background task project and also make some manifest changes. In the main app also, we need to write code using the BackgroundTaskBuilder class. Using this class, we can register the background task with the system.
But before we look at that in more detail, notice there’s 2 other blocks floating around the BackgroundTaskBuilder: Trigger and Condition. What are these?
Triggers
We’re used to a Windows environment where a lot of things are happening. The thing with a regular background task in Windows 8 is that this code just can’t execute when it wants. The registration for the execution of the background task is done using a trigger. This means that the code can only execute when a trigger in the system is firing. Each background task should be registered with the system using such a task. It’s possible to register the same background task more than once with different triggers.
Below you can see a list of triggers available in WinRT.
- SystemEventTrigger
- InternetAvailable
- NetworkStateChange
- TimeZoneChange
- UserPresent
- …
- MaintenanceTrigger
- TimeTrigger *
- Network-related triggers *
- ControlChannelTrigger *
- PushNotificationTrigger *
The once that have an asterisk next to their name are not usable for regular background tasks, they are part of the lock screen API that we’ll learn later. So that effectively means that we can only run background tasks with events such as NetworkStateChange, UserPresent… Indeed, very limited!
Conditions
Although it seems that triggers are already limiting the number of times we can execute code, we can also even apply a condition. It might seem useless but they have their purpose. We’ll see later that background tasks can only run for a limited amount of time (there are constraints in place that basically limit the execution time of the task). The condition can help us with this. For example, we can add an “InternetAvailable” condition so that instead of wasting our allocated time on contacting a service if no internet is available, we check it first with the condition.
Below you can see a list of available conditions:
- InternetAvailable
- InternetNotAvailable
- UserNotPresent
- UserPresent
- SessionConnected
- SessionDisconnected
Let’s look at a demo.
As mentioned before, we need to start by creating a separate project for our background task. In this case, this is the Tasks project which contains a class, MyBackgroundTask. This class implements the IBackgroundTask interface. The code in the Run method will run when the background task runs.
public sealed class ReportBackgroundTask : IBackgroundTask
{
volatile bool cancelRequested = false;
BackgroundTaskDeferral deferral = null;
uint progress = 0;
IBackgroundTaskInstance backgroundTaskInstance = null;
public async void Run(IBackgroundTaskInstance taskInstance)
{
backgroundTaskInstance = taskInstance;
taskInstance.Canceled += taskInstance_Canceled;
deferral = taskInstance.GetDeferral();
List<Report> allReports = await ReadAllXmlReports();
}
private async Task<List<Report>> ReadAllXmlReports()
{
...
}
}
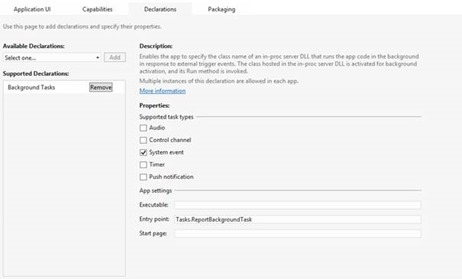
In the main application, we need to create a reference to the background task project. Next, we need to make some manifest changes. In the application manifest, we need to add a Background Task declaration and specify what is the name of the task (namespace + class name).
Also, we need to indicate that we are going to trigger the task using a System event. Notice we are not saying which event trigger this will be, this is done using code.

Now in the code of the application, we need to use the BackgroundTaskBuilder class to register our background task. We specify which trigger we want to register our task with and also indicate if we want to add one or more conditions on the task.
private void RegisterBackgroundTask()
{
SystemTrigger internetAvailableTrigger =
new SystemTrigger(SystemTriggerType.InternetAvailable, false);
SystemCondition internetAvailablecondition =
new SystemCondition(SystemConditionType.InternetAvailable);
BackgroundTaskRegistration task =
BackgroundTaskHelper.RegisterBackgroundTask
("Tasks.ReportBackgroundTask",
"ReportBackgroundTask",
internetAvailableTrigger,
internetAvailablecondition);
StatusTextBox.Text += "Task registered\n";
task.Progress += task_Progress;
task.Completed += task_Completed;
}
...
class BackgroundTaskHelper
{
public static BackgroundTaskRegistration RegisterBackgroundTask(string taskEntryPoint, string name, IBackgroundTrigger trigger, IBackgroundCondition condition)
{
var builder = new BackgroundTaskBuilder();
builder.Name = name;
builder.TaskEntryPoint = taskEntryPoint;
builder.SetTrigger(trigger);
if (condition != null)
{
builder.AddCondition(condition);
}
BackgroundTaskRegistration task = builder.Register();
return task;
}
public static void UnregisterBackgroundTasks(string name)
{
foreach (var task in BackgroundTaskRegistration.AllTasks)
{
if (task.Value.Name == name)
{
task.Value.Unregister(true);
}
}
}
}
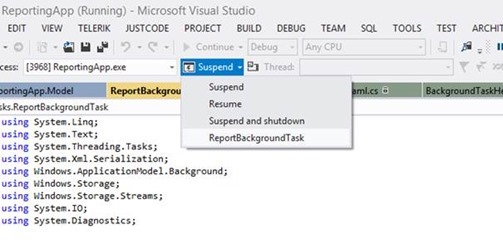
At this point, the task is registered. We can run and debug the task from Visual Studio. Simply run the main application and then go to the Debug Location toolbar, select your background task and it will run. If it’s not listed here, you have missed a step and therefore can’t debug the task.

When you debug the task, you’ll see that the code isn’t running any async tasks. For this to work, we need to add a deferral in the background task code. Otherwise, async operations are not awaited. In the following code, you can see the implementation of the ReadAllXmlReports() method which now uses the deferral to enable the execution of async code from the background task.
private async Task<List<Report>> ReadAllXmlReports()
{
backgroundTaskInstance.Progress = 0;
Debug.WriteLine("ReadAllXmlReports starting");
StorageFolder storageFolder = ApplicationData.Current.LocalFolder;
List<Report> reports = new List<Report>();
List<ReportingService.Report> serviceReports = new List<ReportingService.Report>();
try
{
IReadOnlyList<StorageFile> files = await storageFolder.GetFilesAsync();
//let's divide 50% of the progress over the amount of files
int fileCount = files.Count;
uint interval = (uint)Math.Round((double)(50 / fileCount));
foreach (var file in files)
{
backgroundTaskInstance.Progress += interval;
Debug.WriteLine("Reading report");
IInputStream inputStream = await file.OpenReadAsync();
XmlSerializer xmlSerializer = new XmlSerializer(typeof(Report));
Report report = (Report)xmlSerializer.Deserialize(inputStream.AsStreamForRead());
reports.Add(report);
inputStream.Dispose();
Debug.WriteLine("Report read");
}
Debug.WriteLine("ReadAllXmlReports finished");
ConvertReportsToServiceReports(reports, serviceReports);
backgroundTaskInstance.Progress = 75;
Debug.WriteLine("Conversion done");
Debug.WriteLine("Service communication started");
ReportingService.ReportingServiceClient reportingServiceClient = new ReportingService.ReportingServiceClient();
bool result = await reportingServiceClient.UploadReportsAsync(serviceReports);
backgroundTaskInstance.Progress = 100;
Debug.WriteLine("Service communication finished");
return reports;
}
catch (FileNotFoundException ex)
{
return null;
}
finally
{
deferral.Complete();
}
}
Summary
In this second article, we’ve covered basic background tasks in Windows 8. In the following articles, we’ll cover lock screen apps and their limitations.
About the author
Gill Cleeren is Microsoft Regional Director, Silverlight MVP, Pluralsight trainer and Telerik MVP. He lives in Belgium where he works as .NET architect at Ordina. Gill has given many sessions, webcasts and trainings on new as well as existing technologies, such as Silverlight, ASP.NET and WPF at conferences including TechEd, TechDays, DevDays, NDC Oslo, SQL Server Saturday Switserland, Silverlight Roadshow in Sweden, Telerik RoadShow UK… Gill has written 2 books: “Silverlight 4 Data and Services Cookbook” and Silverlight 5 Data and Services Cookbook and is author of many articles for magazines and websites. You can find his blog at www.snowball.be. Twitter: @gillcleeren