Welcome to the second part of this article series on what’s new in the Windows 8.1 update for developers. In the first part, we’ve spent some time looking at the new features, mostly from an end-user’s perspective. We haven’t seen any code yet. That’s about to change with this second part.
The goal of this article is showing you the new stuff in XAML and WinRT. The WinRT library has been extended with a great deal of extra classes and features that allow compelling experiences. Part of all that is of course XAML, in which a huge number of extra controls has been added.
What’s new in XAML
The XAML/C# combination is the preferred way of building apps for the Windows 8 store. A huge part of the apps currently in the Store has been built using XAML and C#. With the initial release of Windows 8, Microsoft spent a lot of effort on the HTML and JavaScript libraries, which resulted in a number of controls only being available for HTML/JavaScript developers and XAML developers not getting them out-of-the-box. We had to resort to external libraries (one of the important ones being the Callisto library by Tim Heuer) to get some extra controls for our apps to use.
With Windows 8.1, this has changed quite dramatically: a huge number of extra controls has been added in XAML, bringing the 2 UI languages (XAML and HTML) on par. I’m not going to give you an overview of all XAML controls, since we already have an article on SilverlighShow that shows a lot of new controls. I’m instead going to continue where Andrea in his article left of, explaining you some interesting facts and controls.
WebView improvements
The WebView may have caused you some headache in the past. With Windows 8, this control had a bug (or was it a feature…?) that it always wanted to be the top-level control. That means that if you had a WebView on your page and an AppBar on there as well, the AppBar would never appear over the WebView, since the latter always showed as the top-level. Quite annoying, isn’t it?
This little thing may not seem like a big deal, but for some apps that perhaps use a WebView for integrating a web experience with an app experience, this is important! Notice in the screenshot that the AppBar (in this case, it’s a CommandBar even) can sit perfectly on top of a WebView.

The changes for the WebView don’t stop there though. Another improvement is that we now can load HTML from more sources. Previously with Windows 8, we could load HTML using a URI (using the Navigate() method), using content from the app package or by passing the HTML and then navigating to it using NavigateToString(). In Windows 8.1, the WebView can now also load HTML from the Application Data API folders (the local and temporary ones). This way, we can create an app that perhaps downloads a ZIP file which contains HTML files, unpacks them into a sub-folder of the Local storage folder (ms-appdata:///local) and from there, reads out the HTML files using the WebView.
In the code below, you can see how we are reading out some HTML located in a subdirectory of the Local Storage folder. We can only get to the HTML file by specifically passing the URL as the parameter for the Navigate() method.
1: string url = "ms-appdata:///local/Htmls/test.html";
2:
3: MyWebView.Navigate(new Uri(url));
Furthermore, the WebView has been enhanced to support the following as well:
- Taking a screenshot of the content of the WebView and saving it to a local image (for example, a png file). This is supported by using the WebView’s CapturePreviewToStreamAsync() method
- More information on the event lifecycle of the loaded page becomes available for the app using it through new events such as NavigationStarting, ContentLoading, DOMContentLoaded and NavigationCompleted. This gives the surrounding app more options to display for example loading icons while the page is loading
- Notifying the app about “changes” in the HTML. Suppose the app needs to be notified about the user completing a field in the HTML page. We can use ScriptNotify to enable this event-raising in the app. The page can send back some data such as a string with this as well.
There are some other (mostly less important) changes made to the WebView API, check out the MSDN page for this control if you want to read all the supported items: http://msdn.microsoft.com/en-us/library/windows/apps/windows.ui.xaml.controls.webview.aspx
Data binding improvements
Data binding has been one of my favourite features in XAML for years. When Windows 8 was released, some interesting features we had with Silverlight weren’t available yet. In fact, I always compared the Windows 8 data binding options to be on-par with only Silverlight 3. This means that a lot of cool features we got in Silverlight 4 and 5 were still missing.
Windows 8 brings some new options, mostly things that we got with Silverlight 4. More specifically, we now have support for TargetNullValue, FallbackValue and UpdateSourceTrigger in Windows 8.1. Let’s take a look at these in a bit more detail.
FallbackValue
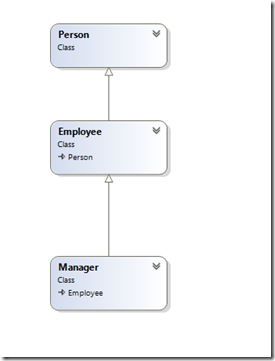
Assume the following, very simple class structure:

Assume that we have the following UI.
1: <Grid>
2: <Grid.RowDefinitions>
3: <RowDefinition Height="50"></RowDefinition>
4: <RowDefinition Height="50"></RowDefinition>
5: <RowDefinition Height="50"></RowDefinition>
6: <RowDefinition Height="50"></RowDefinition>
7: <RowDefinition Height="50"></RowDefinition>
8: </Grid.RowDefinitions>
9: <Grid.ColumnDefinitions>
10: <ColumnDefinition Width="200"></ColumnDefinition>
11: <ColumnDefinition Width="200"></ColumnDefinition>
12: </Grid.ColumnDefinitions>
13: <TextBlock Text="First name" Grid.Row="0"></TextBlock>
14: <TextBlock Text="Last name" Grid.Row="1"></TextBlock>
15: <TextBlock Text="Function" Grid.Row="2"></TextBlock>
16: <TextBlock Text="Employee badge" Grid.Row="3"></TextBlock>
17: <TextBlock Text="Company car type" Grid.Row="4"></TextBlock>
18: <TextBox Text="{Binding FirstName}" Grid.Row="0" Grid.Column="1"></TextBox>
19: <TextBox Text="{Binding LastName}" Grid.Row="1" Grid.Column="1"></TextBox>
20: <TextBox Text="{Binding EmployeeBadgeId}" Grid.Row="2" Grid.Column="1"></TextBox>
21: <TextBox Text="{Binding Function}" Grid.Row="3" Grid.Column="1"></TextBox>
22: <TextBox Text="{Binding CompanyCarType}" Grid.Row="4" Grid.Column="1"></TextBox>
23: </Grid>
If we now bind to a Person instance, we’ll get a lot of binding errors, as can be seen in the screenshot below. It’s quite logical we are getting these, since we’re binding to properties that don’t exist, which will logically result in a binding error.

We can now make use of the FallBackValue property. The value we specify in a binding for this property will be shown when the binding fails (for whatever reason that may be).
1: <TextBox Text="{Binding FirstName}" Grid.Row="0" Grid.Column="1"></TextBox>
2: <TextBox Text="{Binding LastName}" Grid.Row="1" Grid.Column="1"></TextBox>
3: <TextBox Text="{Binding EmployeeBadgeId, FallbackValue='Not an employee'}" Grid.Row="2" Grid.Column="1"></TextBox>
4: <TextBox Text="{Binding Function, FallbackValue='Not an employee'}" Grid.Row="3" Grid.Column="1"></TextBox>
5: <TextBox Text="{Binding CompanyCarType, FallbackValue='Not a manager'}" Grid.Row="4" Grid.Column="1"></TextBox>
The following will now display. Note that we could have gotten the same result by using a converter. The FallbackValue is just a bit of a shortcut in order not to have to write a converter.
TargetNullValue
Assume now that we are binding to a value which evaluates to null (the Manager hasn’t received a company car sadly).
1: Manager m = new Manager();
2: m.FirstName = "Gill";
3: m.LastName = "Cleeren";
4: m.Function = "Director";
5: m.EmployeeBadgeId = "12345";
6: m.CompanyCarType = null;
We can again display a message of choice by using the TargetNullValue as follows:
1: <TextBox Text="{Binding CompanyCarType, FallbackValue='Not a manager', TargetNullValue='No company car for this manager'}" Grid.Row="4" Grid.Column="1"></TextBox>
The result is shown below.

The TargetNullValue is another property on the Binding new in 8.1. It allows us to specify what has to happen when the property we’re binding too evaluates to null.
UpdateSourceTrigger
The last new property we’re getting related to data binding is the UpdateSourceTrigger. Previously, when using a two-way binding, the source was always updating automatically (so when the value in the UI was changed by the user, the source also updated). UpdateSourceTrigger can change that. When we set it to Explicit, we can specify when we want the update of the source to take place.
Take a look at the following XAML code. Notice that the Mode for the binding has now been set to TwoWay and the UpdateSourceTrigger is Explicit. This means that although the binding is TwoWay, changing the value won’t happen directly anymore.
1: <TextBox Name="CompanyCarTextBox" Text="{Binding MyManager.CompanyCarType, Mode=TwoWay,
2: FallbackValue='Not a manager', TargetNullValue='No company car for this manager',
3: UpdateSourceTrigger=Explicit}" Grid.Row="4" Grid.Column="1"></TextBox>
Instead, the value will now only update when we want it too. We can do this using the following code.
1: private void UpdateButton_Click(object sender, RoutedEventArgs e)
2: {
3: var expression = CompanyCarTextBox.GetBindingExpression(TextBox.TextProperty);
4: expression.UpdateSource();
5: }
The other values for UpdateSourceTrigger are Default and PropertyChanged. Most often, PropertyChanged is the default and is actually the same as we had previously.
RenderTargetBitmap
We will close this article by looking at another UI related class in WinRT namely the RenderTargetBitmap. This class is one of my favourite additions to Windows 8.1 since it enables a lot of cool scenarios, such as a meme generator application.
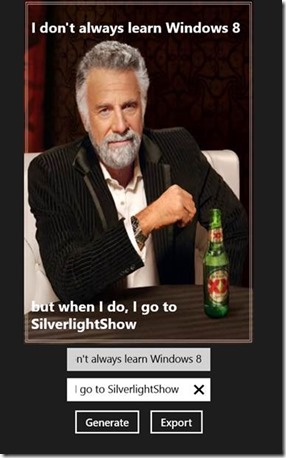
The RenderTargetBitmap class enables us to capture just any XAML element and export it to an image, for example a *.png that we then can save to the local disk. Since the XAML element itself can be a container element as well (like a Grid), it’s perfectly possible to allow the user to create an interface (a meme, a Christmas card…) and then export this to a physical file from the app using a FileSavePicker. Let’s take a look at how this controls works. We’ll build a very basic meme generator, based on the Most Interesting Man meme, as shown below.

For the XAML, take a look at the code for the article. We’ll focus on the code here.When clicking on the Export button, we are first instantiating the RenderTargetBitmap. It is passed through the RenderAsync method, the name of the element we want to export. Once rendered using the async RenderAsync, we use the GetPixelsAsync to get access to the pixels that were rendered.
1: RenderTargetBitmap renderTargetBitmap = new RenderTargetBitmap();
2: await renderTargetBitmap.RenderAsync(MemeGrid);
3: var pixelBuffer = await renderTargetBitmap.GetPixelsAsync();
After this, we can ask the user to select a location to save the file using a FileSavePicker.
1: var fileSavePicker = new FileSavePicker();
2: fileSavePicker.DefaultFileExtension = ".png";
3: fileSavePicker.FileTypeChoices.Add(".png", new List<string> { ".png" });
4: fileSavePicker.SuggestedStartLocation = PickerLocationId.PicturesLibrary;
5: fileSavePicker.SuggestedFileName = "Meme.png";
6:
7: var saveFile = await fileSavePicker.PickSaveFileAsync();
With this in place, we can now write the image pixels to the selected file. We first get in the StorageFile and open it. Then we create the encoder and pass it some values to indicate the parameters for the image creation (image size, DPI…). Finally, the FlushAsync will flush the image data to the physical file. We now have a saved image on disk on the selected location!
1: if (saveFile != null)
2: {
3: using (var fileStream = await saveFile.OpenAsync(FileAccessMode.ReadWrite))
4: {
5: var imageEncoder = await BitmapEncoder.CreateAsync(BitmapEncoder.PngEncoderId, fileStream);
6:
7: imageEncoder.SetPixelData(
8: BitmapPixelFormat.Bgra8,
9: BitmapAlphaMode.Ignore,
10: (uint)renderTargetBitmap.PixelWidth,
11: (uint)renderTargetBitmap.PixelHeight,
12: DisplayInformation.GetForCurrentView().LogicalDpi,
13: DisplayInformation.GetForCurrentView().LogicalDpi,
14: pixelBuffer.ToArray());
15:
16: await imageEncoder.FlushAsync();
17: }
18: }
Summary
In this second part, we looked at some interesting, new aspects from XAML and we started looking at some new classes part of WinRT as well. The next article in this series will build on this, exploring some more interesting classes in the framework. I hope to see you there as well!
About the author
Gill Cleeren is Microsoft Regional Director, Silverlight MVP, Pluralsight trainer and Telerik MVP. He lives in Belgium where he works as .NET architect at Ordina. Gill has given many sessions, webcasts and trainings on new as well as existing technologies, such as Silverlight, ASP.NET and WPF at conferences including TechEd, TechDays, DevDays, NDC Oslo, SQL Server Saturday Switzerland, Silverlight Roadshow in Sweden, Telerik RoadShow UK… Gill has written 2 books: “Silverlight 4 Data and Services Cookbook” and Silverlight 5 Data and Services Cookbook and is author of many articles for magazines and websites. You can find his blog at www.snowball.be. Twitter: @gillcleeren