Welcome to what is already part 4 in this article series on working with services from Windows 8 applications. We started out this series by looking at how Windows 8 apps can integrate with services, including WCF, REST and ASMX services. In the previous part, we've started our detour by looking at how we can upload and download external data using the background transfers in Windows 8. In this very article, we continue our little detour by looking at how tiles can interact with the outside world. This way, they can show up-to-date information and engage the user to start your application more often.
The need for updating tiles
In a previous article (that can be found here) we've taken an extensive look at how tiles work and how we can update them from code. That means that for the update of the tile to work, the application has to run. If the user isn't running the app, it can’t update its tile. For some scenarios, that’s perfect. Think of a book reading app you could build: every time the user turns a page, you as the developer could update the tile to reflect the current position in the book your end-user is reading.
But other scenarios aren’t covered with this solution. Take for example a weather application. If you want to show the latest weather forecast in the tile of your weather app, it’s probably not going to be a very good experience if the user only gets an update if he starts the app. The tile would be showing outdated weather information. This can be solved by making the tile more intelligent, more interactive. This we can achieve in two ways.
A first model is a pull-model. In this model, known as a periodic tile update, the tile will perform a GET every so often to a service endpoint which retrieves some XML. This XML is the same XML as we already know from regular tile updates. For some scenarios, this solution is perfect. Assume again you’re building that weather application we’ve just mentioned. It’s certainly OK to check for an updated forecast every 30 minutes or so. Again, not all scenarios are covered with this solution.
A second model is a push-model. Using so-called push notifications, updates can be sent from the cloud to a device that will then update an application tile. In this scenario, no request was made from the client; it was purely the server-side that initiated the update. This solution works perfect for breaking news updates, stock updates and much more.
Let’s now look at these two models in more detail. We’ll start with the easiest one, periodic tiles.
Creating periodic tiles
As mentioned in the previous paragraph, a periodic tile uses a pull mechanism. In this model, from application code, we specify a URI where the tile can get updated versions of its XML. It thus requires us to build a service that returns some plain XML (not wrapped in a SOAP message!!). This service endpoint is then passed to the tile. The OS makes sure that periodic polls are performed so that updated information is available in the tile.
Periodic tile updates don’t support being queued. This means that it’s not possible to specify that the tile should flip between 5 different XML’s it got back from the service. The service can however be http or https. Should the service not be available at the time the polling is performed, nothing happens: the tile will not update and a new poll is performed after the given interval.
Let’s create a small application that uses periodic tile updates. From Visual Studio 2012, create a new app and name it MyPeriodicTiles. First, we are going to create the service that returns the XML. Note that this service should be returning the exact template code, not surrounded by extra XML. To achieve this, we have to return an XElement. Returning a string will not give a correct result. The service contract is defined as follows.
[ServiceContract]
public interface IWeatherService
{
    [WebGet(UriTemplate="/GetWeather/{zip}")]
    [OperationContract]
    XElement GetWeather(string zip);
}
The code for the service is shown below.
public XElement GetWeather(string zip)
{
    var xmlPath = HostingEnvironment.MapPath("~/XMLTemplates/WeatherTile.xml");
    var xml = XElement.Load(xmlPath);
    foreach (var binding in xml.Element("visual").Elements("binding"))
    {
        var textlist = binding.Elements("text").ToList();
        switch (zip)
        {
            case "12345":
                textlist[0].Value = "London";
                textlist[1].Value = "17° and rain";
                break;
            case "98765":
                textlist[0].Value = "Paris";
                textlist[1].Value = "15° and sun";
                break;
        }
    }
    return xml; ;
}
One thing to note here is that for this REST service to work, we need some changes in config code as well:
<system.serviceModel>
  <behaviors>
    <endpointBehaviors>
      <behavior name="webBehavior">
        <webHttp/>
      </behavior>
    </endpointBehaviors>
    <serviceBehaviors>
      <behavior name="">
        <serviceMetadata httpGetEnabled="true" httpsGetEnabled="true" />
        <serviceDebug includeExceptionDetailInFaults="true" />
      </behavior>
    </serviceBehaviors>
  </behaviors>
  <services>
    <service name="XmlService.WeatherService">
      <endpoint address="" behaviorConfiguration="webBehavior" binding="webHttpBinding" bindingConfiguration="" contract="XmlService.IWeatherService"/>
    </service>
  </services>
  <serviceHostingEnvironment aspNetCompatibilityEnabled="true"
      multipleSiteBindingsEnabled="true" />
</system.serviceModel>
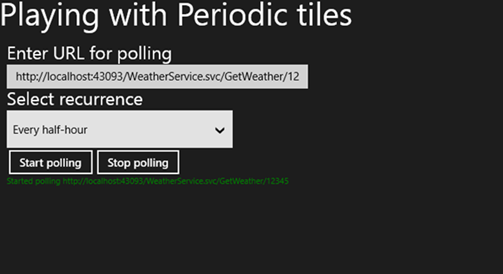
With the service running (you can test it from your browser), we can now look at the client app. The XAML for this application is pretty basic. It allows us to enter the URL for the service as well as select the recurrence of updates we want. A screenshot of the interface is shown next.

Note that these occurrences listed here are part of an enumeration, the PeriodicUpdateRecurrence. It contains the possible update intervals:
// Summary:
// Specifies the time period for subsequent polls of the tile or badge data
// source for new content.
[Version(100794368)]
public enum PeriodicUpdateRecurrence
{
// Summary:
// Poll every half an hour.
HalfHour = 0,
//
// Summary:
// Poll every hour.
Hour = 1,
//
// Summary:
// Poll every 6 hours.
SixHours = 2,
//
// Summary:
// Poll every 12 hours.
TwelveHours = 3,
//
// Summary:
// Poll once a day.
Daily = 4
}
That effectively means that we can’t pass just any interval we want.
Let’s now register the tile to update from our service. The code for this is shown below. Essentially, the TileUpdater has a StartPeriodicUpdate method, to which we can pass the interval and of course the URI we need to poll.
private void StartPollingButton_Click_1(object sender, RoutedEventArgs e)
{
    String polledUrl = UrlTextBox.Text;
    PeriodicUpdateRecurrence recurrence = (PeriodicUpdateRecurrence)RecurrenceComboBox.SelectedIndex;
    TileUpdateManager.CreateTileUpdaterForApplication().StartPeriodicUpdate(new Uri(polledUrl), recurrence);
    MessageTextBlock.Text = "Started polling " + polledUrl;
}
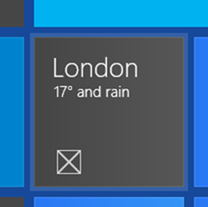
Running the code above shows our tile showing information coming in from the service as can be seen on the screenshot below.

This sample is a perfect fit for using periodic updates. The client doesn’t get updates when something happens though. In the next paragraph, we will dive in the push model, through push notifications.
Creating Push Notifications
Push notifications are notifications which are initiated from the server-side. This means that the service can decide when it needs to update clients. This technique is similar to push notifications we already had in Windows Phone 7.
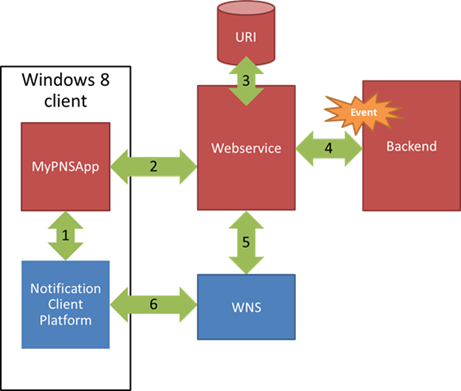
The technology works through something called Windows Notification Service. This cloud-hosted service, managed by Microsoft, takes care of transferring a message (again that same XML template message) to the Windows 8 clients that have expressed interest in it. Let’s take a look at the schema below which shows the flow of a message being transferred to the client.

1. First, the Windows 8 app will register with the Notification Client Platform. Doing so results in receiving the so-called ChannelUri. This unique token identifies this application on this device for this user. It will expire at some point, therefore asking this every time the application starts up is not a bad idea!
2. Our Windows 8 app needs to send to the server-side this ChannelURI. For this, we need to create a service endpoint that accepts this value.
3. The ChannelUri needs to be stored in a database (this could be a SQL Azure database or table storage).
4. At some point, a backend event will trigger (for example, some breaking news occurs). The backend triggers our service code that an update needs to be sent out to clients.
5. Our service creates the template XML code, loops over all the registered clients and sends out the XML to WNS.
6. WNS will communicate with the Notification Client Platform. This receives the XML, figures out which is the attached application and updates the tile or shows a toast notification (depending on the XML contents). Note that this is entirely transparent for the developer; all this is done for us!
To get Push Notifications to work in your application, you need to follow a few steps. As you’ll see, a lot of the work is done by Microsoft, it’s abstracted away from the developer. Using Push Notifications is also free, which means that you can use the service to scale to thousands (why not millions of users) of your application.
Let’s take a look at how we can make this work. The code on the client-side is quite simple, some more work is required on the server-side. Let’s take a look.
We’ll create a new application for this, namely MyPushNotifications. In the application, we are going to request the ChannelUri using the following code:
private async void GetChannelUri()
{
    var channelOperation = await Windows.Networking.PushNotifications.PushNotificationChannelManager.CreatePushNotificationChannelForApplicationAsync();
    ChannelUriTextBox.Text = channelOperation.Uri;
    MessageTextBlock.Text = "Valid until " + channelOperation.ExpirationTime.ToString();
    //upload to service endpoint from here
}
Before we look at the server-side code, we need to change a few things in the Package.appxmanifest. To create a link between the application and WNS, we need to register the application. We can do so via http://manage.dev.live.com/build. The entire process is explained at the mentioned link. The net result should be that you have a new Package name which you can paste into your package. Also keep track of the Client secret and the SID, we’ll need them in a few minutes!

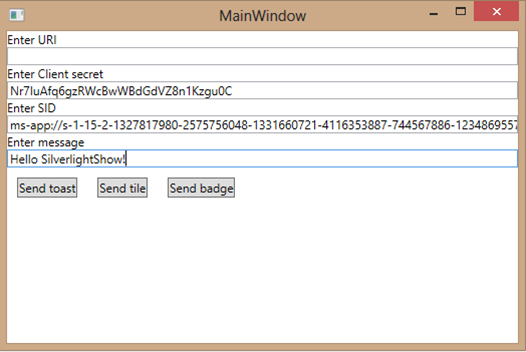
After receiving the URI, we need to contact our service endpoint which can then store the URI. Let’s now focus on the service. Instead of making this a service for this demo, we’ll mimic the behaviour by building a small WPF application which will contain the same code as we would write in the service. For this demo, we are creating a WPF project named PushNotificationsConsole. The application’s UI is shown below.

Let’s take a look at the most important aspects of the code. First, we are going to perform an authorization with WNS from our service code. For this, we need to client secret and the SID we just got back.
public class WnsAuthentication
{
    [DataContract]
    public class OAuthToken
    {
        [DataMember(Name = "access_token")]
        public string AccessToken { get; set; }
        [DataMember(Name = "token_type")]
        public string TokenType { get; set; }
    }
    public static OAuthToken GetAccessToken(string clientSecret, string sid)
    {
        var urlEncodedClientSecret = HttpUtility.UrlEncode(clientSecret);
        var urlEncodedSid = HttpUtility.UrlEncode(sid);
        var body = String.Format("grant_type=client_credentials&client_id={0}&client_secret={1}&scope=notify.windows.com", urlEncodedSid, urlEncodedClientSecret);
        OAuthToken oAuthToken;
        using (WebClient client = new WebClient())
        {
            client.Headers.Add("Content-Type", "application/x-www-form-urlencoded");
            string response = client.UploadString("https://login.live.com/accesstoken.srf", body);
            using (MemoryStream memoryStream = new MemoryStream(Encoding.Unicode.GetBytes(response)))
            {
                DataContractJsonSerializer jsonSerializer = new DataContractJsonSerializer(typeof(OAuthToken));
                oAuthToken = (OAuthToken)jsonSerializer.ReadObject(memoryStream);
            }
        }
        return oAuthToken;
    }
}
Once we have the authorization token, we can create the call. Instead of using a tile update, let’s create a toast notification (note that it’s just some different XML, nothing more).
private string SendToastNotification(PushNotificationsConsole.WnsAuthentication.OAuthToken token)
{
    string type = string.Empty;
    string toastMessage = string.Empty;
    bool result = false;
    try
    {
        type = "wns/toast";
        toastMessage =
            String.Format
               ("<?xml version='1.0' encoding='utf-8'?><toast><visual><binding template=\"ToastText01\"><text id=\"1\">{0}</text></binding></visual></toast>", MessageTextBox.Text);
        byte[] contentInBytes = Encoding.UTF8.GetBytes(toastMessage);
    }
    catch (Exception ex)
    {
        return ex.Message;
    }
}
With the XML to send ready, we can make the call to WNS. To do so, we create a WebRequest that has as its URI the ChannelURI. On this request, we specify that we are going to do a POST as well as attach some required headers. The XML message itself is then written in a byte array. Finally, we write the array into the stream. This is shown in the code below.
var request = (HttpWebRequest)WebRequest.Create(new Uri(UriTextBox.Text));
request.Method = "POST";
request.ContentType = "text/xml";
request.Headers = new WebHeaderCollection();
request.Headers.Add("X-WNS-Type", type);
request.Headers.Add("Authorization", "Bearer " + token.AccessToken);
request.ContentLength = toastMessage.Length;
using (Stream requestStream = request.GetRequestStream())
{
    requestStream.Write(contentInBytes, 0, toastMessage.Length);
}
var response = (HttpWebResponse)request.GetResponse();
return response.StatusCode.ToString();
One thing to note here is that we won’t be notified about the client not being reachable! This means that we are solely responsible for making sure our database is cleaned (based on expiry dates).
With this set up, we can now trigger the sending of a toast notification. The image below shows this message coming in.

We have successfully created a Push Notification!
Summary
In this article, we’ve looked at how we can create tiles that are updated with the application running. We saw that periodic tiles use a pull model, whereas Push notifications can be sent based on a server-side event.
About the author
Gill Cleeren is Microsoft Regional Director (www.theregion.com), Silverlight MVP (former ASP.NET MVP) and Telerik MVP. He lives in Belgium where he works as .NET architect at Ordina (http://www.ordina.be/). Passionate about .NET, he’s always playing with the newest bits. In his role as Regional Director, Gill has given many sessions, webcasts and trainings on new as well as existing technologies, such as Silverlight, ASP.NET and WPF at conferences including TechEd Berlin 2010, TechDays Belgium – Switzerland - Sweden, DevDays NL, NDC Oslo Norway, SQL Server Saturday Switserland, Spring Conference UK, Silverlight Roadshow in Sweden, Telerik RoadShow UK… He’s also the author of many articles in various developer magazines and for SilverlightShow.net and he organizes the yearly Community Day event in Belgium. He also leads Visug (www.visug.be), the largest .NET user group in Belgium. Gill is the author of “Silverlight 4 Data and Services Cookbook”. In 2012, the second edition, “Silverlight 5 Data and Services Cookbook” is released.
You can find his blog at www.snowball.be.
Twitter: @gillcleeren