This article is compatible with the latest version of Silverlight.
1. Introduction
In the previous part of the article I described how to create a simple analog clock in Silverlight using pattern oriented approach. It was focused not so much on Silverlight but on the object oriented programming. In that part I will focus your attention on the process of improving the view (the clock face), making it much better and user-friendly. I will look at little more advance topics such as creating gradient brushes, creating custom figures, making transformations and of course adding movement and interactivity with animations.
So let’s roll up our sleeves and set to work.
Source code
2. Enhancing the clock face
Let’s create two ellipses for start, one on top of the other, each of them smooth blended with LinearGradientBrush and RadialGradientBrush. I will need the help of Microsoft Expression Blend for both of the operations.
Before going into action let’s take a brief look over the structure of the LinearGradientBrush. In its simplest form it creates a transition that takes one color and gradually blends it into a second color. The direction of the transition can be set to horizontal, vertical, or any specified angle. The location where the transition begins can be set to a focal point other than the beginning of the area to be filled in. In the cases where the gradient must be tiled to completely fill an area, options are available to control the displaying of each repeat. These options are confusing for me, so let’s begin with something simple.
The first ellipse is stretched to fill the entire allocated space. In our case it is a square with dimension of 250 pixels. I will use a LinearGradientBrush to fill its background and a RadialGradientBrush to fill its stroke.
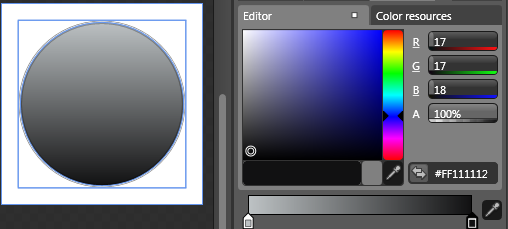
Version 1 of our clock use mainly dark colors, so I will stick to the dark colors scheme. Otherwise all RGB values are absolutely random. The result XAML code is shown on the next figure.
<Ellipse StrokeThickness="5" Stretch="Fill">
<Ellipse.Fill>
<LinearGradientBrush StartPoint="0.5,0" EndPoint="0.5,1">
<GradientStop Color="#FFBDC2C4" />
<GradientStop Color="#FF111112" Offset="1" />
</LinearGradientBrush>
</Ellipse.Fill>
<Ellipse.Stroke>
<RadialGradientBrush>
<GradientStop Color="#FF000000" Offset="0.9" />
<GradientStop Offset="0.99" />
<GradientStop Color="#FF696969" Offset="1" />
</RadialGradientBrush>
</Ellipse.Stroke>
</Ellipse>
The second component of our clock face is again ellipse filled with LinearGradientBrush, but this time with more gradient stops. The ellipse has width and height set to 230, so it is a little smaller than the first one.
The result XAML code can be seen on the next figure.
<Ellipse Width="230" Height="230">
<Ellipse.Fill>
<LinearGradientBrush
StartPoint="0.877, 0.004"
EndPoint="0.231, 1">
<LinearGradientBrush.GradientStops>
<GradientStopCollection>
<GradientStop
Color="#FF020202"
Offset="0" />
<GradientStop
Color="#FF232323"
Offset="0.061" />
<GradientStop
Color="#FF4d4d4d"
Offset="0.066" />
<GradientStop
Color="#FF242424"
Offset="0.5" />
<GradientStop
Color="#FF000000"
Offset="0.505" />
<GradientStop
Color="#FF040404"
Offset="0.827" />
<GradientStop
Color="#FF292929"
Offset="0.966" />
<GradientStop
Color="#FF2e2e2e"
Offset="0.983" />
</GradientStopCollection>
</LinearGradientBrush.GradientStops>
</LinearGradientBrush>
</Ellipse.Fill>
</Ellipse>
When we put the second ellipse on the top of the first one, we’ve got the following result:

A much better clock face, than the first version, isn’t it?
3. Drawing the clock markers
The procedure of drawing the clock markers is the same as the previous version, with the only difference that the process of drawing is done in XAML. In fact, unlike the first article, where almost the whole drawing was made in the procedural code, here I decided to use in the utmost degree the opportunities that XAML offers to us.
But before getting involved in the programming aspect, let’s delve back into some basic mathematics. You all know that a circle is of 360 degrees or 2∏ in radians. There are 60 markers on the face of the clock corresponding to the digits from 0 to 59. To draw them, we need to place each of the markers at same degree from each other, so 360/60 = 6, which means that we need to place each marker 5 degree apart from the other. To position them I use two translations and one rotation. First I translate each marker to the center of the canvas, then I rotate it to the corresponding angle and finally translate them back to their place on the clock face.
A part of the markup used for drawing the clock markers is shown on the next figure.
<Rectangle x:Name="_00" Style="{StaticResource MarkersBig}">
<Rectangle.RenderTransform>
<TransformGroup>
<TranslateTransform X="-1.5" Y="-111.5"/>
<RotateTransform Angle="0"/>
<TranslateTransform X="125" Y="125"/>
</TransformGroup>
</Rectangle.RenderTransform>
</Rectangle>
....
<Rectangle x:Name="_1" Style="{StaticResource MarkersSmall}">
<Rectangle.RenderTransform>
<TransformGroup>
<TranslateTransform X="-0.5" Y="104.25"/>
<RotateTransform Angle="186"/>
<TranslateTransform X="125" Y="125"/>
</TransformGroup>
</Rectangle.RenderTransform>
</Rectangle>
Each marker is a rectangle with dimensions: width equal to 3 pixels and height equal to 8 pixels for the big markers, and respectively width equal to 1 pixel and height equal to 4 pixels for the small markers. Each marker has background filled in white.
<Style x:Key="MarkersBig" TargetType="Rectangle">
<Setter Property="Width" Value="3"/>
<Setter Property="Height" Value="8"/>
<Setter Property="Fill">
<Setter.Value>
<SolidColorBrush Color="White"/>
</Setter.Value>
</Setter>
</Style>
<Style x:Key="MarkersSmall" TargetType="Rectangle">
<Setter Property="Width" Value="1"/>
<Setter Property="Height" Value="4"/>
<Setter Property="Fill">
<Setter.Value>
<SolidColorBrush Color="White"/>
</Setter.Value>
</Setter>
</Style>
So now we have:
4. Enhancing the clock hands
The clock has three hands: one for hours, one for minutes and one for seconds. In the first version of the clock each hand was basically a rectangle, rounded off a little on the corner. And each hand started off positioned at some initial coordinates (they were pointing to twelve noon) and were redrawn whenever an event was thrown from our clock model. Silverlight/WPF has a very powerful animation system and updating the clock hands angle is not the normal way of specifying animations in Silverlight – animations should be declarative, just like our element tree. I will talk more about that later.
Now let’s come back to the clock’s hands drawing. Each hand represents a polygon placed in the center of the clock by setting the Top and Left properties of the parent canvas. The polygon represents series of connected lines that form a closed shape. The big difference with the similar object polyline is that the polygon must be a closed shape. In order to draw a closed hand, we must create a Polygon element and use its Points property to specify the vertices of a shape. A line that connects the first and the last points is automatically drawn. Finally I specify the fill element of the polygon.
<Polygon Name="SecondHand"
Canvas.Top="30" Canvas.Left="124"
Points="0,0 2,0 2,95 0,95">
<Polygon.Fill>
<LinearGradientBrush StartPoint="0,0" EndPoint="1,0">
<LinearGradientBrush.GradientStops>
<GradientStop Offset="0" Color="White" />
<GradientStop Offset="1" Color="DarkGray" />
</LinearGradientBrush.GradientStops>
</LinearGradientBrush>
</Polygon.Fill>
<Polygon.RenderTransform>
<RotateTransform x:Name="secondHandAngle" Angle="0" CenterX="1" CenterY="95"/>
</Polygon.RenderTransform>
</Polygon>
<Polygon Name="MinuteHand"
Canvas.Top="45" Canvas.Left="123"
Points="0,5 2.5,0 1,0 4,5 4,80 0,80">
<Polygon.Fill>
<LinearGradientBrush StartPoint="0,0" EndPoint="1,0">
<LinearGradientBrush.GradientStops>
<GradientStop Offset="0" Color="White" />
<GradientStop Offset="1" Color="DarkGray" />
</LinearGradientBrush.GradientStops>
</LinearGradientBrush>
</Polygon.Fill>
<Polygon.RenderTransform>
<RotateTransform x:Name="minuteHandAngle" CenterX="2.5" CenterY="80" />
</Polygon.RenderTransform>
</Polygon>
<Polygon Name="HourHand"
Canvas.Top="65" Canvas.Left="121"
Points="0,5 3,0 5,0 8,5 8,60 0,60">
<Polygon.Fill>
<LinearGradientBrush StartPoint="0,0" EndPoint="1,0">
<LinearGradientBrush.GradientStops>
<GradientStop Offset="0" Color="White" />
<GradientStop Offset="1" Color="DarkGray" />
</LinearGradientBrush.GradientStops>
</LinearGradientBrush>
</Polygon.Fill>
<Polygon.RenderTransform>
<RotateTransform x:Name="hourHandAngle" CenterX="4.5" CenterY="60" />
</Polygon.RenderTransform>
</Polygon>
So now we have a clock with hands:
5. Adding digits
In the previous version no digits were displayed on the clock face. This time I decided to add them over the clock display. I couldn’t find a way to exactly positioned centered text on a canvas, so in the end I opened the Expression Blend and positioned them approximately. And the result is:
<Grid x:Name="DigitsGrid" Width="250" Height="250">
<Canvas x:Name="DigitsCanvas">
<TextBlock Height="19" HorizontalAlignment="Center" Margin="0,0,0,0" x:Name="tb12" Text="12" VerticalAlignment="Center" Width="19" Canvas.Left="117" Canvas.Top="20" TextWrapping="Wrap" FontSize="12" Foreground="White"/>
<TextBlock Height="19" HorizontalAlignment="Center" Margin="0,0,0,0" x:Name="tb1" VerticalAlignment="Center" Width="19" Canvas.Left="169" Canvas.Top="33.455" Text="1" TextWrapping="Wrap" FontSize="12" Foreground="White"/>
<TextBlock Height="19" HorizontalAlignment="Center" Margin="0,0,0,0" x:Name="tb2" VerticalAlignment="Center" Width="19" Canvas.Left="205" Canvas.Top="69.455" Text="2" TextWrapping="Wrap" FontSize="12" Foreground="White"/>
<TextBlock Height="19" HorizontalAlignment="Center" Margin="0,0,0,0" x:Name="tb3" VerticalAlignment="Center" Width="19" Canvas.Left="218" Canvas.Top="115.455" Text="3" TextWrapping="Wrap" FontSize="12" Foreground="White"/>
<TextBlock Height="17.455" x:Name="tb4" Width="7.629" Text="4" TextWrapping="Wrap" FontSize="12" Foreground="White" Canvas.Left="205" Canvas.Top="164.455"/>
<TextBlock Height="17.455" x:Name="tb5" Width="7.629" Text="5" TextWrapping="Wrap" FontSize="12" Foreground="White" Canvas.Left="169" Canvas.Top="199.455"/>
<TextBlock Height="17.455" x:Name="tb6" Width="7.629" Text="6" TextWrapping="Wrap" FontSize="12" Foreground="White" Canvas.Left="121.629" Canvas.Top="211.455"/>
<TextBlock Height="17.455" x:Name="tb7" Width="7.629" Text="7" TextWrapping="Wrap" FontSize="12" Foreground="White" Canvas.Left="72.629" Canvas.Top="199.455"/>
<TextBlock Height="17.455" x:Name="tb8" Width="7.629" Text="8" TextWrapping="Wrap" FontSize="12" Foreground="White" Canvas.Left="37.629" Canvas.Top="164.455"/>
<TextBlock Height="17.455" x:Name="tb9" Width="7.629" Text="9" TextWrapping="Wrap" FontSize="12" Foreground="White" Canvas.Left="23.629" Canvas.Top="115.455"/>
<TextBlock Height="17.455" x:Name="tb10" Width="7.629" Text="10" TextWrapping="NoWrap" FontSize="12" Foreground="White" Canvas.Left="37.444" Canvas.Top="69.455"/>
<TextBlock Height="17.455" x:Name="tb11" Width="7.629" Text="11" TextWrapping="NoWrap" FontSize="12" Foreground="White" Canvas.Left="72.443" Canvas.Top="33.455"/>
</Canvas>
</Grid>
6. Adding animations
First let’s say in a few words what an animation is. Animations allow you to create truly dynamic user interfaces. They are a core part of the Silverlight/WPF model. Which means that you don’t need to use timers and event handling code to put them into action, as I did in the previous version of the clock. Instead, you can create them declaratively, configure them, and put them into action without writing a single line of a C# code, as I am going to do in the new version of the clock. At first glance, I thought that the property-focused nature of Silverlight animations seems terribly limiting. However, in the process of work I found out that it’s surprisingly capable. In fact, you can create a wide range of animated effects using common properties that every element supports.
There are some things that also should be mentioned. Silverlight animations are time-based. Thus I only need to set the initial state, the final state, the duration and the repetition behavior and Silverlight will calculate the frame rate for me. Silverlight animations can do just one thing: change the value of the property (I am not sure if it has to be a dependency property) over an interval of time.
Now let’s take a look at our clock and animate it. The target is to animate the angle of the RotateTransform for our hands. I will show you two solutions for animating the clock hands.
In the first one I will create a storyboard and make it a resource. After that I will add an animation object to the storyboard:
<Canvas x:Name="HoursHandCanvas" Loaded="HoursHandCanvas_Loaded">
<Canvas.Resources>
<Storyboard x:Name="HoursHandStoryboard">
<DoubleAnimation From="0" To="360" Duration="12:00:00" RepeatBehavior="Forever"
Storyboard.TargetProperty="(Polygon.RenderTransform).(RotateTransform.Angle)"
Storyboard.TargetName="HourHand"/>
</Storyboard>
</Canvas.Resources>
....
</Canvas>
Because the value of the property we are animating (Angle) uses a double, this example uses the double animation object. An animation object specifies what is animated and how the animation behaves. The DoubleAnimation object specifies the following animation:
- Storyboard.TargetProperty="(Polygon.RenderTransform).(RotateTransform.Angle)" – specifies that the Angle property is animated.
- Storyboard.TargetName="HourHand" – specifies which is the object this property is animates (the polygon).
- From="0" To="360" – specifies that the Angle property starts at a value 0 and animates to 360. This will cause another problem, but I will talk about it later.
- Duration="12:00:00" – specifies how long the animation lasts (how fast the hand moves). The structure of the Duration property is “hours:minutes:seconds”, that’s why the duration is 12 hours (one day).
- RepeatBehavior="Forever" – specifies that when the animation starts, it continues indefinitely. In our example the clock will never stop working (of course if we don’t close the hosting page).
Next we need to start the animation. I will do that when the canvas is already loaded. I will attach to the Canvas.Loaded event.
private void HoursHandCanvas_Loaded( object sender, RoutedEventArgs e )
{
this.HoursHandStoryboard.Begin();
}
The second solution excludes the use of procedural code for starting the animation. The animation also can be started in the XAML:
<Canvas Name="clockCanvas" Width="292" Height="493" >
<Canvas.Triggers>
<EventTrigger RoutedEvent="Canvas.Loaded">
<EventTrigger.Actions>
<BeginStoryboard ... />
</EventTrigger.Actions>
</EventTrigger>
</Canvas.Triggers>
<!-- Draw hands here -->
</Canvas>
Both of the solutions have a problem: every time the animation is started the hands might not be fetched to the position that corresponds to the current time of the day. That’s why we need to set the time to the current time – that must be triggered after the animations have actually been started.
this.HoursHandStoryboard.Begin();
this.HoursHandStoryboard.Seek( DateTime.Now.TimeOfDay );
7. Adding chronographic capabilities
Next I decided to make our clock a little more attractive, adding chronographic capabilities to it. The chronograph is a timepiece or watch with both timekeeping and stopwatch functions. Making our clock a stopwatch will be a target of some of the next articles I plan to publish. For now I will add two additional displays. The procedure is absolutely identical to the one already described in the article. The result can be seen on the next picture.
Our clock is almost done; the only think I should add is a digital display. Again I will command the services of Expression Blend. I need one border, rounded off the corners, and a text block to fill the space allocated from the border.
There are two possible solutions for updating the digital display that came to my mind. In the first one our ClockModel class (which is explained in the previous article) will be forced to implement the INotifyPropertyChanged interface. After that I will use a data binding to update the display.
In the second one our AnalogClock should implement the IView interface and should implement the Update method where the display will be updated. The second approach was used in the first version of the clock, that’s why I will stick to it. I need to add a little piece of code. The implementation of the Update method is extremely simple:
private const string DigitalDisplayFormat = "{0} : {1} : {2}";
public void Update( ClockData clockData )
{
tbDigitalDisplay.Text = String.Format(
DigitalDisplayFormat,
clockData.Hours.ToString( "00" ),
clockData.Minutes.ToString( "00" ),
clockData.Seconds.ToString( "00" ) );
}
In the constructor of the control that hosts the clock should be added the following lines of code:
IClockModel clockModel = Clock.Create();
clockModel.ClockData = new ClockData().Update( DateTime.Now );
ClockPresenter presenter = new ClockPresenter( this.AnalogClockControl, clockModel );
presenter.Response += new Callback( this.AnalogClockControl.Update );
clockModel.Start();
Finally we are ready to build the application and see the result.
8. Conclusion
So there we go, a pretty attractive and animated clock display was made with very little effort. I think the differences with the first version are visible. There’s plenty I haven’t covered in both of the articles. The first article was focused on the object oriented programming, but the second one is entirely focused in the programming Silverlight and should give you a basic understanding of Silverlight animation, brushes and transformations. I hope that you have felt the visual capabilities of Silverlight and this has been a helpful introduction.
9. References
http://msdn.microsoft.com/en-us/library/system.windows.media.animation.storyboard.aspx
http://msdn.microsoft.com/en-us/library/system.windows.media.transformgroup.aspx