In the previous article of this series, we wrote our first lines of code for WinRT. The main message was that although WinRT is a new API, we can still use our familiar languages to create Metro style applications. We have used the XAML/C# combination, but it’s perfectly possible to use XAML/VB or XAML/C++ as well. We’ll be using more of the API in the coming articles but in this article, we’ll focus on some specifics around contracts, more specifically, the Search contract. Contracts enable Metro applications to communicate with each other or with Windows itself without there being a hard reference in place.
The code for this article is available here.
Contracts: what are they
You are probably familiar with the term and meaning of a contract. It’s basically an agreement between two parties where they agree on some mutual aspect.
When you use an interface, you’re using a software contract: your interface defines a contract that classes implementing this interface need to oblige to. If they don’t, they are breaking the contract, hence the functionality is not guaranteed.
Windows 8 defines contracts as well. Like with other contracts, they are a way of making sure that the users of the contract will oblige certain rules. In the case of Windows 8, the participants for the contract are the apps: some contracts take place between two applications, mediated by Windows itself, others are between an app and Windows.
Windows 8 defines quite a few contracts. The most important ones are the search contract, the share contract, the settings contract and the App-To-App picker contract. There are more contracts available, but when you start with implementing these in your application, you’ll definitely be adding a good experience to your app. For the other contracts, head over to this page on MSDN.
Now that we have a basic understanding of what a contract is, let’s take a look at how the end-user will experience these contracts. We’ll start our exploration by looking at the search contract.
The Search contract from the end-user perspective
Searching for information is very important in today’s world. We are constantly searching on the web but also locally on our machine/device. During a regular day, I often enter a search query in my Outlook search bar (thank God it still likes searching over 15GB of mails…) or I enter a short string as search query in my start menu. Quite often, I (and countless of users worldwide) rely on search to quickly find the information we need on our machine without remembering where we put it in the first place. The same thing happens when I need to find something in my control panel: when I look for the administrative tools, I don’t start clicking my way to them. Instead, I enter a query and find them, probably faster than when I would have started navigating.
Windows 8 is built around apps. These apps have a lot of information available as well. This information is by default reachable by opening the app and then searching from within the app.
In Windows 8, Microsoft has built in an integrated way of searching. When we enter a search query when we are in the Metro environment, Windows will by default search for apps, settings and files as can be seen on the image below. Note that this search is conducted from within Windows itself (you’ll see why this is important in just a second).
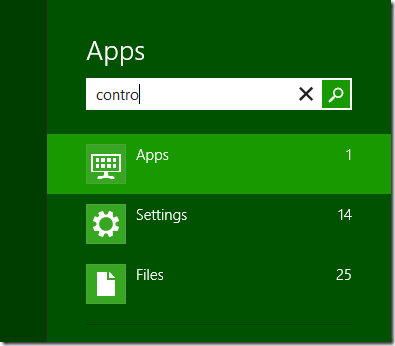
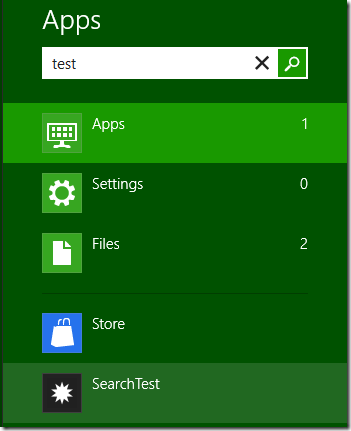
When we select any of the top 3 options, we can see that the list of results is being shown. Here we see results for apps.

Below we see results for files being shown.
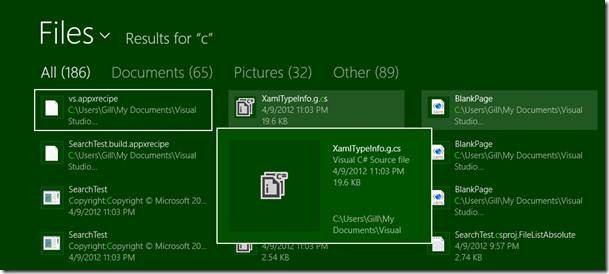
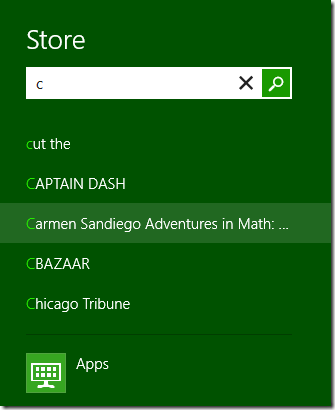
Down at the bottom of the search pane, we see a list of apps. This list is composed out of all the apps that have implemented the search contract. To do so, they have made it clear through a declaration (we’ll see what exactly is a declaration later in this article) that they can be searched from within Windows. When selecting an app (here we have used the Store app), the app will open and we are immediately transported to the search results page. Below, you can see the Store app showing search results. The app was activated through search.

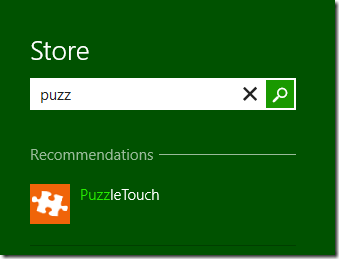
With this app open, we can search again. Notice now that at the top, we are searching within the app. Searching is made consistent all throughout Windows. The active app can now send query suggestions and result suggestions. Query suggestions are returned by the running application to help the end user in finding what he’s probably looking for. Result suggestions are more specific in that they also contain an icon of the search result. Both of these can be implemented through code inside your application.
Below you can see result suggestions.
Let’s now take a look at how we can build an app that implements the search contract.
The Search contract from the developer perspective
If we think of the possible ways of searching we just saw above, we can see the following items to be implemented by the developer to make his application implement the search contract:
- Declare that the application can be search through a declaration
- Write code that reacts to the application being activated ( while it wasn’t running) for search and show the results of that search query
- Write code to accept a search query while it was already running
- Send search suggestions and query suggestions to Windows to be shown in the search pane while it’s running
We’ll now build a sample application that implements the search contract in full in the steps below. Create a new Windows 8 Metro style application and name it SearchTest.
Adding the declaration for search
Metro style apps are using a specific way of letting Windows know about their intentions and capabilities once installed on a user’s device.
By adding one or more capabilities, they are saying that they need to use a specific API for them to run properly on the system. For example, when an application needs to use the webcam, the developer needs to check the Webcam capability. This will then be shown in the Windows store so that the end user can decide on not using the application. Also, while running, the capabilities are checked by the runtime broker.
A declaration is different. It’s a way for the application to say to Windows that it will take part in some operations or contracts. One of the possible declarations is search. By enabling the search declaration, Windows will show your application in the list of possible search targets. We’ll see other declarations being used later in this article series.
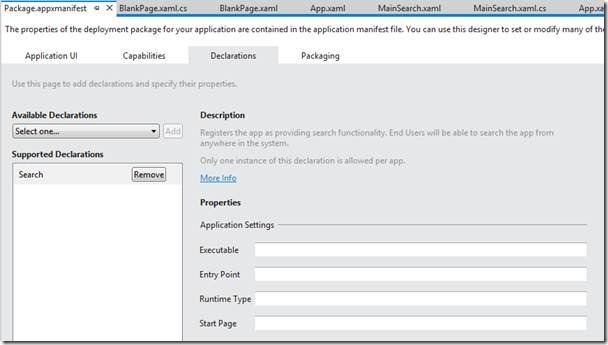
We can enable the declaration in 2 ways. To do things manually, go to the manifest editor by double clicking on the Package.appxmanifest. In the Declarations tab, check Search as shown below.
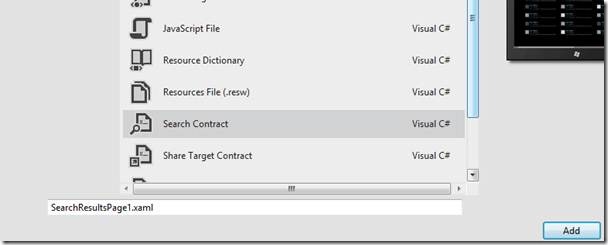
A better way that will save us quite some work is adding a Search contract to the application. To do so, in the Add new item dialog, select Search contract. Files are being updated and added as well as the declaration being enabled for you.
To test things out, let’s run the application now. When selecting the Search charm on the right, the Search pane pops up. Notice that it’s now scoped to search the current running application.
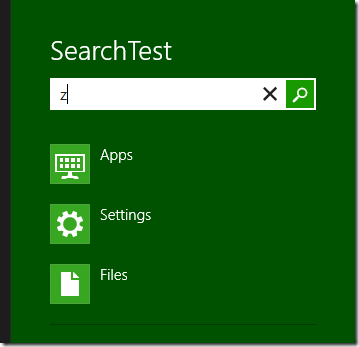
Also, when searching from within Windows, the application is now shown in the list.
Both cases of searching don’t work yet (which is quite logical since we haven’t implemented searching yet). Let’s work on that!
React to search activation
Another things that’s done automatically by the Search contract template, is adding code in the OnSearchActivated() in the App.xaml.cs. Before we look at the code, a word on activation.
A Metro application in Windows 8 can be “started” in several ways. The most normal way is starting the app by tapping/clicking the tile. This triggers the OnLaunched() to be called in the App.xaml.cs. When the app isn’t running though and the user selects the app as the target for his/her search query, the application also executes the OnSearchActivated(). Effectively, the application gets activated for search. Through this event handler, the search query entered by the user is also passed in via the SearchActivatedEventArgs instance. This way, we know what the user wanted to find in our application. The code generated by the template is shown below.
protected override voidOnSearchActivated(Windows.ApplicationModel.Activation.SearchActivatedEventArgsargs)
{
SearchTest.MainSearch.Activate(args.QueryText);
//TODO: Move the following code to OnLaunched to speed up searches when your
// application is already running:
//Windows.ApplicationModel.Search.SearchPane.GetForCurrentView().QuerySubmitted+=
//(sender,queryArgs)=>
//{
// SearchTest.MainSearch.Activate(queryArgs.QueryText);
//};
}
In the first line of the code, what happens is that MainSearch.Activate() event is called. This is code, generated in the MainSearch.xaml.cs (I called my search result page MainSearch here, you can give it any name of course) sets an instance of the MainSearch page through navigation of the application frame as the content of the application. This way, when the application is activated for search, the search results page is navigated to. If we start the application now again, go to Metro, enter a search query and target our application, the application activates and automatically goes to the search result page as you can see below.

In the commented-out code, we see that VS11 is pointing us to the next topic: reacting to queries being submitted with the application running.
Reacting to submitting queries
When the application is running as the main foreground application (that does not include running in snap mode), the user can search by using the search charm the current application. To do so, we as developers need to subscribe to the QuerySubmitted() event. In the constructor of the BlankPage.xaml.cs, we can do so using the code below.
private SearchPanesearchPane;
public BlankPage()
{
this.InitializeComponent();
//Get SearchPane object
this.searchPane=SearchPane.GetForCurrentView();
//Register for SearchPaneQuerySubmitted event
this.searchPane.QuerySubmitted+=searchPane_QuerySubmitted;
}
When we run the application now and hit search (the search is of course scoped to the application since it has the search declaration), the entered query is returned to our application. We are automatically redirected to the event handler of the QuerySubmitted event. In there, we can get hold of the value through the SearchPaneQuerySubmittedEventArgs instance that is passed in, as shown below.
void searchPane_QuerySubmitted(SearchPanesender,SearchPaneQuerySubmittedEventArgsargs)
{
SearchResultTextBlock.Text="You've searched for: " + args.QueryText;
}
Of course, in a real-life application, we can write code to perform a search (perhaps by calling a service) and then redirect the user to the search results page.
Sending query suggestions
An application that is running as the main application in the foreground can send query and result suggestions to Windows. Windows will show a maximum of 5. Note that by default, Windows will also show a search history. This comes for free; we don’t have to develop anything for this. Let’s see how we can make search suggestions work.
The first thing we need to do is registering for the SuggestionRequested event coming in. This event will be raised by Windows when the user starts typing in the search box.
this.searchPane.SuggestionsRequested += searchPane_SuggestionsRequested;
When the event is effectively raised, we need to send suggestions. Just like with queries, the results can come from a service. In this sample code, we have hard-coded the list of possible suggestions. In the SearchPageSuggestionsRequestedEventArgs instance, we add our suggestions to the SearchSuggestionCollection. This list is then shown by Windows. Every time the user types something, this code is again executed. Therefore, be cautious what you place in there!
void searchPane_SuggestionsRequested(SearchPane sender, SearchPaneSuggestionsRequestedEventArgs args)
{
string[] suggestions={"AAA","AAABBB","AAACCC","AAADDD","EEE","FFF","GGG","HHH","III","JJJ","KKK","LLL","MMM","NNN","OOO","PPP","QQQ"};
foreach(string suggestion in suggestions)
{
if(suggestion.StartsWith(args.QueryText, StringComparison.CurrentCultureIgnoreCase))
{
args.Request.SearchSuggestionCollection.AppendQuerySuggestion(suggestion);
}
if(args.Request.SearchSuggestionCollection.Size >= 5)
{
break;
}
}
}
Below we can see the result of the search suggestions being sent by our application.
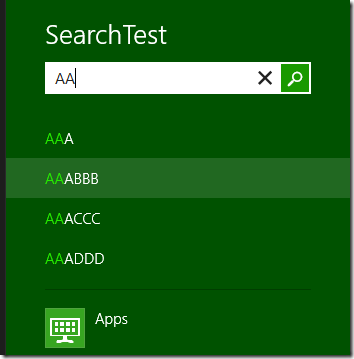
We have successfully implemented the Search contract in our application.
Summary
Implementing the right contracts in your application is vital to its success. The user will come to expect that applications work as prescribed by the OS. In this sample, we saw how we could use WinRT code to implement the search contract in our applications. In the next article, we’ll see how to implement the share contract.
About the author
Gill Cleeren is Microsoft Regional Director (www.theregion.com), Silverlight MVP (former ASP.NET MVP) and Telerik MVP. He lives in Belgium where he works as .NET architect at Ordina (http://www.ordina.be/). Passionate about .NET, he’s always playing with the newest bits. In his role as Regional Director, Gill has given many sessions, webcasts and trainings on new as well as existing technologies, such as Silverlight, ASP.NET and WPF at conferences including TechEd Berlin 2010, TechDays Belgium – Switzerland - Sweden, DevDays NL, NDC Oslo Norway, SQL Server Saturday Switserland, Spring Conference UK, Silverlight Roadshow in Sweden, Telerik RoadShow UK… He’s also the author of many articles in various developer magazines and for SilverlightShow.net and he organizes the yearly Community Day event in Belgium. He also leads Visug (www.visug.be), the largest .NET user group in Belgium. Gill recently published his first book: “Silverlight 4 Data and Services Cookbook” (Packt Publishing). His second book, Silverlight 5 Data and Services Cookbook will be released early 2012. You can find his blog at www.snowball.be.
Twitter: @gillcleeren