In the previous articles of this series, we have touched on quite a few important aspects of Windows 8 application development. In part 6, we looked at tiles. We saw that live tiles are a way of allowing your application to displaying up-to-date information to the end-user while it’s not running. A valid question that I often get is: why isn’t the application running? We’ve had the multi-tasking paradigm for many years now and it’s something we as developers take for granted.
Windows 8 breaks with this “tradition”: a new type of application lifecycle is introduced in Windows 8, entirely managed by the operating system itself. However, it has several places where we as developers need to hook into to build great experiences for our users.
In this article, we’ll take a look at the options we have to manage how our application behaves in combination with the new application lifecycle management. We’ll take a look at executing code in the background as well.
The code for this article can be downloaded here.
Breaking with a tradition
In the last 15-20 years using Windows, we have been used to the fact that applications run in the background, even if they aren’t receiving the full attention of the user. When I’m running Visual Studio and Word together to write this article, I know that Visual Studio is waiting somewhere behind the Word instance for me to interact with it again. I could well have given Visual Studio a task such as compiling a large project and keep typing in Word. The CPU’s time is scheduled so that both processes receive enough CPU time to perform their tasks.
Of course, this results in divided attention of the CPU for all process (even though it’s not always conceived that way). This goes for other resources such as the disk and the network as well.
Also, users are fully responsible for managing the system and its resources. When I once again have too many Visual Studio instances open and my system starts running out of memory, I’m the one that will have to start shutting down some apps. Windows won’t be doing that for me.
With Windows 8, Microsoft is changing this paradigm for Windows 8 apps (in the desktop environment, this doesn’t change). The basic rule in Windows 8 is that the foreground application receives the full attention of the system and therefore gets undivided access to system resources such as the CPU, the disk or the network. By default, only one application is the foreground app (unless we have an application in snap view, where we’ll have 2 apps running at the same time). All other apps running in the Windows 8 environment are suspended, meaning the application is kept in memory but it doesn’t get access to system resources such as CPU, disk or network. The app can return from suspension (it’s being resumed) or it can be terminated (basically the memory is cleared). We’ll take a look at these states in a second.
The most important thing to remember here is that Windows will be managing the lifecycle of the application, not the user. We as developers need to act on events being thrown when the application goes from one state to another. The resulting experience is that the user will not care about saving state or even his work: he switches to another application and will expect that the application saves his document he was working on or the level in the game he was playing.
It’s time to say goodbye to confirmation messages, asking the user if he wants to save his work. It’ll need to be done automatically using the above mentioned state change events.
Let’s look at the life cycle in detail.

The process lifetime in detail
Initially, our application isn’t running. By tapping a tile, the application is launched by the user. The application enters the Running state. At this point, the application is the only running application, it gets access the full system resources. Any other application that might have been running, is suspended.
At some point, the user decides that he wants to launch another application. This results in our application receiving the Suspending event. Our application gets 5 seconds to save all it needs to save. That includes things like state, a document the user was working on or perhaps the location (page) the user was currently on. We should make sure that we save all that’s necessary to be able to reconstruct the same environment again afterwards so that the user is not aware that it might be a different application instance that’s running. Note however that the suspending event will only happen after 5 seconds. This interval is included so that actions such as quickly jumping to the mail client to check if there are any mails, wouldn’t trigger the suspension.
The net result after suspension is that the memory instance of our application remains intact. If the user selects to return to our application and the memory instance isn’t removed, we are returning to the same memory instance of our application. An event is fired, the resuming event. Not every application should be working with this event: it’s useful in scenarios where we perhaps want to rehydrate the data (such as a Twitter app where we’ll download the latest tweets again). A game would probably not benefit from this event.
If the user launches the one application after the other and Windows will basically leave them all intact in memory, at some point, the system will run now on resources (memory). At that point, termination will kick in, deleting the apps from memory that haven’t been touched for some time. The important thing to remember here is that the application isn’t notified about this and therefore can’t act upon it. When the user now returns to the application, a new instance is created and it’s vital that the state information we created when receiving the suspending event, is now put to good use.
App termination isn’t triggered exclusively by the system though: a user might shut down the application, a user may log off… These actions also trigger termination of the application.
Let’s look at a sample. In the code below, we are registering to be notified in the page of suspensions happening. This way, we can save all the fields the user has already filled in.
public MainPage()
{
this.InitializeComponent();
App.Current.Suspending += AppSuspending;
App.Current.Resuming += AppResuming;
}
private void AppSuspending(object sender, Windows.ApplicationModel.SuspendingEventArgs e)
{
//Save any state you want to persist
//Application data might be a good idea
}
private void AppResuming(object sender, object e)
{
//When the app returns from suspending, this will get executed
//Restore state in all fields in the view
}
In the App.xaml.cs, we have access to these events as well, basically allowing for application-wide handling of the lifetime events. Below we can see the OnSuspending and the OnResuming methods on the application level.
public App()
{
this.InitializeComponent();
this.Suspending += OnSuspending;
this.Resuming += OnResuming;
}
private void OnSuspending(object sender, SuspendingEventArgs e)
{
var deferral = e.SuspendingOperation.GetDeferral();
//Here we can save application-wide state
deferral.Complete();
}
private void OnResuming(object sender, object e)
{
}
Launching an app in Windows 8
In Windows 8, the default way of launching an app is through the tile. This will trigger the OnLaunched in the App.xaml.cs. Here, we have the ability to check if the application was already running (we don’t want to start it a second time). We can do so by checking the value of the PreviousExecutionState property on the LaunchActivatedEventArgs.
protected override void OnLaunched(LaunchActivatedEventArgs args)
{
// Do not repeat app initialization when already running, just ensure that
// the window is active
if (args.PreviousExecutionState == ApplicationExecutionState.Running)
{
Window.Current.Activate();
return;
}
}
Next, we need to check if the application was terminated in its previous run. If so, the above explained state management needs to do its job. We as developers need to insert code here as shown below.
if (args.PreviousExecutionState == ApplicationExecutionState.Terminated)
{
//Load state from previously suspended application
}
Finally, we create the rootFrame, create an instance of the default page that we set as the content for the rootFrame and set the rootFrame as the content of the Window of the application.
// Create a Frame to act navigation context and navigate to the first page
var rootFrame = new Frame();
if (!rootFrame.Navigate(typeof(MainPage)))
{
throw new Exception("Failed to create initial page");
}
// Place the frame in the current Window and ensure that it is active
Window.Current.Content = rootFrame;
Window.Current.Activate();
Windows 8 however introduces several other ways applications can be started. Let’s take a look.
Launching the app through searching
When the user searches in Windows 8, he can select our application. If the application isn’t running, it’s launched. If it’s already running, it gets activated, in this case “activated for search”. The net result is that a method, OnSearchActivated, gets called, which we can override. Code should be implemented here that typically redirects the user to a search results page. The OnSearchActivated receives SearchActivatedEventArgs. In the QueryText property, the value entered by the user is passed to the method, allowing the app to perform the search operation.
Take a look at the following code where this is implemented. The code reads out the search value (QueryText) and redirects the user to the search results page.
protected override void OnSearchActivated(Windows.ApplicationModel.Activation.SearchActivatedEventArgs args)
{
ProcessLifetimeSample.MainSearchResults.Activate(args.QueryText, args.PreviousExecutionState);
}
Launching the app through sharing
When the user is running an application that is capable of sharing content (often referred to as a share source) and our application is capable of accepting content (often referred to as being a share target), the target app can be activated for sharing. In this case, similarly to what happens with search, if the app isn’t running, it’s launched; if it’s already running, it gets activated for share. In this case, the OnShareActivated is called; we as developers of a share target should implement code in the OnShareTargetActivated event. An instance of ShareTargetActivatedEventArgs is passed which contains a ShareOperation instance. This can be passed to in most cases a specific page that the application will display in the search pane. The ShareOperation.Data is the DataPackage.
Take a look at the following code where the above is demonstrated.
protected override void OnShareTargetActivated(Windows.ApplicationModel.Activation.ShareTargetActivatedEventArgs args)
{
var shareTargetPage = new ProcessLifetimeSample.MainSearchTarget();
shareTargetPage.Activate(args);
}
Applications can also be launched from the file picker, both for saving and opening.
An important thing to think about in this context is the splash screen. The splash screen is shown on application launching (when the OnLaunched is called). The splash screen is shown until the Window.Current.Content is set automatically. As developer, we shouldn’t be doing heavy work in the launching of the application: if the splash screen is shown for more than 5 seconds, Windows will kill off the application. However, some scenarios require that a long running operation takes place before the application is actually showing its first screen, for example while we download data from a service. In that case, the first screen of the application should be a so-called extended splash screen. This screen should be identical to the regular splash screen but can contain a loading animation. The weather application for example does this, as can be seen below.

Running code in the background
When reading all the above, one can wonder how Windows makes it possible to run code in the background. With Windows, we are all so accustomed with the ability of simply moving an application to the background and let it keep doing its work there. In Windows 8, we’ve seen that applications get suspended when they are moved to the background. How is it then possible for apps to execute logic when they aren’t running?
Windows 8 introduces the concept of a background task. A background task is a separate DLL that is managed outside the main application. It can run whether or not the main application is running.
Creating a background task is in fact quite easy. Let’s take a look.
The first step is creating a library that contains a class that implements IBackgroundTask. We need to override the Run method, which is actually the code that runs in the background.
public class BGTask: IBackgroundTask
{
public void Run(IBackgroundTaskInstance taskInstance)
{
//Background code goes here
}
}
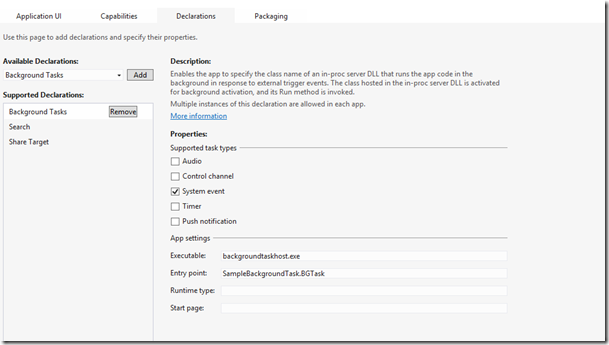
The second step is making sure that a link exists between the main application and the background DLL. This is done through adding a declaration in the Package.appxmanifest.

Finally, the main application needs to create the background task and register it with Windows. Execution of background code is as mentioned completely different in Windows 8. The background task will execute when a trigger is fired. Optionally, a condition can be checked to see if the background task should run. So essentially, background execution = trigger + optional condition.
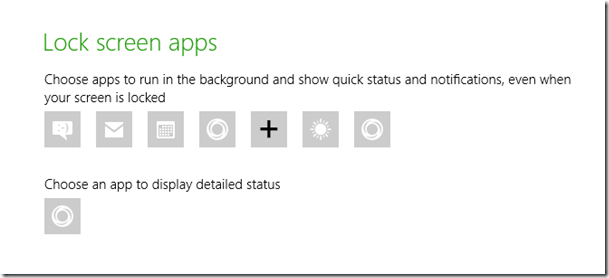
A trigger can be for example the change of network. Some triggers like the time trigger require that an app is a lock screen app before the can be used. Giving an app lock screen permission is a user decision that can be set through the control panel in Windows 8.

The idea here is that certain triggers like the time trigger can only be used when the user has specified that the app is important for him and therefore can run in the lock screen. When doing so, the app gets more CPU time for its background task as well.
In the code below, a background task is registered with Windows using the InternetAvailable trigger.
protected override void OnLaunched(LaunchActivatedEventArgs args)
{
...
UnregisterBackgroundTask();
RegisterBackgroundTask();
...
}
string BackgroundTaskName = "SampleBackgroundTask";
string BackgroundTaskEntryPoint = "SampleBackgroundTask.BGTask";
void UnregisterBackgroundTask()
{
foreach (var cur in BackgroundTaskRegistration.AllTasks)
{
if (cur.Value.Name == BackgroundTaskName)
{
cur.Value.Unregister(true);
}
}
}
void RegisterBackgroundTask()
{
var taskBuilder = new Windows.ApplicationModel.Background.BackgroundTaskBuilder();
var systemTrigger = new Windows.ApplicationModel.Background.SystemTrigger
(Windows.ApplicationModel.Background.SystemTriggerType.InternetAvailable, false);
taskBuilder.SetTrigger(systemTrigger);
taskBuilder.Name = BackgroundTaskName;
taskBuilder.TaskEntryPoint = BackgroundTaskEntryPoint;
var task = taskBuilder.Register();
}
Summary
We’ve seen how Windows 8 apps run and noticed that the process lifetime management is totally new for the Windows OS. Although only one application receives the main focus, it remains possible through background tasks to execute code in the background.
Series summary
In this series of articles, we’ve touched on the most important aspects coming with Windows 8. The developer opportunity is huge, the potential of the OS even bigger. The time to invest in Windows 8 is now. Imagine having your app being featured in the Store someday… Then you can think back of this series of articles which helped you with your first steps in Windows 8!
About the author
Gill Cleeren is Microsoft Regional Director (www.theregion.com), Silverlight MVP (former ASP.NET MVP) and Telerik MVP. He lives in Belgium where he works as .NET architect at Ordina (http://www.ordina.be/). Passionate about .NET, he’s always playing with the newest bits. In his role as Regional Director, Gill has given many sessions, webcasts and trainings on new as well as existing technologies, such as Silverlight, ASP.NET and WPF at conferences including TechEd Berlin 2010, TechDays Belgium – Switzerland - Sweden, DevDays NL, NDC Oslo Norway, SQL Server Saturday Switzerland, Spring Conference UK, Silverlight Roadshow in Sweden, Telerik RoadShow UK… He’s also the author of many articles in various developer magazines and for SilverlightShow.net and he organizes the yearly Community Day event in Belgium. He also leads Visug (www.visug.be), the largest .NET user group in Belgium. Gill is the author of “Silverlight 4 Data and Services Cookbook”. In 2012, the second edition, “Silverlight 5 Data and Services Cookbook” was released.
You can find his blog at www.snowball.be.
Twitter: @gillcleeren