Tweet
This is Part 1 in the series Working with Prism 4.
Introduction
Prism is a toolkit produced by Microsoft patterns & practices to aid you in building Silverlight and WPF composite applications.
Now, that probably doesn’t tell you much unless you have been building composite applications with other toolkits or frameworks and know what that term really means, so let me expand on what that means and what the real purpose of Prism is to get started.
A composite application can be thought of as the opposite of a monolithic application. I can hear you thinking now: “Ah, now I see. I know monolithic applications are bad, therefore composite applications must be good. Yin/Yang, Dark/Light. I need to check this out!” Or at least that is what I hope you are thinking. Composite applications are built from more granular, loosely coupled parts. Two of the primary reasons for approaching application development in a composite way are for maintainability and extensibility. If your application is composed of fine grained, well-focused, loosely coupled parts, it should be easier to develop and easier to maintain and add new functionality over time. Things like the code that defines the structure of your user interface (XAML in Silverlight, WPF, and Metro), the code that supports the interaction logic with the user (view models in the MVVM pattern), the data structures and logic (the model in MVVM), and services that provide shared functionality for service or data access in your application are examples of things that are better separated into parts rather than getting all woven together in spaghetti code. The fact that building composite applications will help you with maintainability is a little hard to prove up front, but the over 50,000 downloads of Prism 4 should tell you that there are a lot of companies out there that get this and like Prism as a toolkit for building apps that way.
To get more specific, Prism has a number of specific feature sets that I will explore in this series that helps you to build your client application as a composite application. These include:
- Modularity – Functionality to define and dynamically load chunks of loosely coupled functionality into a single running application instance.
- UI Composition – Functionality to plug in views into parent containers in a loosely coupled fashion where the parent and child do not need to know explicitly about one another with direct object references.
- Communications – Functionality to support loosely coupled commands and pub/sub events between the components of your application.
- Navigation – Functionality to switch views when the user interacts with the application within a container without every view and parent view needing to know about all the others.
- Application Structure – Support for the Model-View-ViewModel pattern, as well as a dependency injection container, and other implementation patterns to help set up your solution for the best separation of concerns for different kinds of code in your application.
An important thing to understand about Prism is that it is not an all-or-nothing framework. You can use any one or several of the features in isolation and ignore the other parts if they do not make sense for your application or your requirements. In addition to these major features, there are many small little helper classes and utilities in Prism that can be used on their own as well.
In the rest of this article, I will quickly step you through creating a simple Prism application that uses modularity and regions to plug a view into the main application. You will see that there are a number of steps that may seem a bit complicated at first. The first thing to keep in mind is that these activities are a one-time set up of your solution as you lay down the structure of your solution. The other is that at the end of the article I will point you to some project templates that make it all much quicker. But I think it is important to go through the steps manually at least once so you understand what all the moving parts are. In the next article, I will flesh that application out some more to use commands and events and later articles will explore other aspects of Prism.
Download the source code for the Prism 101 completed solution.
Step 1: Create your Prism application
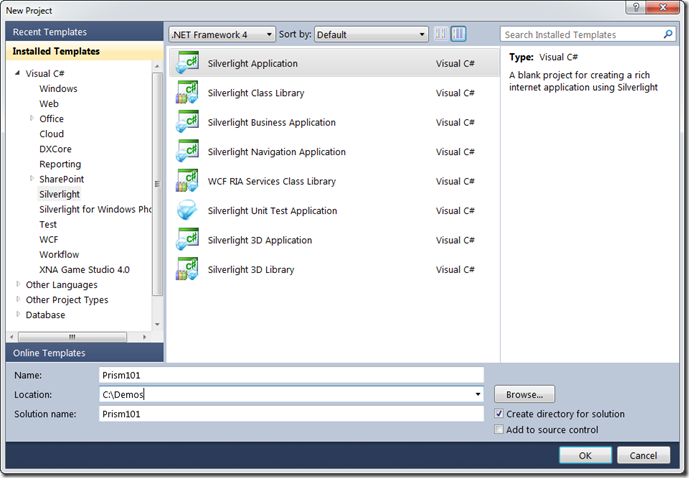
To get started, create a new Silverlight Application project in Visual Studio and name it Prism101.
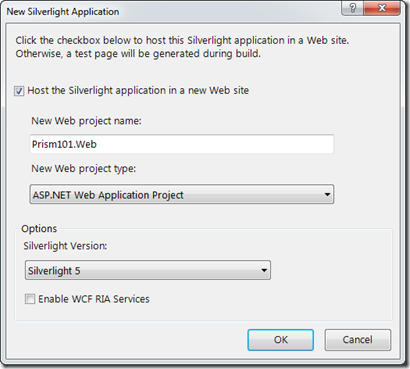
In the New Silverlight Application dialog that asks about creating a host application, accept the defaults by clicking OK. (Note: I am using Silverlight 5 RC for my example, but all of what I will show works equally well for Silverlight 4).
Step 2: Decide which Dependency Injection container to use
Prism uses the Inversion of Control and Dependency Injection patterns under the covers with the help of a Container. Out of the box, Prism supports using either Unity or Managed Extensibility Framework (MEF). You can also plug in other containers by implementing the IServiceLocator interface similar to the implementations that are provided for Unity and MEF.
I won’t go into a full discussion of the differences and similarities between Unity and MEF. Each has distinct capabilities, but for the purposes of what I will be covering in this article series, either one is equally sufficient. I generally prefer MEF myself since it is a part of the .NET and Silverlight Frameworks, and because I like the declarative approach that MEF uses. So I will be using MEF throughout the article series. The sample applications that come with Prism have numerous examples of using Unity instead.
Step 3: Add the Prism Library assemblies
To follow along with the coding, you will need to download the Prism 4 toolkit. It is a self-extracting executable that you can point to any folder on your machine where you want to store the libraries, source code, sample code, and documentation for Prism 4. Once you have extracted the files, add references to the Prism101 Silverlight client application project to the Microsoft.Practices.Prism, Microsoft.Practices.Prism.Interactivity, and Microsoft.Practices.Prism.MefExtensions libraries in the \Bin\Silverlight folder wherever you extracted Prism to:
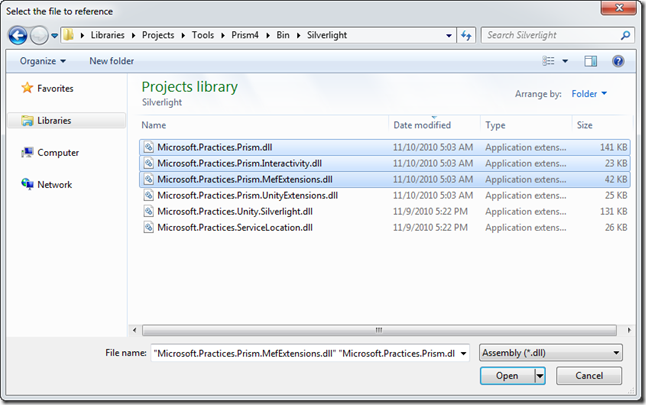
For this sample article I will not be using any functionality from the Interactivity library, but it is easier to just always add references to all three of these libraries in your client projects so that you have the full Prism toolkit at your disposal. If you were using Unity instead of MEF, you can see that instead of adding the MefExtensions library, you would add the UnityExtensions and Unity.Silverlight libraries instead
Also add references to the System.ComponentModel.Composition, System.ComponentModel.Composition.Initialization and the System.Windows.Controls libraries.
Step 4: Add a Bootstrapper
If you are going to use modularity, UI composition, or navigation in your application, you will need to have some Prism-specific initialization code in your application. The standard way to set up this initialization code is to have it in a separate class called a bootstrapper. The bootstrapper is just a way to centralize all the initialization logic for your application in one well known location, separate from the App.xaml code behind. Prism provides a base bootstrapper class for each of the containers that takes care of initializing all the types and services in the Prism toolkit. All you need to do is derive from it and handle a couple of overrides to initialize the specifics of your application.
Add a class named Bootstrapper to your Prism101 project. Modify the code to match the code below.
1: public class Bootstrapper : MefBootstrapper
2: {
3: protected override DependencyObject CreateShell()
4: {
5: MainPage shell = new MainPage();
6: Application.Current.RootVisual = shell;
7: return shell;
8: }
9: }
Part of the initialization of the application is to create the main page. The outermost UI (Window in WPF or RootVisual in Silverlight) is referred to as the Shell in a Prism application. Part of the design of a composite application is that the shell is just a place for content to live. The specific content and functionality of your application will be contributed by the modules that load into the shell. I will get to creating a module later in the article. The shell is responsible for setting up the overall look and feel of the application (i.e. contributing the application scoped resources), determining the top level window layout and navigation. However, the shell should remain ignorant of the details of what is going to load into the application other than those aspects.
So the code above just initializes the application’s RootVisual to an instance of the MainPage class and returns a reference for that instance to the bootstrapper base class. Prism will use that reference to hook up some of the region functionality that I will be using shortly.
As you may know, normally your RootVisual is set in the App.xaml.cs file of your project, and you can only set the RootVisual once per application. Additionally, for the bootstrapper to do anything, it has to be called from somewhere. Open your App.xaml.cs file and modify the Application_Startup event handler to run the bootstrapper instead of setting the RootVisual:
1: private void Application_Startup(object sender, StartupEventArgs e)
2: {
3: new Bootstrapper().Run();
4: }
The Run method on the MefBootstrapper base class will execute an intialization workflow that performs the following:
- Creates the container
- Adds MEF exports to the container for the types contributed by Prism
- Creates and initializes the shell
- Loads and initializes the modules
The third bullet is the point where the overridden CreateShell method in your bootstrapper will be called. The main application project (Prism101) is referred to as the Shell application project since it is the root application that loads and hosts the shell.
Build and run the application at this point to make sure all is well. Your Silverlight application should launch like normal with an empty main page, but you should not see any exceptions. There is not much there to see yet, but the addition of the bootstrapper has made it so all the functionality of Prism is now at your disposal in your application. Next I will show how to start harnessing some of that functionality by defining a module.
Step 5: Add a Module project to your solution
A Module in Prism is an abstract container for a set of functionality. The way you partition your sets of functionality into modules is completely arbitrary, but common lines of separation are to put individual feature sets that you want to be able to turn on or off as a whole in the application into separate modules. Another common approach is to separate modules based on team composition and which team will be working on which set of functionality. For this article, I will just add a single Core module with the main view that will load up to welcome the user and get them started using the application. In later articles I will add additional modules and show how you can plug functionality from multiple modules in at the shell level, or can even plug functionality into the views of one module from another module.
Add another Silverlight Application project to your solution and name it Prism101.Modules.Core.
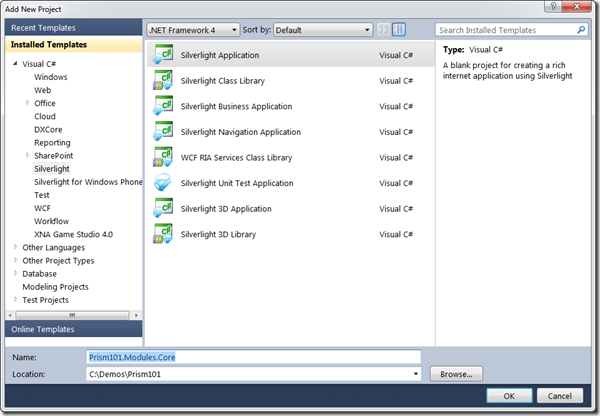
When the New Silverlight Application dialog pops up, uncheck the option at the top to host the application and click OK.
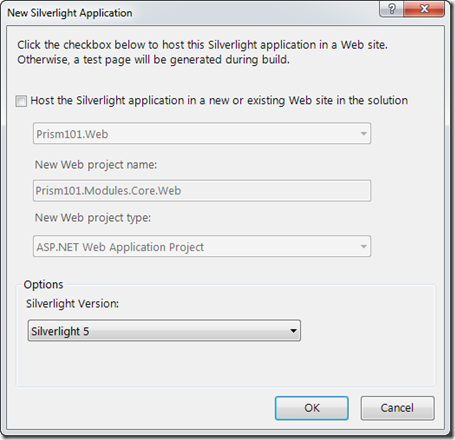
Normally you only create a Silverlight Application project type for your main application, and any types that you separate into other assemblies you would create with a Silverlight Class Library project type. A module in Prism is an independently loadable unit of functionality. By creating it as a Silverlight Application project, it will get compiled into its own XAP file and can be downloaded and loaded independently from the rest of the application. That is part of the decoupling you are going after when you develop an application as a composite application.
Because this project will not launch as a standalone Silverlight Application itself though, delete the MainPage.xaml and App.xaml files from the project. Then go to the project properties and change the Startup object drop down to (not set).

Step 6: Add the Module class
The thing that identifies an assembly as a module to Prism is that it contains one or more module classes. A module class is just a class that implements the Prism IModule interface. When using MEF as the container, you also have to decorate the class with a [ModuleExport] attribute so that Prism can discover the module class through the container. Even though Prism supports defining more than one module class in a single assembly, my design recommendation is to only ever have one module class for a given module project. That allows you to treat the assembly boundary as the container for a single module’s functionality rather than trying to rationalize which types within the assembly are associated with which logical module.
Before you add the module class, you will need the same references for each module that you added to the shell project:
- Microsoft.Practices.Prism
- Microsoft.Practices.Prism.Interactivity
- Microsoft.Practices.Prism.MefExtensions
- System.ComponentModel.Composition
- System.ComponentModel.Composition.Initialization
- System.Windows.Controls
However, one important difference is that you need to set the Copy Local property for each of the Prism references to false so that those assemblies do not get copied into the application multiple times. They will be present at runtime because the Shell project will already have them in its XAP file. Having multiple copies load up causes problems in the module loading process.
Add a class to the Prism101.Modules.Core project and name it CoreModule. Add code to the class so it matches the following code snippet:
1: [ModuleExport(typeof(CoreModule))]
2: public class CoreModule : IModule
3: {
4: public void Initialize()
5: {
6: MessageBox.Show("Core Module initialized!");
7: }
8: }
Step 7: Define the Module catalog
Prism supports several ways of loading modules into the shell application. Modules can be downloaded along with the main application or they can be downloaded asynchronously in the background. They can be loaded as soon as they have been downloaded or you can defer loading of the module until the first point where the functionality is invoked from the module. You can declare which modules the application is composed of programmatically or declaratively in a module XAML file. The module loader is also extensible, so if you wanted to write your own module catalog implementation that went out and made a service call with the logged in user identity to get back a tailored list per user of what modules to download and load, you could easily do that as well. In fact, that might make a good future article… leave a comment if you would like to see that.
For this sample, I will use a ModuleCatalog.xaml file to indicate which modules to load. For the Core module I will have it download and initialize as the application starts up since it represents the initial landing page for the user. In a later article I will show how to defer downloading and initialization until additional functionality is first invoked.
Add a Text File from the General category of project item templates named ModuleCatalog.xaml to the Prism101 project.
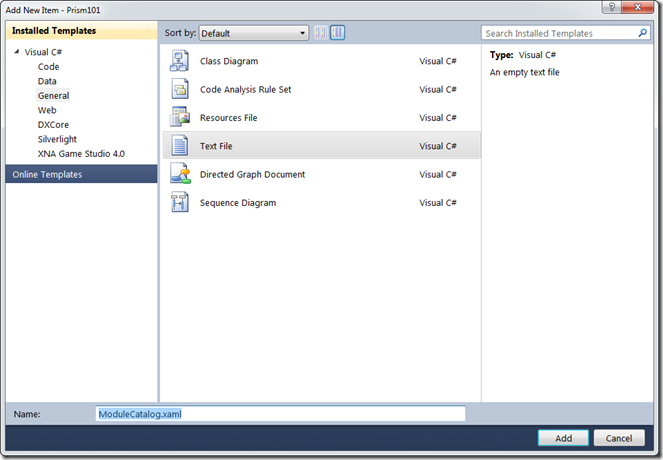
Edit the contents of the file to contain the following markup.
1: <Modularity:ModuleCatalog xmlns="http://schemas.microsoft.com/winfx/2006/xaml/presentation"
2: xmlns:x="http://schemas.microsoft.com/winfx/2006/xaml"
3: xmlns:sys="clr-namespace:System;assembly=mscorlib"
4: xmlns:Modularity="clr-namespace:Microsoft.Practices.Prism.Modularity;assembly=Microsoft.Practices.Prism">
5: <Modularity:ModuleInfo Ref="Prism101.Modules.Core.xap"
6: ModuleName="CoreModule"
7: ModuleType="Prism101.Modules.Core.CoreModule, Prism101.Modules.Core, Version=1.0.0.0, Culture=neutral, PublicKeyToken=null" />
8: </Modularity:ModuleCatalog>
This markup identifies the module assembly information in a declarative fashion outside the compiled code so that it could potentially be changed on the deployment site to add or remove modules without needing to recompile anything. Go to the properties for the file and make sure its Build Action is set to Resource.
Step 8: Add the module XAP to the host site
For Prism to be able to download the module XAP file, it will have to be present in the hosting web applications \ClientBin folder. To add this, open the Prism101.Web project and go to its project properties. Select the Silverlight Applications tab and Click the Add button at the bottom.
In the Add Silverlight Application dialog, select Prism101.Modules.Core from the drop down list for “Use and existing Silverlight application project in the solution”. Uncheck the option towards the bottom to “Add a test page that references the control”. Click Add.
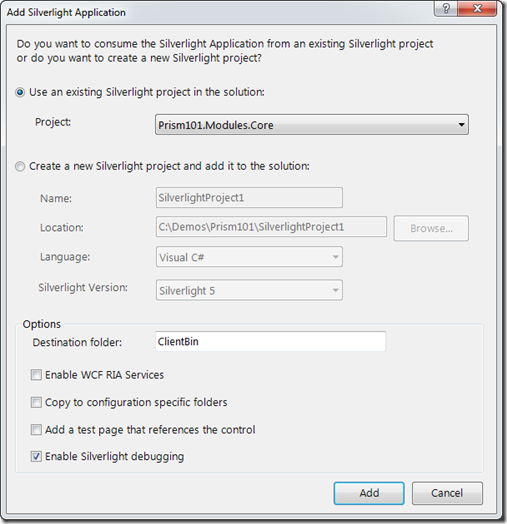
You should now see both the Shell project (Prism101) and the module project (Prism101.Modules.Core) listed as hosted applications.

Step 9: Read the ModuleCatalog.xaml from the bootstrapper
The final step to get the module loaded is to modify the bootstrapper so it knows where to find the module catalog information. Add this method to your Bootstrapper class:
1: protected override Microsoft.Practices.Prism.Modularity.IModuleCatalog CreateModuleCatalog()
2: {
3: return Microsoft.Practices.Prism.Modularity.ModuleCatalog.CreateFromXaml(
4: new Uri("/Prism101;component/ModuleCatalog.xaml", UriKind.Relative));
5: }
At this point you should be able to run the application again and you will see the message box pop up as the application loads, indicating that the module has in fact loaded.
Step 10: Add a Region to the Shell
Popping a message box at least tells us our module is loading and initializing, but is not very interesting. What you will typically do as a module loads up is start presenting some screens or at least commanding functionality to the user that lets them take advantage of the functionality that is encapsulated in the module. So now I will show how you can define a view in a module and present it to the user by plugging it into the shell as the module loads.
The first step in doing that is to define somewhere for the view to plug in within the shell. The most common way to do this is to add either a ContentControl or ItemsControl (or derived type) to the shell and mark it as a Prism region.
Open MainPage.xaml and add the Prism XAML namespace to the XML namespaces on the root UserControl element so that you can access types from the Prism Library in XAML
1: xmlns:prism="http://www.codeplex.com/prism"
Then add a ContentControl and mark it as a region named MainContent:
1: <Grid x:Name="LayoutRoot" Background="White">
2: <ContentControl prism:RegionManager.RegionName="MainContent" />
3: </Grid>
Step 11: Add a View to the Core Module and plug it into the Shell region
Add a new Silverlight User Control to the Prism101.Modules.Core project named WelcomeView. In the XAML, add a TextBlock with its Text property set to “Hello Prism!” and set the font size big to celebrate your excitement with Prism.
1: <Grid x:Name="LayoutRoot" Background="White">
2: <TextBlock Text="Hello Prism!"
3: FontSize="24" />
4: </Grid>
Next, open the CoreModule class and replace the code there with the following code.
1: [ModuleExport(typeof(CoreModule))]
2: public class CoreModule : IModule
3: {
4: [Import]
5: public IRegionManager RegionManager { get; set; }
6:
7: public void Initialize()
8: {
9: var view = new WelcomeView();
10: RegionManager.AddToRegion("MainContent", view);
11: }
12: }
The import allows your module class to access the RegionManager service exposed by Prism. This manager knows about all regions declared in any view throughout the application and allows you to dynamically plug in child views into those regions. The Initialize method code then creates an instance of your module’s view and plugs it into the MainContent region you placed in the shell as a ContentControl. To do this without Prism you would somehow have to feed an object reference to that ContentControl from the MainPage down into the module code that is loading into the application so that it could programmatically set the Content property to the view instance. That would be an example of the kind of coupling that you are trying to avoid when building composite applications. At this point the only coupling between the main application and the module are the declaration of the module in the ModuleCatalog.xaml and the shared “contract” of the MainContent region name as a string.
Step 12: Making it easier
I’m sure that seemed like a lot of work to get a Hello Prism view displayed in your application. And if you app is fairly small – say less than a couple dozen screens, you might not bother with using modularity and regions at all. In later articles in the series I’ll get into other features of Prism including commands, events, and some of the Model-View-ViewModel pattern support that can be very handy regardless of the scale of your application.
But even all this initial setup cries out for automation, and it happens to be readily available in the form of the Prism Template Pack created by David Hill, a Microsoft Program Manager from the Prism team.
If you follow the instructions at that link to download an install the template pack, you can quickly create a Prism starter app with a module following these steps:
Create a new project, select the Prism templates in the New Project dialog, and pick the MEF category. Start by selecting the Prism Silverlight 4.0 Shell (MEF) project type. This will create a pre-populated shell project with several regions already defined in the shell, the bootstrapper all set up for you, references added, etc.
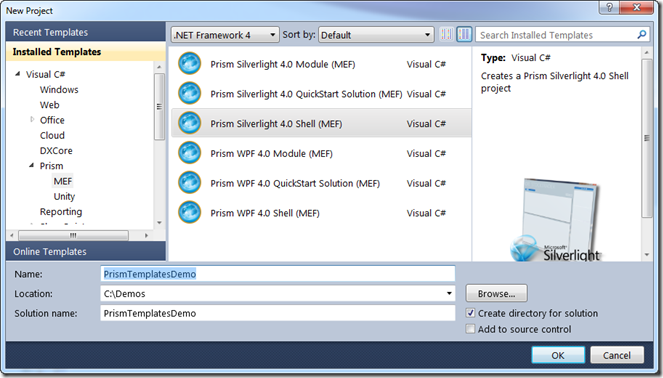
Next, add another project to the solution and this time select the Prism Silverlight 4.0 Module (MEF) project type. Keep the default name of Module1.
Next go into the ModuleCatalog.xaml in the shell project and uncomment the Module1 information:
1: <prism:ModuleInfo Ref="Module1.xap"
2: ModuleName="Module1.ModuleInit"
3: ModuleType="Module1.ModuleInit, Module1, Version=1.0.0.0, Culture=neutral, PublicKeyToken=null"
4: InitializationMode="WhenAvailable"/>
Next add a new ASP.NET Empty Web Application project to act as a host. The Readme.txt file in each project tells you how to configure it, but it is similar to what I showed in Step 8 of this article to configure the web application as the host for the Shell and to add the Module1 XAP to be hosted in the site as well for download. Then you will want to launch the app using the web project as the startup project with the test page for the Shell as the startup page. If you do that, viola – you have a running Prism app with a module and a bit more functionality than the one we put together in this article because it has some views wired up with some sample data and navigation commands and other things we will be talking about in later articles.
These templates will need to be updated for Silverlight 5 and you can customize them yourself if you want to trim them down to get rid of all the sample data and such to be a better (empty) starting point for real projects.
Download the source code for the Prism 101 completed solution.
Summary
In this article I gave you a quick introduction to the concepts and capabilities of Prism and walked you through creating your first Prism application, explaining as we went what some of the moving parts and pieces are that make a Prism application a little different than a normal Silverlight app. You saw that there is some initialization required with the bootstrapper to get the Prism services and types initialized to support your application. The bootstrapper is also where you create your main shell view as your RootVisual and where you indicate, either directly or indirectly through a module catalog XAML file, which modules you want to load into your application. You then saw how to define a module and get it initialized, as well as how to plug views into the shell with Regions. In the next article, I’ll put a little more “meat” in the views to include some commands and the MVVM pattern. In later articles I’ll expand to multiple modules, navigation, events and more.
About the Author
Brian Noyes is Chief Architect of IDesign, a Microsoft Regional Director, and Silverlight MVP. He is a frequent top rated speaker at conferences worldwide including Microsoft TechEd, DevConnections, VSLive!, DevTeach, and others. Brian worked directly on the Prism team with Microsoft patterns and practices and co-authored the book Developers Guide to Microsoft Prism4. He is also the author of Developing Applications with Windows Workflow Foundation, Smart Client Deployment with ClickOnce, and Data Binding in Windows Forms 2.0. Brian got started programming as a hobby while flying F-14 Tomcats in the U.S. Navy, later turning his passion for code into his current career. You can contact Brian through his blog at http://briannoyes.net/ or on Twitter @briannoyes.