Are you interested in
creating games for Windows Phone 7 but don't have XNA experience?
Watch the recording of the recent intro webinar delivered by Peter Kuhn '
XNA for Windows Phone 7'.
This article is part 7 of the series "XNA for Silverlight developers".
This article is compatible with Windows Phone "Mango".
Latest update: Aug 1, 2011.
Detection of and reaction to collisions is a very fundamental element in games. As soon as it has moving components of some sort, it is likely that collisions are of concern. For example, the player character may collide with the scenery of the game. The player may also collide with other characters (enemies, monsters etc.), and of course many games work with projectiles that can hit various other parts on the game screen. But what exactly are collisions in a game, and what are good ways to detect and handle them? This article tries to give answers.
What collisions are
The definition of collisions in our sense is pretty simple: a collision is the state of two or more objects that intersect. But at second glance, we will see that it can become pretty difficult to translate this seemingly simple definition to the context of a game.
We have learned that in XNA, all sprites are actually textures, or parts of textures, which are drawn on the screen. In both cases, the shape of a sprite is a rectangle. This is the only option available; we can either draw a whole texture on the screen (which is rectangular per se), or define a portion of a texture that should be drawn using the "source rectangle" mechanism. So apparently, working with collisions comes down to detecting the intersection of rectangles:

Of course it's not as simple as that. We already have used ways to work around the rectangle restriction in former parts of this series and know that we are very well able to create irregularly shaped sprites in XNA, using the instrument of transparency. For example, if we wanted to create a round object, like a ball, we'd simply make those parts that don't belong to the ball transparent:

And this inevitably leads to potential problems:
So a better definition of collisions for 2D games would be: a collision is the state of two or more objects that intersect in their non-transparent parts. In the following paragraphs, we will look at different approaches to optimize the detection of collisions in both accuracy and performance.
Pixel-perfect collision detection
If we take the above mentioned extended definition and translate it into an algorithm, then it would read like this:
- Check whether the rectangle bounds of two sprites intersect.
- If they do, check whether any pair of pixels within the intersection are non-transparent on both sprite textures.
- If we found at least one pair of non-transparent pixels, we have detected a "real" collision.

How does XNA help us with this approach?
Retrieving and accessing the texture data
In XNA you can get access to the raw texture data by using the "GetData" generic method of the Texture2D class. If you think about it, a texture really is only a huge array of color values – each pixel in that texture is made of the red, green, blue and alpha values in that place. That is why you can retrieve the raw texture values as color array:
1: var texture = content.Load<Texture2D>(textureName);
2: Color[] textureData = new Color[texture.Width * texture.Height];
3: texture.GetData(textureData);
After loading the texture, you have to create an array that is big enough to hold all color values of the texture and then pass it into the "GetData" method. You will notice that the result actually is a one-dimensional array of color values, whereas the texture itself is a two-dimensional structure. This is by design because it is faster and offers more flexibility than a multi-dimensional structure. If you want to access the texture data in a more "natural" way using x and y coordinates, you have to calculate the offset in the one-dimensional array as
x + y * textureWidth.
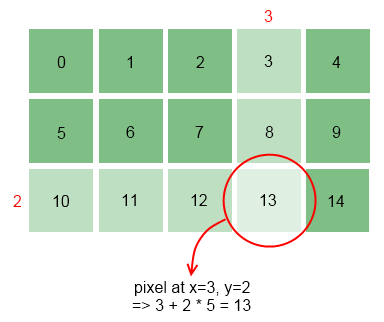
In the above example, the texture width is 5 pixels, and if you wanted to access the pixel at position (3, 2) in the one-dimensional array you retrieve by calling "GetData", you would calculate the index as 3 + 2 * 5 = 13.
Note: When you are using a sprite sheet (e.g. multiple sprites or sprite animation frames on a single texture), you have to take the current source rectangle your sprite uses into account too. The calculation then would look like:
1: public Color GetColorAt(int x, int y)
2: {
3: // we need to take the source rectangle into account
4: var transformedX = x + SourceRectangle.X;
5: var transformedY = y + SourceRectangle.Y;
6:
7: // calculate the offset and return the color from
8: // the one-dimensional texture data returned by the "GetData" method
9: return TextureData[transformedX + transformedY * Texture.Width];
10: }
This demonstrates the extra step involved to get the correct offset in the sprite texture, depending on the source rectangle.
Calculating the intersection
Using the location and dimensions of two sprites, we can calculate the intersecting rectangle fairly easily. To this end, we first calculate the bounds of the sprite in screen coordinates, which I once again have made a method of my custom sprite class:
1: public Rectangle GetScreenRectangle()
2: {
3: // calculate the rectangle from the current location
4: // and the current source rectangle
5: var rectangle = new Rectangle(
6: (int)Location.X,
7: (int)Location.Y,
8: SourceRectangle.Width,
9: SourceRectangle.Height);
10:
11: return rectangle;
12: }
If your sprite only uses a whole texture, you can use that texture's width and height for this. I used the source rectangle my custom sprite class defines, which can potentially be different from the texture dimensions, e.g. when a sprite sheet is used.
Given two of those screen space rectangles, the intersection can be calculated as:
1: public static Rectangle Intersect(this Rectangle rectangleA, Rectangle rectangleB)
2: {
3: // get the top, bottom, left and right coordinates
4: // of the intersection
5: int top = Math.Max(rectangleA.Top, rectangleB.Top);
6: int bottom = Math.Min(rectangleA.Bottom, rectangleB.Bottom);
7: int left = Math.Max(rectangleA.Left, rectangleB.Left);
8: int right = Math.Min(rectangleA.Right, rectangleB.Right);
9:
10: // do the rectangles intersect at all?
11: if (top > bottom || left > right)
12: {
13: return Rectangle.Empty;
14: }
15: else
16: {
17: return new Rectangle(left, top, right - left, bottom - top);
18: }
19: }
Again this is pretty straight-forward, but some people have problems picturing it. It really helps to use a piece of paper and draw a few possible cases to realize that this actually creates the intersection rectangle (unless there is no intersection, which results in the static "Empty" rectangle as a result).
Comparing pixels
It's now time to put those pieces together to compare the pixel colors of the intersection rectangle of two sprites. To this end, we first get the intersection rectangle and then inspect every pixel in it. To retrieve the color values of a certain pixel for a sprite, we need to transform these coordinates back to the respective sprite's space. We can then use the "GetColorAt" method we've created above to retrieve both color values and compare their alpha values:
1: public static bool IsPerPixelCollidingWith(this Sprite spriteA, Sprite spriteB)
2: {
3: // get the bounds in screen coordinates
4: var rectangleA = spriteA.GetScreenRectangle();
5: var rectangleB = spriteB.GetScreenRectangle();
6:
7: // find the bounds of the rectangle intersection in screen space
8: var intersection = rectangleA.Intersect(rectangleB);
9: if (intersection == Rectangle.Empty)
10: {
11: return false;
12: }
13:
14: // Check every point within the intersection bounds
15: for (int y = intersection.Top; y < intersection.Bottom; y++)
16: {
17: for (int x = intersection.Left; x < intersection.Right; x++)
18: {
19: // to retrieve the color of a pixel
20: // we need to transform the coordinates back
21: // to the sprite's local space
22: int xA = x - rectangleA.Left;
23: int yA = y - rectangleA.Top;
24: Color colorA = spriteA.GetColorAt(xA, yA);
25:
26: int xB = x - rectangleB.Left;
27: int yB = y - rectangleB.Top;
28: Color colorB = spriteB.GetColorAt(xB, yB);
29:
30: // If both pixels are not completely transparent,
31: if (colorA.A != 0 && colorB.A != 0)
32: {
33: // then an intersection has been found
34: return true;
35: }
36: }
37: }
38:
39: return false;
40: }
The transitions between different coordinate systems may seem confusing at first, but you should be able to get accustomed to it quickly once you understand the chain of involved actions required to retrieve the actual color value:
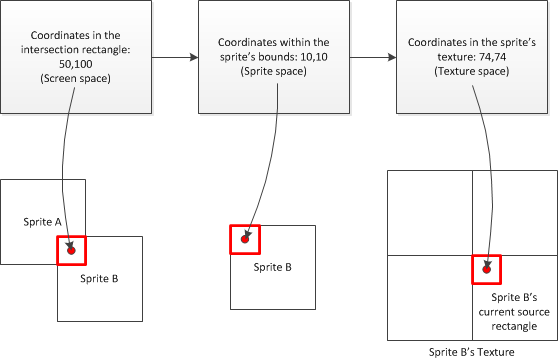
A sample application
The first sample you can find in the download package creates some balls with random initial positions and velocities that move around the screen. In each frame, collisions are detected using the above described approach, and if one is found, the involved sprites are tinted red. Running in the emulator, it looks like this:
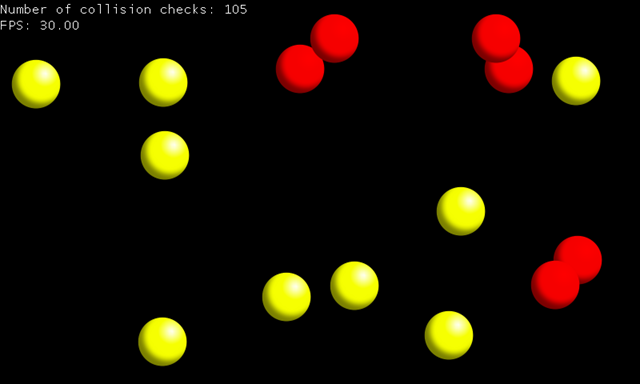
When you observe the balls, you can see that indeed no collisions are detected if their transparent corners overlap.
Performance considerations
A collision detection algorithm like this is not only very accurate, it is also pretty expensive. Especially when you have sprites with large amounts of transparency you can easily end up with thousands of individual pixels to compare in each frame. Also, the number of collision checks that need to be performed obviously raises with the number of objects. The above screenshot includes that number, and as you can see, 15 objects on the screen already require 105 checks. The first ball is compared to all the 14 others, the second one to the remaining 13, the third one to 12 and so on. More accurately:

I was wondering when this would become a problem and did some tests on my phone. Interestingly I was able to raise the number of balls to 100 without any problems. 4950 of these collision checks are performed in this case in each frame update. Performance declined quickly after that. 150 balls (11175 collision checks) are pretty horrible, and depending on the random distribution of the sprites reached frame rates as low as 2 per second. Again the question is whether you will really ever need and have more than 100 objects on the screen that need collision detection. But still let's talk about possible improvements and alternatives.
Please note that a rule of thumb for the following actions is that you shouldn't put too much effort into preliminary performance optimization until you actual start seeing problems, or unless it's low hanging fruits you know will pay off.
Working with bounding geometries
Instead of working with pixel perfect collision detection, an often used alternative is to use some sort of bounding geometry, like a rectangle or a circle. In more sophisticated scenarios, even multiple geometries can be used. For example, a concept borrowed from 3D games is to use three circles for a human-like character (head, torso, legs). In almost all cases this means losing precision regarding the detection of collisions, but it can result in quite a performance gain.
In our sample, the obvious improvement is to use a circle as bounding geometry, which in this special case results in the same perfect collision detection, because we do use, well, circles as sprites. A modified collision detection in this case can use a custom circle structure, like:
1: public class Circle
2: {
3: public Vector2 Center;
4: public float Radius;
5:
6: public bool Intersects(Circle other)
7: {
8: // calculate the minimum distance of the centers
9: // the circles are not intersecting at
10: var minCenterDistance = Radius + other.Radius;
11:
12: // calculate the actual distance and compare
13: var distanceVector = Center - other.Center;
14: if (distanceVector.Length() < minCenterDistance)
15: {
16: return true;
17: }
18: else
19: {
20: return false;
21: }
22: }
23: }
A sprite can then create its bounding circle depending on its current position and size:
1: public Circle GetBoundingCircle()
2: {
3: // create a new bounding circle
4: Circle result = new Circle();
5:
6: // the center is the location + half the size
7: result.Center = new Vector2(Location.X + SourceRectangle.Width / 2.0f,
8: Location.Y + SourceRectangle.Height / 2.0f);
9:
10: // use half the width as radius
11: result.Radius = SourceRectangle.Width / 2.0f;
12:
13: return result;
14: }
With this approach and the same sample as above, the demo was able to provide a decent frame rate for almost twice as much balls: 190, which require 17955 collision checks in each frame. This illustrates how much more expensive the pixel-perfect check actually is.
Unfortunately, no general recommendation can be made with regards to bounding geometries. In some cases you can achieve very good results using them (like in this case), but in other situations you may really see that a bounding box or similar cannot stand up to your requirements and deliver the desired accuracy. Often using bounding geometries requires fine-tuning, and customizing the detection algorithms for your particular game to a point where you even differentiate between collisions of certain game object types (e.g. treating player-monster collisions differently from player-projectile etc.).
Tiling your game
If you look at the above numbers, you can see that 10 times the balls (150 instead of 15) resulted in more than 100 times more collision checks (11175 compared to 105). Reducing the number of checks by additional tricks is therefore highly desired. An often used technique you may be able to take advantage of for this is to tile your game. What this means in this context is to divide the screen into multiple areas that are treated independently from each other. At the moment, we are checking each sprite on the screen against all the others, even if they are located on opposite ends and obviously cannot collide. So the idea is to separate your sprites into groups depending on their rough location. This makes perfect sense for example for platformers, where monsters often cannot leave certain areas and it wouldn't make sense to check these against the player when they are not even near that area. Each of those groups can be inspected separately which can save a lot of the required checks.
Of course this can also be contradictory, for example if your sprites can move between multiple tiles/areas and you need to determine what area they are currently in very often. Once again no general recommendation can be made and the decision should be based on your scenario.
Potential problems
Scale and rotate
If you are using a pixel-perfect collision detection algorithm like the one above, you will inevitably run into some problems if you use scaling and rotation with the involved sprites. In our sample, when we are only using translations, there is a one-to-one relationship between the pixels on the screen and the pixels on the involved textures (texels), and we have a very simple geometry to check (an intersection rectangle). This makes these checks relatively easy.
Now when you zoom and/or rotate your sprites, you will find that a texel suddenly can span multiple pixels on the screen (or the other way round: one pixel's final color is determined by multiple texels), and that the involved geometries are not axis-aligned anymore. How to overcome this problem?
Once again the solution is to use coordinate transforms. In particular, what you'd typically do is create a transformation matrix that transforms coordinates from the one sprite's local space to the other sprite's local space. This allows you to iterate over the pixels in one sprite like we did above and get the corresponding pixel color value in the other sprite, whilst taking into account the involved rotate and scale transforms. The education section of Microsoft's App Hub site actually has an example for this that shows how to handle rotations (link), but unfortunately it only includes source code for the desktop and Xbox version of XNA. For your convenience, I have converted the sample to Windows Phone 7, cleaned it up a bit and added the code for scaling. Since a full discussion of the required steps is beyond this article, I strongly recommend downloading the source code package below if you are interested in it. I hope the extensive comments in the code help understand the concepts. Here is what the sample looks like in the phone emulator:

You can use the arrow keys to move around the small player character at the bottom; to enable keyboard input in the emulator, you have to press the "Pause" key on your keyboard first. The sample demonstrates how pixel-perfect collision detection still works even for the rotated and scaled elements on the screen.
The a posteriori bug
The approach we are using here (and that is used in most games) is named "a posteriori", which means we are first updating the scene and move all objects, and then check for collisions afterwards. If a collision is detected, the game logic reacts accordingly. Whether that is a simple color tint change like in our example or an attempt to simulate physical laws (bouncing off etc.) depends on the game. In a lot of cases this works surprisingly well, but in some situations you may come across the "a posteriori bug". The problem with this technique in general is that it always only looks at a current snapshot of the game situation instead of considering a continuous analysis. This is easy to implement and provides good performance, however it can actually lead to collisions that are missed, for example when objects are moving very fast, if very thin or small objects are involved, or both. Let's look at an example:

In the above picture, we see two successive frames. The green ball is moving very fast to the right and is supposed to bounce off the orange wall. However, due to the high velocity the update process has moved the ball so far to the right that it traveled past the wall within one frame. In neither of the two frames the collision detection is able to do its job, because there never is an actual intersection. In real world scenarios, this often happens with projectiles because usually they're pretty small and move around much faster than other objects.
If you identify such situations and are not able to find a simpler workaround, you indeed have to do a temporal analysis for these cases. In the above example, you would always look at two successive frames, for example by comparing the current position to the previous one, and use that information to check if collisions happened "in between" the frames. From a mathematical point of view, this involves intersecting a line (through the previous and current position) with another line or geometry (the wall) and checking whether the intersection point (if existent) lies between the previous and current position of the object.
What about Silverlight?
In all the articles so far I've started with an evaluation of how people would implement the respective features in Silverlight, and then make the transition to XNA. The reason there is no such analysis in this article simply is that Silverlight has no built-in features and support for collision detection in games. When you are creating a game in Silverlight you will find that you have to think about the same concepts we were exploring in XNA here, and then manually implement the required code.
Of course others have done this already; you can find a nice sample implementation by Christophe Geers here (which in turn is based on an implementation of Andy Beaulieu). When you look at the code you can see that it's quite similar to what we did: first bounding rectangles are checked for performance optimization, and then every pixel in the intersection rectangle is inspected separately using the FindElementsInHostCoordinates method of the visual tree helper. And just like in XNA, this is a very expensive operation that should not be used excessively.
Summary and further readings
Collision detection is a complex topic, and even though we have learned a pretty good method to detect collisions accurately in this article, it only scratches the surface of it. For example, a completely different issue is how to actually react to collisions once they are detected. In simple cases you are just interested in the hit itself ("shoot at monster"). But sooner or later you may also want to create more sophisticated features that involve simple or complex physics ("bouncing ball") which adds a whole new set of problems to solve, and a whole new world of interesting things to do (think physics engines etc.).
A good place to find additional material on the topic is the App Hub education section about collision detection. It has some articles specific to Windows Phone 7 and even some full games you can dissect and learn from. Another example from that site which is not explicitly mentioned in the collision section is the Platformer code sample. That game uses bounding boxes for collision detection and achieves some pretty good results with it. It also shows how to handle simple physics like gravity and common situations with collision detection like characters standing on the floor.
The source code package this time contains three solutions: the pixel-perfect approach we learned about in the first part of the article, a different solution using bounding circles, and the reworked Microsoft sample that shows how to handle collisions of transformed objects on the phone.
Download source code
About the author
Peter Kuhn aka "Mister Goodcat" has been working in the IT industry for more than ten years. After being a project lead and technical director for several years, developing database and device controlling applications in the field of medical software and bioinformatics as well as for knowledge management solutions, he founded his own business in 2010. Starting in 2001 he jumped onto the .NET wagon very early, and has also used Silverlight for business application development since version 2. Today he uses Silverlight, .NET and ASP.NET as his preferred development platforms and offers training and consulting around these technologies and general software design and development process questions.
He created his first game at the age of 11 on the Commodore 64 of his father and has finished several hobby and also commercial game projects since then. His last commercial project was the development of Painkiller:Resurrection, a game published in late 2009, which he supervised and contributed to as technical director in his free time. You can find his tech blog here: http://www.pitorque.de/MisterGoodcat/