This article is sponsored by
 Telerik RadControls for Silverlight. For similarly awesome content check out
 Telerik XAMLflix, your step-by-step guide to Telerik Silverlight and WPF controls. Get access to video tutorials, written tutorials, and tons of code!
 To contact me directly please visit my blog at http://michaelcrump.net/ or through twitter at http://twitter.com/mbcrump.
This article is Part 2 of the series “10 Laps around Silverlight 5.” If you have missed any other section then please see the Roadmap below.
To refresh your memory on what Silverlight is:
Microsoft Silverlight is an application framework for writing Rich Internet Applications. The run-time environment is available as a plug-in for most web browsers and works on a variety of operating systems including Windows, Mac and Linux.
To recap what we learned in the previous section:
- We have briefly discussed what Silverlight is.
- Looked at the Roadmap for the series.
- Reviewed the history of Silverlight.
- Downloaded the required bits.
- Became familiar with creating a new Silverlight 5 project.
In this article, I am going to show you how to use Ancestor Relative Source Binding and Implicit Data Templates using Silverlight 5. Please review the Roadmap for the series before going any further.
The Roadmap for this Series
I’ve included the Roadmap for the series below as you may want to visit other sections as you learn Silverlight 5. I picked the following features as I thought that you may find them useful in your day-to-day work. If you want a specific topic covered then please leave it in the comments below.
1) Introduction to SL5 – provides a brief history of Silverlight and relevant links.
2) Binding [This Post] - Ancestor Relative Source Binding and Implicit Data Templates.
3) Graphics –XNA 3D API and Improved Graphics Stack.
4) Media - Low-Latency Sound using XNA and Remote Control and Media Command (Keys) Support.
5) Text - Text Tracking and Leading, Linked and Multi-column Text, OpenType Support, Pixel Snapped Text and TextOptions.
6) Operating System Integration Part 1 - P/Invoke, Multiple Windows and Unrestricted File System Access in Full Trust.
7) Operating System Integration Part 2 - Default Filename for SaveFileDialog, 64-bit browser support and Power Awareness.
8) Productivity and Performance - XAML Binding Debugging, Parser Performance Improvements and Multi-core JIT for improved start-up time.
9) Controls - Double and Triple click support, PivotViewer and ComboBox Type-Ahead.
10) Other items - In-Browser HTML, PostScript and Tasks for TPL.
Let’s Begin with Ancestor RelativeSource Binding
A new addition to the binding engine in Silverlight is called Ancestor RelativeSource Binding. This was previously available in WPF, but is new to Silverlight 5. With Ancestor RelativeSource Binding you can now bind a child object property to a parent object property. It comes with additional properties to determine the type of parent object and how many levels up it is from the child.
Let’s begin today by looking at a sample ported over from WPF which shows how to retrieve the FontFamily and FontSize for a given TextBlock.
Adding onto our existing project.
Hopefully you have completed part 1 of the series. If not then create a new Silverlight 5 project and name it “BeginnerSilverlight5”, and look under Solution Explorer. Double click the file named MainPage.xaml and replace the grid with the following code:
1: <Grid x:Name="LayoutRoot" Background="White" >
2: <StackPanel VerticalAlignment="Center" HorizontalAlignment="Center" >
3: <TextBlock Text="This TextBlock has a FontFamily of "/>
4: <TextBlock Text="{Binding RelativeSource={RelativeSource self}, Path=FontFamily}"/>
 5:             <TextBlock Text="
This TextBlock has a FontSize of "/>
6: <TextBlock Text="{Binding RelativeSource={RelativeSource self}, Path=FontSize}"/>
7: </StackPanel>
8: </Grid>
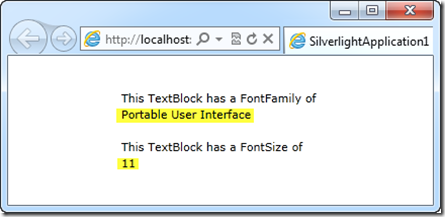
If we go ahead and run this project then we will see that by setting the RelativeSource to self and the Path to FontFamily or FontSize then we were able to determine the FontFamily and FontSize of the TextBlock with no code-behind.

But that is not all that we can do. The Ancestor Relative Source contains a property called AncestorType where we can specify what to bind to. Let’s go ahead and see a sample of the AncestorType being set. Go ahead and remove the code you added earlier with the following code snippet shown below:
1: <Grid x:Name="LayoutRoot" Background="White">
2: <StackPanel Orientation="Horizontal" HorizontalAlignment="Center">
3: <TextBlock Text="This TextBlock is inside a StackPanel with " />
4: <TextBlock Text="{Binding RelativeSource={RelativeSource AncestorType=StackPanel}, Path=Orientation}"/>
5: <TextBlock Text=" orientation" />
6: </StackPanel>
7: </Grid>

In this sample, we see the AncestorType being set to StackPanel and the Path to Orientation. When the application runs, it displays the word Horizontal. If we switch the StackPanel’s Orientation to Vertical then it would have displayed Vertical.
Finally, we will take a look at both AncestorType and AncestorLevel. Go ahead and remove the code you added earlier with the following code snippet shown below:
1: <Grid x:Name="LayoutRoot" Background="White" Margin="5,5,5,5" >
2: <StackPanel Orientation="Horizontal" HorizontalAlignment="Center">
3: <TextBlock Text="{Binding RelativeSource={RelativeSource AncestorType=Grid, AncestorLevel=1}, Path=Margin}"/>
4: </StackPanel>
5: </Grid>
As you can see from the following code, we set the AncestorType to the Grid (What Element to Bind) and AncestorLevel to 1. We also specified the Path to Margin. The Margin of the grid is then displayed when the application is executed.

Let’s see what you have learned so far today.
Question: What would have happened if the AncestorLevel were set to 2 in the last example?
Answer: Nothing would have been displayed as it would not have found the Grid on Level 2.
Question: What would have happened if the Path was set to VerticalAlignment in the last example?
Answer: Then the word, “Stretch” would have been displayed in the window.
Let’s take a look at Implicit Data Templates
Another new addition to the binding engine in Silverlight is called Implicit Data Templates. This was also previously available in WPF, but is new to Silverlight 5. Using Implicit Data Templates we have the ability to produce a DataTemplate that will be implicitly associated with a particular data type.
Let’s dive straight into an example (Go ahead and create a new VS2010 Project and give it the name SLShowImplicitDataTemplateDemo) :
I have two classes in my project.
- Podcast.cs – Which contains the Description, ReleaseData and a Link to the Podcast.
- PodcastAuthor.cs – This class will inherit from Podcast and add the author of the Podcast.
They should look like this:
1: public class Podcast
2: {
3: public string Description { get; set; }
4: public DateTime ReleaseDate { get; set; }
5: public Uri Link { get; set; }
6: }
1: public class PodcastAuthor : Podcast
2: {
3: public string Author { get; set; }
4: }
Let’s switch over to MainPage.xaml now.
The first thing we are going to need to do is setup a clr-namespace to our local project. In my sample below, I gave it the name of local and simply pointed it to my current project name.
1: xmlns:local="clr-namespace:SLShowImplicitDataTemplateDemo"
Now we will define our DataTemplates in a UserControl as shown below:
1: <UserControl.Resources>
2: <DataTemplate DataType="local:Podcast">
3: <StackPanel Orientation="Vertical">
4: <TextBlock Text="{Binding Description}" />
5: <TextBlock Name="txtReleaseDate" Text="{Binding ReleaseDate}" />
6: <HyperlinkButton Content="Listen to this Episode" NavigateUri="{Binding Link}" TargetName="_blank" />
7: </StackPanel>
8: </DataTemplate>
9:
10: <DataTemplate DataType="local:PodcastAuthor">
11: <StackPanel Orientation="Vertical">
12: <TextBlock Text="{Binding Author}" />
13: <TextBlock Foreground="Red" Text="{Binding Description}" />
14: <TextBlock Name="txtReleaseDate" Text="{Binding ReleaseDate}" />
15: <HyperlinkButton Content="Listen to this Episode" NavigateUri="{Binding Link}" TargetName="_blank" />
16: </StackPanel>
17: </DataTemplate>
18: </UserControl.Resources>
The thing to notice here is that the DataTemplate is getting a DataType set to the particular class that we want to use. This will allow us to style our Templates differently depending on the data. If this is still not clear, then continue following along and you will see a screenshot of it in action.
Finally, let’s add a ListBox to the grid and give it the name of listBox1.
1: <Grid x:Name="LayoutRoot" Background="White">
2: <ListBox Name="listBox1" />
3: </Grid>
Double click on MainPage.xaml.cs and add the following code snippet:
1: public MainPage()
2: {
3: InitializeComponent();
4: Loaded += new RoutedEventHandler(MainPage_Loaded);
5: }
6:
7: void MainPage_Loaded(object sender, RoutedEventArgs e)
8: {
9: var Podcast = new List<Podcast>();
10:
11: Podcast.Add(new Podcast()
12: {
13: Description = "This Developer's Life - Typo",
14: ReleaseDate = new DateTime(2011, 9, 19),
15: Link = new Uri("http://www.thisdeveloperslife.com/post/2-0-5-typo", UriKind.Absolute)
16: });
17:
18: Podcast.Add(new PodcastAuthor()
19: {
20: Author = "Scott Hanselman",
21: Description = "Digging into the Kinect SDK with Dan Fernandez",
22: ReleaseDate = new DateTime(2011, 7, 14),
23: Link = new Uri("http://hanselminutes.com/275/digging-into-the-kinect-sdk-with-dan-fernandez", UriKind.Absolute)
24: });
25:
26: listBox1.ItemsSource = Podcast;
27: }
In this code snippet, you will see that we created a Loaded event and and added data to our application. We then set the ItemSource on our ListBox to the generic list called Podcast.
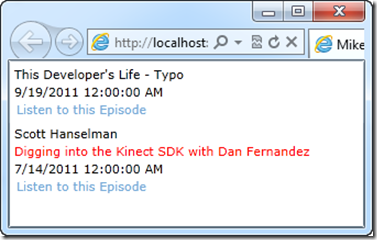
If you run the project you will see the following:

Notice how the Description of the second item is in red? That’s because we used an Implicit Data Template on the PodcastAuthor class. Easy enough!
What else relating to binding should we know about?
Silverlight 5 has a lot of new features related to binding to cover. I decided to give a quick definition and and links to further information.
ICustomTypeProvider – This enables data binding to objects the structure of which cannot be known until runtime.
Links for further information:
MSDN Documentation on ICustomTypeProvider
Using ICustomTypeProvider in Silverlight 5 by Damon Payne
Using ICustomTypeProvider in Silverlight 5 to Display JSON Data by Jeremy Likness
Custom Markup Extensions – They allow custom code to be run at XAML parse time for both properties and event handlers. You are probably already familiar with Markup Extensions in Silverlight 4 (Binding, StaticResource, TemplateBinding, NullExtension and RelativeSource).
The Binding statement below is a MarkupExtension in Silverlight 4.
1: <TextBlock Name="txtReleaseDate" Text="{Binding ReleaseDate}" />
MSDN Documentation on Markup Extensions
Silverlight 5 Rough Notes – Markup Extensions by Mike Taulty
Using Custom Markup Extensions in Silverlight 5 by Jeff Prosise
Binding in Style Setters – You can use any type of markup extension inside of the style setter.
MSDN Documentation on Style Setters
Binding on Style Setter in Silverlight 5 by Kunal Chowdhury
Silverlight 5 – Binding Style’s Setter.Value by Muhammad Shujaat Siddiqi
DataContextChanged Event – Occurs when the DataContext object for a control changes.
MSDN Documentation for DataContextChanged Event.
PropertyChanged now an UpdateSourceTrigger option – This updates the binding source immediately whenever the binding target property changes.
MSDN Documentation for UpdateSourceTrigger Enumeration
Conclusion
At this point, we have seen how you would use Ancestor Relative Source Binding and Implicit Data Templates in your Silverlight 5 Applications. We have also discussed a few other features included with the new binding engine in Silverlight 5. In the next part of the series, I am going to take a look at the new and improved Graphics stack in Silverlight 5 including the XNA 3D API and much more. Again, thanks for reading and please come back for the next part.