Introduction
With the help of the WCF RIA Services framework we are now capable of creating business applications in Silverlight easy and fast. But before starting we should download and install the latest versions of Silverlight 3 and WCF RIA Services. In this article you'll find the needed links and a brief walkthrough of creating the project for our first Silverlight application using the WCF RIA Services Framework, as well as some highlights and explanations about the created project.
Here is a link to the live demo at this stage and the source code. Note that they will be updated with each article! ;)
WCF RIA Services and Silverlight 3
Before beginning to code your first application, you have to download and install the Silverlight 3 Tools for Visual Studio, which contain the tools, the runtime and the SDK. After that do the same with the WCF RIA Services.
According to the information provided by Brad Adams in one of the Channle9 clips, Silverlight 3 and the WCF RIA Services work on the Express version of Visual Studio too.
Creating the project
In Visual Studio select File->New Project and a prompt will appear where you'd be able to choose your template. In the Silverlight section you can see three templates: Silverlight Application, Silverlight Navigation Application (the Navigation is one of the new features of Silverlight 3, you can read more about it here) and Silverlight Class Library. Choose Silverlight Application, enter the name of your project and click "OK".

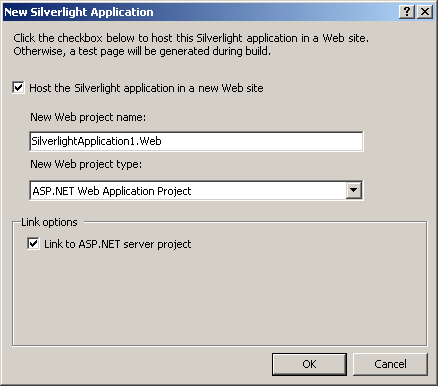
On the next window check both the "Host the Silverlight application in a new Web site" and the "Link to ASP.NET server project".
Click "OK" and that's it!
Highlights
As you can see there are no changes in creating a new Silverlight Application project, but changes to the project itself have been made in order to work with the WCF RIA Services framework.
First take a look at the references - the references that you'll use while creating your application are automatically added both on the client and on the server. The reference to the WCF RIA Services is System.Web.Ria, which has a client and server version. Another reference that is related to the framework is the System.Web.DomainServices, which, as the name hints, allows us to work with the DomainService class.
The other interesting thing is that the client and the server projects are connected to one another (remember the "Link to ASP.NET server project" checkbox?). In this way you can share code between the server and the client, so you don't have to write business logic both on the server and on the client. You write it only once and the code on the server gets generated on the client too (of course not every piece of code, this applies to some of the classes and files and will be discussed in the next articles). That is one of the most powerful features of the framework.
Now select your Silverlight project and click on "Show All Files" icon. You will see a folder named GeneratedCode. In this folder will be placed the code, generated from the server project on every build (first the server project will be build and then the client). You should not include this folder to your project or add it to source control.
Conclusion
Now we are ready to begin to develop our application! In the next articles I'll show how to create the business logic, load and modify data form a DB and some more.