This article is written for Silverlight 3 and may not be fully compatible with the latest version.
Introduction
These series of posts will help you when creating rich data forms with Silverlight 3 in your projects. Silverlight 3 introduces a new control, called DataForm. It enables various methods for display, edit, update and navigation through data. In my previous article I gave you a clear view of this new cool control. I showed you how easily you can bind an object or a collection of objects to a DataForm control and the whole bunch of stuff you can do with every data source.
In this article I will show you how you can style your control. Since the default style of a DataForm control may not fit your Silverlight application style, you can change this default look very easily. You can achieve really great results while playing with this control.
In your projects you may need to change the style of the DataForm to fit your own application. You will ask, “How to do this?” Well, there is a very simple solution to your problem. The DataForm control supports template properties (such as HeaderTemplate, DisplayTemplate, EditTemplate and InsertTemplate). Reading this article you will see how you can manipulate these properties in order to change the structure of the control. I will also show you how to style your data form controls in order to make them fit better in your applications.
You can run the online demo before you read the article just to see what it is.
Beginning
Well, you can bind different objects to a DataForm control. You can edit and update them, too. Cool! But, can you change the way this control looks? The answer is ‘Yes, you can’. The power of the DataForm control is in its customization.
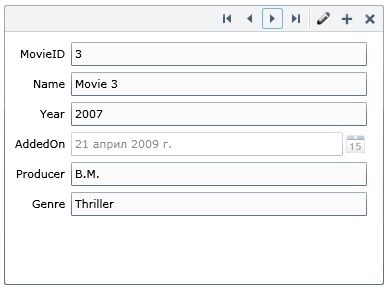
Did you remember the project, which we developed in my previous article? I created a simple Movie system in order to demonstrate you how the DataForm control works.
Customizing DataForm Fields
Did you remember how you solved the problem with customs column, when you worked with a DataGrid control? The DataGrid control lets you customize the columns instead of auto-generating them. Well, the good news is that the DataForm control provides the same functionality. You can change the default fields to satisfy your requirements.
In our Movies application, the default field of the DataForm control does not provide the necessary functionality. Why?
- The MovieID field should be read-only
- The Year column field let users enter only years
- The Genre field should let users select a genre from a list (now, if a user enters a genre which is not supported, the DataForm control won’t let him save the record; so users have to enter values while they enter a valid genre)
- The AddedOn field should be read-only, too
We made clear which our requirements are. Now, all we have to do is to implement them. DataForm fields are defined in the Fields property of the control. It is of type ObservableCollection<DataFormField>. In my previous article I explained you in short about ObservableCollections and why they are so popular in WPF/Silverlight.
Like in DataGrid control, before we start defining our custom fields, we should set AutoGenerateFields to false. If this property is set to false, the DataForm control will show the custom fields. Otherwise it will auto-generate field based on the properties of the bound object.
| <df:DataForm x:Name="myDataForm" Header="MovieStore" AutoGenerateFields="False"> |
| <df:DataForm.Fields> |
| … |
| </df:DataForm.Fields> |
| </df:DataForm> |
Here is a list of all fields, which you can add:
- DataFormCheckBoxField – renders a field, which consists of one CheckBox control
- DataFormComboBoxField – renders a field, which consists of one ComboBox control
- DataFormDateField – renders a field, which consists of one date-picker control
- DataFormTextField – renders a field, which consists of one TextBox field.
- DataFormTemplateField – renders a custom field; this option is very powerful, because you can create your own fields
Let’s have a look at our fields. We should create a field for each property of Movie class.
| <df:DataForm.Fields> |
| <df:DataFormTextField IsReadOnly="True" Binding="{Binding MovieID}" FieldLabelContent="ID" /> |
| |
| <df:DataFormTextField Binding="{Binding Name }" FieldLabelContent="Name" /> |
| |
| <df:DataFormTemplateField FieldLabelContent="Year"> |
| <df:DataFormTemplateField.DisplayTemplate> |
| <DataTemplate> |
| <TextBox Text="{Binding Year}" HorizontalAlignment="Left" /> |
| </DataTemplate> |
| </df:DataFormTemplateField.DisplayTemplate> |
| <df:DataFormTemplateField.EditTemplate> |
| <DataTemplate> |
| <controls:NumericUpDown Maximum="2050" Minimum="1900" IsEditable="False" |
| alue="{Binding Year, Mode=TwoWay, Converter={StaticResource yearConverter}}" HorizontalAlignment="Left" /> |
| </DataTemplate> |
| </df:DataFormTemplateField.EditTemplate> |
| </df:DataFormTemplateField> |
| |
| <df:DataFormDateField Binding="{Binding AddedOn}" IsReadOnly="True" FieldLabelContent="Date Added" /> |
| |
| <df:DataFormTextField Binding="{Binding Producer}" FieldLabelContent="Producer" /> |
| |
| <df:DataFormComboBoxField Binding="{Binding Genre, Mode=TwoWay, Converter={StaticResource enumSelectedValueConverter}}" FieldLabelContent="Genre" /> |
| </df:DataForm.Fields> |
The MovieID field is a simple TextBox control. As we do not want this field to be editable, we set its property IsReadOnly to true. However, if you want a TextBox field to be read-only when it is displayed, but to be editable, when it is in edit mode, you should set its property IsEditModeReadOnly.
For the Year field we use a template field. You can specify template for display, edit and insert mode. Note: In edit mode we use a NumericUpDown control. It is available in the Silverlight Toolkit. This control does not accept a “normal” binding, so we use a simple converter. This converter does nothing more than just converting an object to a string or an integer.
The most interesting field here is the Genre field. To visualize this property we use a ComboBox field. You remember that we have a custom enum, called Genres. I bind its members to the ComboBox field in the Loaded event of the whole user control. So, the ItemsSource of the ComboBox field is a array of strings. In order to make the ComboBox select a specific value (using bindings), you have two options: using the Binding property or using the SelectedIndexBinding one. You also need to define a custom converter, which will convert a Genres item to a string and a string to a Genres item.
There are some additional objects, you can use when defining the fields:
- DataFormHeader – specifies a text, which is shown above all fields
- DataFormSeparator – a line, which separates fields
- DataFormFieldGroup – groups fields in it
Customizing the Entire DataForm Layout
Well, we saw how we can customize fields of a DataForm control. This is pretty cool, but we want more and more. We want to change the entire look of the control. Is it possible? The answer is, “Yes, it is”. DataForm control provides templates for each part of it and each mode can be in. Let’s have a look at these templates:
- HeaderTemplate – you can customize the header of the control
- DisplayTemplate– you can customize the display mode
- EditTemplate – you can customize the edit mode
- InsertTemplate – you can customize the insert mode
- Template – you can customize the whole control
| <df:DataForm.DisplayTemplate> |
| <DataTemplate> |
| <StackPanel Orientation="Vertical"> |
| <TextBlock Text="{Binding Name}" /> |
| <TextBlock Text="{Binding Year}" /> |
| <TextBlock Text="{Binding AddedOn}" /> |
| <TextBlock Text="{Binding Producer}" /> |
| <TextBlock Text="{Binding Genre}" /> |
| </StackPanel> |
| </DataTemplate> |
| </df:DataForm.DisplayTemplate> |
| <df:DataForm.EditTemplate> |
| <DataTemplate> |
| <StackPanel Orientation="Vertical"> |
| <TextBox Grid.Row="0" Text="{Binding Name, Mode=TwoWay}" /> |
| <toolkit:NumericUpDown Grid.Row="1" Minimum="1900" Maximum="2050" HorizontalAlignment="Left" Value="{Binding Year, Mode=TwoWay, Converter={StaticResource yearConverter}}" /> |
| <TextBlock Grid.Row="2" Text="{Binding AddedOn}" /> |
| <TextBox Grid.Row="3" Text="{Binding Producer, Mode=TwoWay}" /> |
| <ComboBox x:Name="cboGenres" Grid.Row="4" ItemsSource="{Binding Genre, Converter={StaticResource enumGetValuesConverter}}" SelectedItem="{Binding Genre, Mode=TwoWay, Converter={StaticResource enumSelectedValueConverter}}" /> |
| </StackPanel> |
| </DataTemplate> |
| </df:DataForm.EditTemplate> |
You see that you can create your own templates for different modes. This functionality is very powerful, because it gives you a great freedom when you want to customize a DataForm control.
Styling the DataForm Control
You can apply many styles to a DataForm control in order to change its appearance. This can help you make your DataForm control use the styling of your application. Here is a list will all possible styles, you can apply to a DataForm control:
- DescriptionViewerStyle – changes the style of the description-viewer (you will see more about description viewer in my next article)
- ErrorSummaryStyle – changes the style of the error summary block, which is displayed when an error is occurred while saving the form
- FieldLabelStyle – changes the style of labels of fields
- Style – changes the style of the entire DataForm control
Do not forget this is a normal Silverlight control, so you can take it into Expression Blend and change whatever you like in order to make it fit your application. Free your imagination and do everything you want, because you have this ability.
Conclusion
This is a big and complicated control that can do a lot for you in a line of business application. I showed you that we can bind both a single object and a collection of objects to it. We can customize the way it generates the fields and the way it looks.
In my last article of this series I will tell you everything about validation, when working with DataForm control. You can apply either automatic validation or manual validation. You will see how you can set different validation rules to your business object’s properties – you can specify a property as a required, you can specify a range validation, a regular expression validation (all like in ASP.NET). You can also specify different error messages. You will learn how to manage event like Edit, Delete, Insert in your business object (sometimes this is very useful).
Source Code
You can download the source code of the examples and test it yourself.
References
- http://silverlight.net/learn/learnvideo.aspx?video=187317
- http://pendsevikram.blogspot.com/2009/03/silverlight-3-dataform-control-features.html
- http://microapplications.com/blog/archive/2009/03/27/328.aspx