This article is Part 2 of the series “Producing and Consuming OData in a Silverlight and Windows Phone 7 application.”.
To refresh your memory on what OData is:
The Open Data Protocol (OData) is simply an open web protocol for querying and updating data. It allows for the consumer to query the datasource (usually over HTTP) and retrieve the results in Atom, JSON or plain XML format, including pagination, ordering or filtering of the data.
To recap what we learned in the previous section:
- We learned how you would produce an OData Data Source starting from File->New Project and selecting empty ASP.NET Application.
- We generated a SQL Compact 4 Edition DB and populated it with data.
- We created our Entity Framework 4 Model and OData Data Service.
- Finally, we learned about basic sorting and filtering of the OData Data Source using the web browser and a free utility called LinqPAD.
In this article, I am going to show you how to consume an OData Data Source using Silverlight 4. In the third and final part of the series, we will consume the data using Windows Phone 7. Read the complete series of articles to have a deep understanding of OData and how you may use it in your own applications.
See the video tutorial
Download the source code for part 2 | Download the slides
Adding on to our existing project.
Hopefully you have completed part 1 of the series, if you have not you may continue with this exercise by downloading the source code to Part 1 and continue. I would recommend at least watching the video to part 1 in order to have a better understanding of where you can add OData to your own applications.
Go ahead and load the SLShowODataP1 project inside of Visual Studio 2010, and look under Solution Explorer. Now right click CustomerService.svc and Select “View in Browser”.

If everything is up and running properly, then you should see the following screen (assuming you are using IE8).
Please note that any browser will work. I chose to use IE8 for demonstration purposes only.
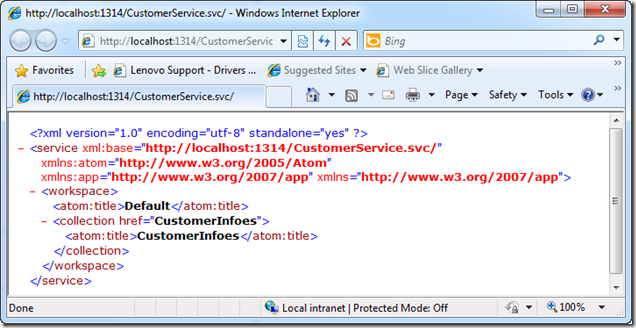
If you got the screen listed above then we know everything is working properly and can continue. If not download the solution and continue with the rest of the article.
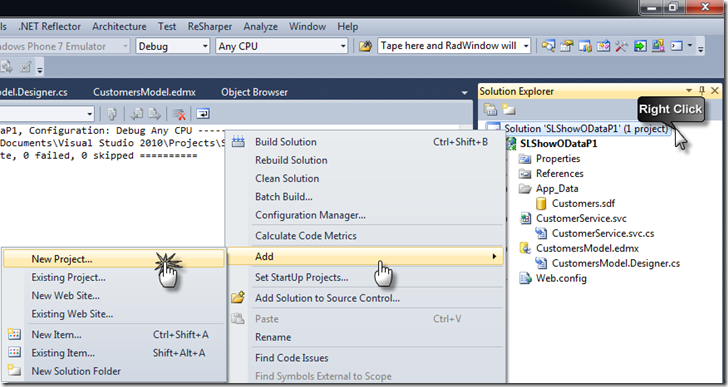
To keep things simple, we are going to use this same project and add in our Silverlight Application. So to begin, you will Right Click on the Solution and select “Add” then “New Project”.
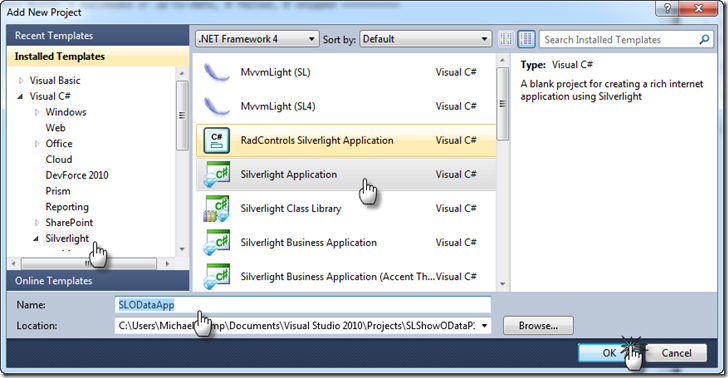
You will want to select “Silverlight” –> “Silverlight Application” –> and give it a name of “SLODataApp” and hit “OK”.
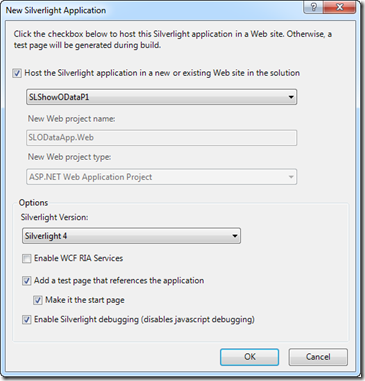
You will be presented with the following screen and we are going to leave everything as the default.
Now our project should look like the following:
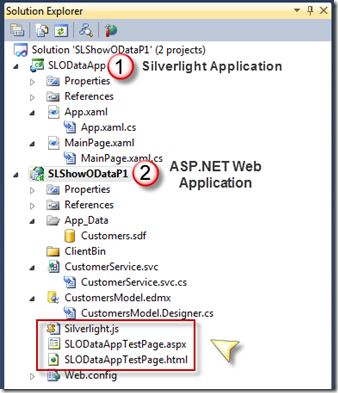
We have a Silverlight Application as well as a ASP.NET Web Application. You should notice that the ASP.NET application has automatically added the Silverlight helper JavaScript as well as the test page to load our Silverlight Application.
The first thing that we are going to do is create our user interface. This will allow us to select any of our customers and display a “Details” view.
Here is a screenshot from the completed application.
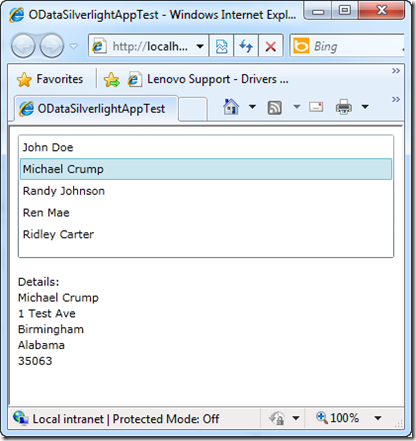
Double click on your MainPage.xaml and replace the existing Grid with the code snippet provided below.
1: <Grid x:Name="LayoutRoot" Background="White">
2: <Grid.RowDefinitions>
3: <RowDefinition />
4: <RowDefinition />
5: </Grid.RowDefinitions>
6: <ListBox ItemsSource="{Binding}" DisplayMemberPath="FirstName" x:Name="customerList" Margin="8" />
7: <StackPanel DataContext="{Binding SelectedItem, ElementName=customerList}" Margin="8" Grid.Row="1">
8: <TextBlock Text="Details:"/>
9: <TextBlock Text="{Binding FirstName}"/>
10: <TextBlock Text="{Binding LastName}"/>
11: <TextBlock Text="{Binding Address}"/>
12: <TextBlock Text="{Binding City}"/>
13: <TextBlock Text="{Binding State}"/>
14: <TextBlock Text="{Binding Zip}"/>
15: </StackPanel>
16: </Grid>
Lines 1-5 are setting up our display to allow two rows. One for the ListBox that contains our individual collection and one for our “details view” that will provide additional information about our customer.
Line 6 contains our ListBox that we going to bind the collection to. The DisplayMemberPath tells the listbox that we want to show the “Name” column. We also give this ListBox a name so we can refer our StackPanel’s DataContext to it. Finally, we give it a margin so it appears nice and neat on the form.
Lines 7-15 contains our StackPanel which represents our “Details” view. We set the DataContext to bind to the SelectedItem of our ListBox to populate the Name, Address, City, State and Zip Code when a user selects an item.
Lines 16 is simply the closing tag for the Grid.
Now that we have our UI built, it should look like the following inside of Visual Studio 2010.
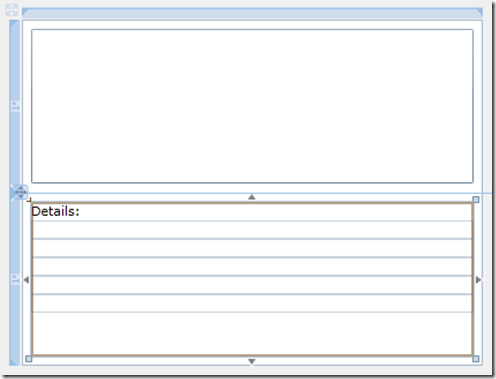
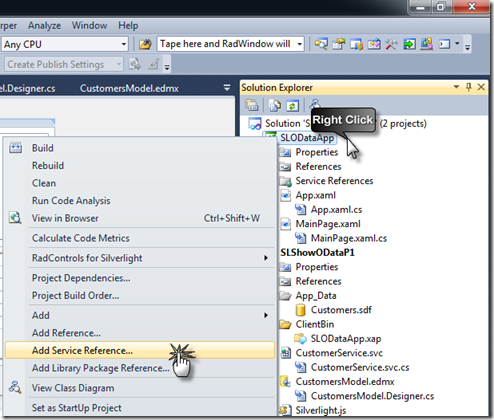
We will now need to add a Service Reference to our OData Data Service before we can write code-behind to retrieve the data from the service.
We will need to right-click on our project and select Add Service Reference.
On the “Add Service Reference” screen, click Discover then type “DataServices” as the name for the Namespace and finally hit OK.
Note: You can use another name besides “DataServices”, I typically use that as Namespace name to avoid confusion to myself and others.
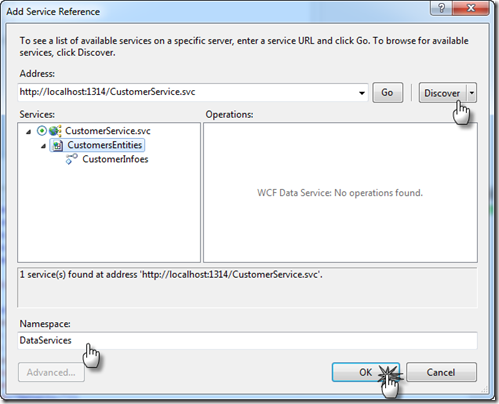
If this OData service was hosted somewhere you could actually use a http://www.yourdomain.com/CustomerService.svc instead of specifying the port number.
You may notice that you have a few extra .dll’s added to your project as well as a new folder called Service References. You may also notice how large the project has become since our initial ASP.NET Empty Web Project!
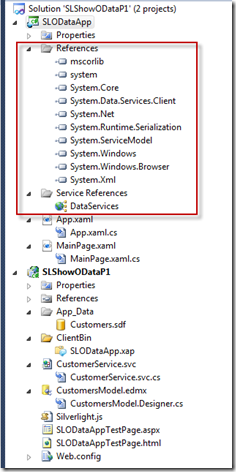
Now that we are finished with our UI and adding our Service Reference, let’s add some code behind to call our OData Data Service and retrieve the data into our Silverlight 4 Application.
Now would be a good time to go ahead and Build our project. Select Build from the Menu and Build Solution. Now we can Double click on the MainPage.xaml.cs file and add the following code snippet, after replacing the MainPage() Constructor.
1: public MainPage()
2: {
3: InitializeComponent();
4: this.Loaded += new RoutedEventHandler(MainPage_Loaded);
5: }
6:
7: void MainPage_Loaded(object sender, RoutedEventArgs e)
8: {
9: var ctx = new CustomersEntities(new Uri("/CustomerService.svc", UriKind.Relative));
10: var qry = from g in ctx.CustomerInfoes
11: select g;
12:
13: var coll = new DataServiceCollection<CustomerInfo>();
14: coll.LoadCompleted += new EventHandler<LoadCompletedEventArgs>(coll_LoadCompleted);
15: coll.LoadAsync(qry);
16:
17: DataContext = coll;
18: }
19:
20: void coll_LoadCompleted(object sender, LoadCompletedEventArgs e)
21: {
22: if (e.Error != null)
23: {
24: MessageBox.Show("Error Detected, handle accordingly.");
25: }
26: }
Lines 1-5 is the standard code generated except for the Loaded event. The Loaded Event created a new Event Handler called Main_Page Loaded.
Line 9 creates a new context with our CustomersEntities (which was generated by Entity Framework 4) and passes the URI of our data service which is located in our ASP.NET Project called CustomerService.svc.
Lines 10-11 simply creates a query that returns all records in our collection. We will modify this shortly to create a where and an orderby example.
Lines 13-15 creates a DataServiceCollection which provides notification if an item is added, deleted or the list is refreshed. It is expecting a collection that was also created by Entity Framework.
Line 17 is simply setting the DataContext of MainPage to the collection.
Finally lines 20-26 are checking for an error and displaying a MessageBox. Of course, in a production application you may want to log that error instead of interrupting the user with a message they shouldn’t be concerned with.
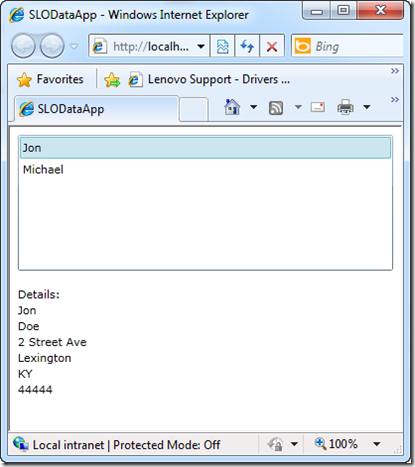
If we go ahead and run this application, we would get the following screen.
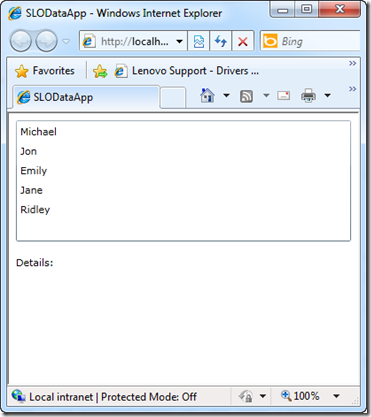
After selecting a user, we would get the Details view as shown below:
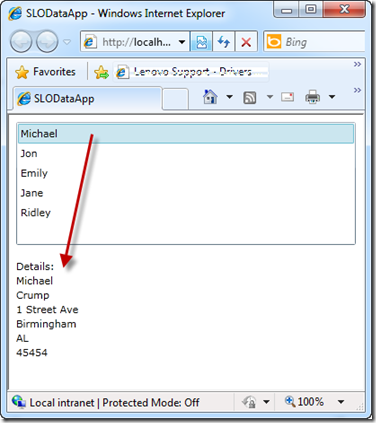
Let’s go back and add a query to filter the data. So go back to your MainPage.xaml.cs file and change this line:
1: var qry = from g in ctx.CustomerInfoes
2: select g;
to:
1: var qry = from g in ctx.CustomerInfoes
2: where g.ID < 3
3: orderby g.FirstName
4: select g;
Now if we run this project you will notice that we only have 2 results returned and ordered by the FirstName. So in this example, Jon is listed first.
Conclusion
At this point, we have seen how you would produce an OData Data Source and learn some basic sorting and filtering using the web browser and LinqPad. We have also consumed the data in a Silverlight 4 Application and queried the data with and without a filter. In the next part of the series, I am going to show you how to consume this data in a Windows Phone 7 Application. Again, thanks for reading and please come back for the final part.

Michael Crump is an MCPD that has been involved with computers in one way or another for as long as he can remember, but started professionally in 2002. After spending years working as a systems administrator/tech support analyst, Michael branched out and started developing internal utilities that automated repetitive tasks and freed up full-time employees. From there, he was offered a job working at McKesson corporation and has been working with some form of .NET and VB/C# since 2003.
He shares his findings in his personal blog: http://michaelcrump.net and he also tweets at:@mbcrump