This article is Part 4 of the series “Producing and Consuming OData in a Silverlight and Windows Phone 7 application.”.
To refresh your memory on what OData is:
The Open Data Protocol (OData) is simply an open web protocol for querying and updating data. It allows for the consumer to query the datasource (usually over HTTP) and retrieve the results in Atom, JSON or plain XML format, including pagination, ordering or filtering of the data.
To recap what we learned in the previous section:
- We began by creating the User Interface and setting up our bindings on our elements.
- We added a service reference pointing to our OData Data Service inside our project.
- We added code behind to sort and filter the data coming from our OData Data Source into our Silverlight 4 Application.
- Finally, we consumed an OData Data Source using Windows Phone 7 (pre-Mango).
In this article, I am going to show you how to create, read, update and delete OData data using the latest Windows Phone 7 Mango release. Please read the complete series of articles to have a deep understanding of OData and how you may use it in your own applications.
Download the source code for part 4
Testing and Modifying our existing OData Data Service
I would recommend at the very least that you complete part 1 of the series. If you have not, you may continue with this exercise by downloading the completed source code to Part 1 and continue. I would also recommend watching the video to part 1 in order to have a better understanding of the OData protocol.
Before we get started, I have good news. The good news is that in Mango you do not have to download extra tools or generate your own proxy classes and import them into Visual Studio like you had to do pre-mango. You will be able to use the “Add Service Reference” like we did in Part 2 (Silverlight 4). Let’s go ahead and get started learning more about OData with Mango.
Go ahead and download the completed source code to Part 1 of this series and load it into Visual Studio 2010. Now right click CustomerService.svc and Select “View in Browser”.

If everything is up and running properly, then you should see the following screen (assuming you are using IE8).
Please note that any browser will work. I chose to use IE8 for demonstration purposes only.
![clip_image001[6] clip_image001[6]](/storage/users/mbcrump/clip_image001_6__thumb.png)
If you got the screen listed above then we know everything is working properly and can continue. If not download the completed solution and continue with the rest of the article.
We are going to need to make one quick change before continuing. Double click the CustomerService.svc.cs file and change the following line from:
1: config.SetEntitySetAccessRule("CustomerInfoes", EntitySetRights.AllRead);
to
1: config.SetEntitySetAccessRule("CustomerInfoes", EntitySetRights.All);
This will simply give our service the ability to create, read, update and delete data.
At this point, leave this instance of Visual Studio running. We are going to use this OData Data Service in the “Getting Started” part. You may also want to copy and paste the address URL which should be similar to the following:
http://localhost:6844/CustomerService.svc/
At this point, we are ready to create our Windows Phone 7 Mango Application. So open up a new instance of Visual Studio 2010 and select File –> New Project.
![clip_image001[8] clip_image001[8]](/storage/users/mbcrump/clip_image001_8__thumb.png)
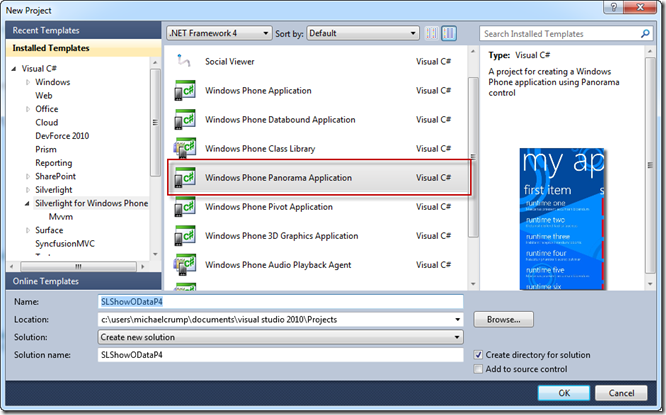
Select Silverlight for Windows Phone –> Windows Phone Panorama Application and give it the name, SLShowODataP4 and finally click OK.
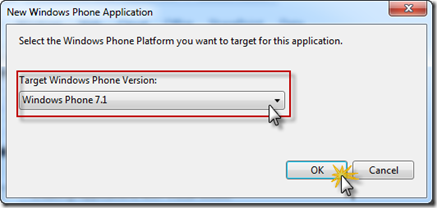
On the next screen make sure you select “Windows Phone 7.1” as the Windows Phone Platform that you want to target.
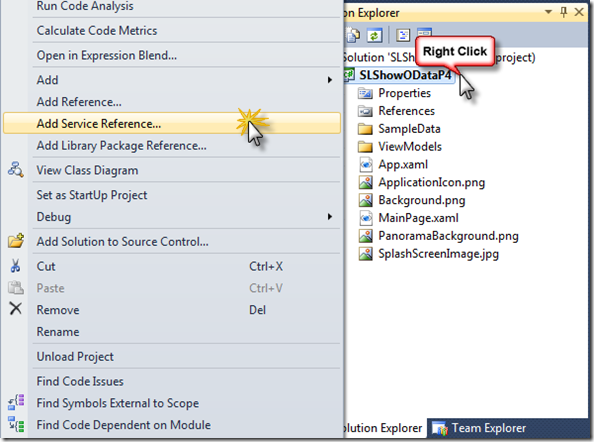
Once the project loads, the first thing we are going to do is to add a Service Reference to our CustomerService. Simply right click your project and select “Add Service Reference”…
Type the Address of your service (as shown in the first step) and hit “Go”. You should now see Services and you can expand that box to see CustomerInfoes if you wish. Now go ahead and type a name for the Namespace. We are going to use CustomersModel for the name and click OK.
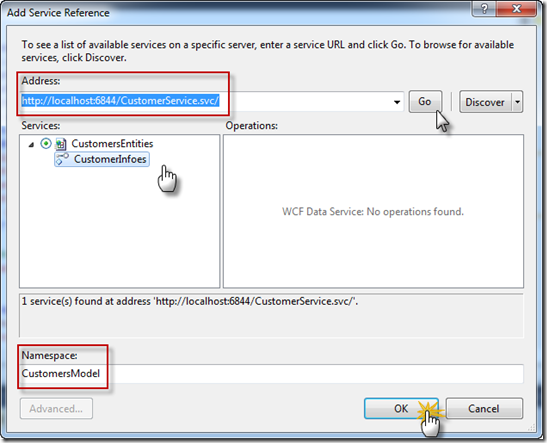
You may notice a few things happened behind the scene. First the reference to “System.Data.Services.Client” was added automatically for us and you now have a Service Reference.
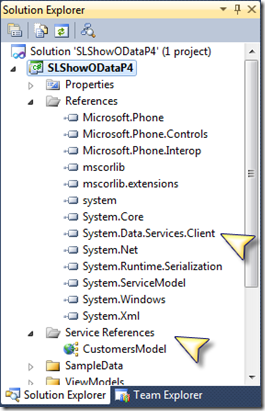
Now we will need to create the User Interface and write the code behind to pull the data into our application.
Double click on the MainPage.xaml file and replace the contents of <—Panorama item one---> with the following code snippet:
1: <!--Panorama item one-->
2: <controls:PanoramaItem Header="first item">
3: <!--Double line list with text wrapping-->
4: <ListBox x:Name="lst" Margin="0,0,-12,0" ItemsSource="{Binding}">
5: <ListBox.ItemTemplate>
6: <DataTemplate>
7: <StackPanel Margin="0,0,0,17" Width="432">
8: <TextBlock Text="{Binding FirstName}" TextWrapping="Wrap" Margin="12,-6,12,0" Style="{StaticResource PhoneTextExtraLargeStyle}"/>
9: <TextBlock Text="{Binding LastName}" TextWrapping="Wrap" Margin="12,-6,12,0" Style="{StaticResource PhoneTextExtraLargeStyle}"/>
10: <TextBlock Text="{Binding Address}" TextWrapping="Wrap" Margin="12,-6,12,0" Style="{StaticResource PhoneTextSubtleStyle}"/>
11: <TextBlock Text="{Binding City}" TextWrapping="Wrap" Margin="12,-6,12,0" Style="{StaticResource PhoneTextSubtleStyle}"/>
12: <TextBlock Text="{Binding State}" TextWrapping="Wrap" Margin="12,-6,12,0" Style="{StaticResource PhoneTextSubtleStyle}"/>
13: <TextBlock Text="{Binding Zip}" TextWrapping="Wrap" Margin="12,-6,12,0" Style="{StaticResource PhoneTextSubtleStyle}"/>
14: </StackPanel>
15: </DataTemplate>
16: </ListBox.ItemTemplate>
17: </ListBox>
18: </controls:PanoramaItem>
This xaml should be very straightforward. This ListBox contains a DataTemplate with a StackPanel that each TextBlock is binding to an element from our collection. This includes the FirstName, LastName, Address, City, State and Zip Code.
Let’s go ahead and setup our second Panorama Item page which will include the “Read”, “Add”, “Update” and “Delete” buttons by using the following code snippet.
Double click on the MainPage.xaml file and replace the contents of <—Panorama item two---> with the following code snippet:
1: <controls:PanoramaItem Header="second item">
2: <!--Double line list with image placeholder and text wrapping-->
3: <StackPanel>
4: <Button x:Name="btnRead" Content="Read" Click="btnRead_Click"/>
5: <Button x:Name="btnAdd" Content="Add" Click="btnAdd_Click" />
6: <Button x:Name="btnUpdate" Content="Update" Click="btnUpdate_Click" />
7: <Button x:Name="btnDelete" Content="Delete" Click="btnDelete_Click" />
8: </StackPanel>
9: </controls:PanoramaItem>
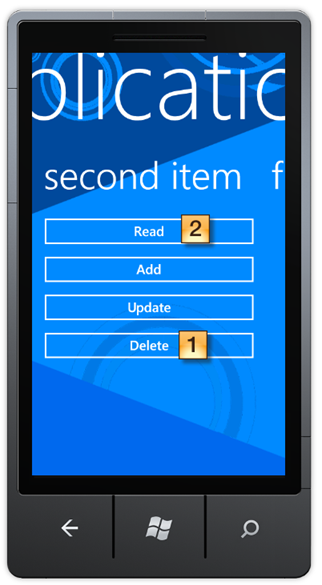
Page 2 should look like the following in the design view.
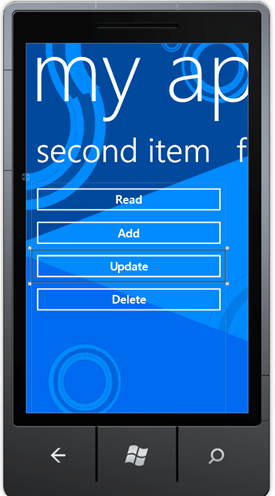
NOTE: You will want to go ahead and make sure the Click Event handlers are resolved before continuing.
Now that we are finished with our UI and adding our Service Reference, let’s add some code behind to call our OData Data Service and retrieve the data into our Windows Phone 7 Application.
Now would be a good time to go ahead and Build our project. Select Build from the Menu and Build Solution.
Reading Data from the Customers Table.
Go ahead and add the following namespaces on the MainPage.xaml.cs file.
1: using System;
2: using System.Data.Services.Client;
3: using System.Linq;
4: using System.Windows;
5: using Microsoft.Phone.Controls;
6: using SLShowODataP4.CustomersModel;
Lines 1-6 are the proper namespaces that we will need to query an OData Data Source. We have already included our CustomersModel so we are ready to go.
Add the following line just before the MainPage() Constructor.
1: public CustomersEntities ctx = new CustomersEntities(new Uri("http://localhost:6844/CustomerService.svc/", UriKind.Absolute));
This line just creates a new context with our CustomersEntities (which was generated by using the DataSvcUtil tool that we downloaded earlier) and passes the URI of our data service which is located in our ASP.NET Project that we have running called CustomerService.svc.
Let’s now add code for our Read Button.
1: private void btnRead_Click(object sender, RoutedEventArgs e)
2: {
3: //Read from OData Data Source
4: var qry = from g in ctx.CustomerInfoes
5: orderby g.FirstName
6: select g;
7:
8: var coll = new DataServiceCollection<CustomerInfo>();
9: coll.LoadCompleted += new EventHandler<LoadCompletedEventArgs>(coll_LoadCompleted);
10: coll.LoadAsync(qry);
11:
12: DataContext = coll;
13: }
Line 4 is the query that we will return records to in our collection. In this particular query, we are going to select all records and order them by the first name.
Lines 8-12 creates a DataServiceCollection which provides notification if an item is added, deleted or the list is refreshed. We have also added a LoadCompleted event that will display a MessageBox if we had an error. It will then Asynchronously load the collection passing the query we specified earlier. Finally, it sets the DataContext of the page to the collection.
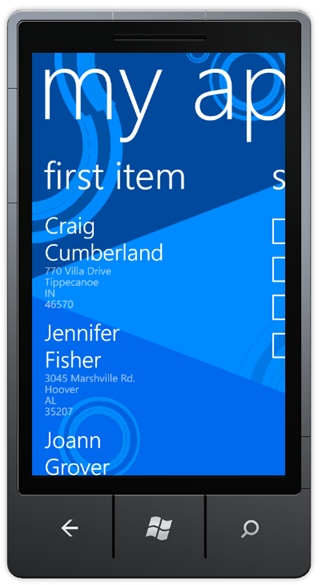
If we go ahead and run this application and click on the “Read” button on the second page, we will get the following screen.
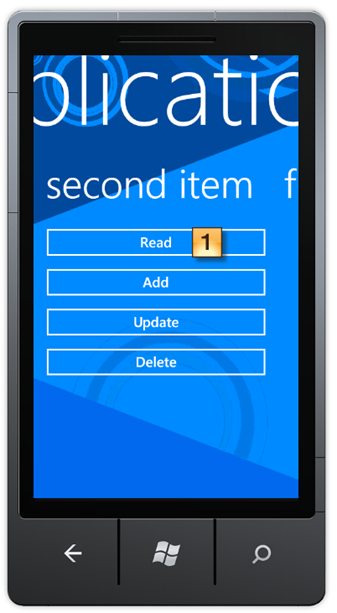
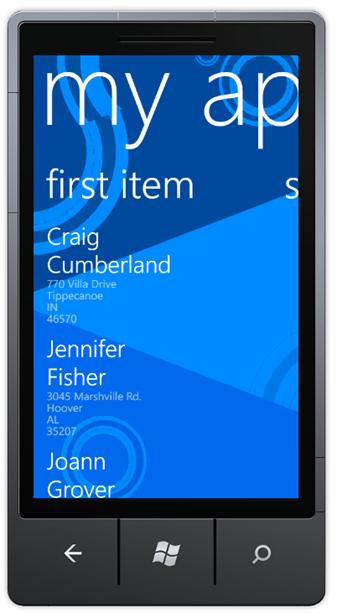
Notice how our results are in alphabetical order? That occurred because our query on line 4 above specified to get all the Customers and order them by the FirstName. Pretty easy huh? Let’s step it up a notch and actually add a record to our Customers Table.
Adding a record to the Customers Table.
Adding a record is going to be pretty straight forward since we already have a context with CustomerEntities defined. Go ahead and add the following code snippet:
1: private void btnAdd_Click(object sender, RoutedEventArgs e)
2: {
3: //Adding a new Customer
4: var newCustomer = new CustomerInfo();
5: newCustomer.FirstName = "Andy1";
6: newCustomer.LastName = "Griffith1";
7: newCustomer.Address = "1111 New Address";
8: newCustomer.City = "Empire";
9: newCustomer.Zip = "34322";
10: newCustomer.State = "AL";
11:
12: ctx.AddObject("CustomerInfoes", newCustomer);
13:
14: //Code to Add/Update/Delete from OData Data Source
15: ctx.BeginSaveChanges(insertUserInDB_Completed, ctx);
16: }
17:
18: private void insertUserInDB_Completed(IAsyncResult result)
19: {
20: ctx.EndSaveChanges(result);
21: }
Lines 4-10 are just setting up a new CustomerInfo() object. We are going to add all the required fields to create a new Customer.
Line 12 Adds the specified object to the set of objects that the DataServiceContext is tracking. In this case, we are going to add our newCustomer that we just created to “CustomerInfoes”.
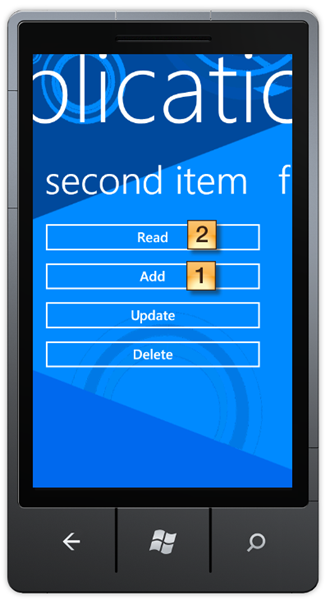
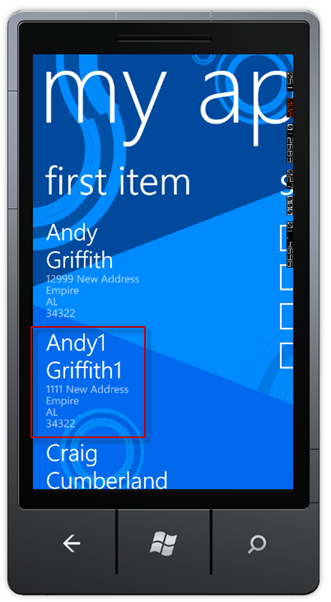
Lines 15-21 Asynchronously submits the pending changes to the OData service collected by the DataServiceContext since the last time changes were saved. The last line called to complete the BeginSaveChanges operation. Now if we click the 1) “Add” button from our second screen then hit 2) “Read” to refresh our screen we shall see the following.
Update a record to the Customers Table.
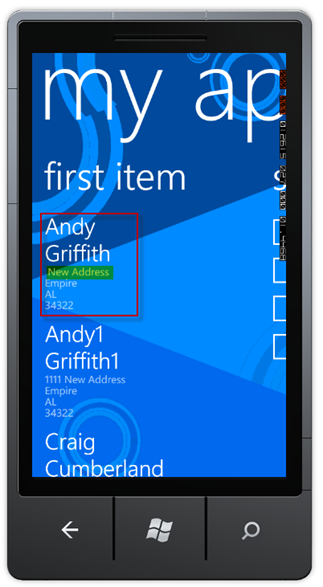
Now let’s go ahead and update an existing record. In this example, we are going to update the first record titled “Andy Griffith”. We are going to change his address to the value “ New Address”. How creative! Ok, let’s get started.
1: private void btnUpdate_Click(object sender, RoutedEventArgs e)
2: {
3: var qry = ctx.CreateQuery<CustomerInfo>("CustomerInfoes").AddQueryOption("$filter", "LastName eq" + " \'" + "Griffith" + "\'");
4:
5: qry.BeginExecute(r =>
6: {
7: var query = r.AsyncState as DataServiceQuery<CustomerInfo>;
8:
9: try
10: {
11: var result = query.EndExecute(r).First();
12: result.Address = " New Address";
13: ctx.UpdateObject(result);
14:
15: ctx.BeginSaveChanges(changeUserInDB_Completed, ctx);
16: }
17:
18: catch (Exception ex)
19: {
20: MessageBox.Show(ex.ToString());
21: }
22:
23:
24: }, qry);
25: }
26:
27: private void changeUserInDB_Completed(IAsyncResult result)
28: {
29: ctx.EndSaveChanges(result);
30: }
Lines 1-3 are setting up the query that we are going to pass to the “CustomerInfoes” object. As you can see, we are setting the filter to LastName equals Griffith. You could also run the filter command directly inside a web browser. In this case, it is only going to return one record.
Lines 5-13 Starts an asynchronous network operation that executes the query that we created earlier. Line 11 will return the first element in the sequence. We then specify the new Address value and update the object.
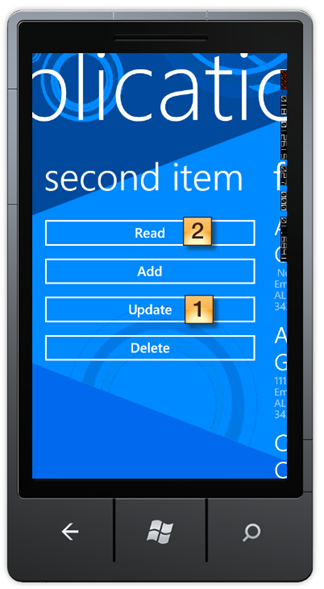
Lines 15-30 Asynchronously submits the pending changes to the OData service collected by the DataServiceContext since the last time changes were saved. Now if we click the 1) “Update” button from our second screen then hit 2) “Read” to refresh our screen we shall see the following.
Deleting a record from the Customers Table.
Now let’s go ahead and delete a existing record. In this example, we are going to update the first record titled “Andy Griffith”. Go ahead and copy and paste the following code snippet for the “Delete” button.
1: private void btnDelete_Click(object sender, RoutedEventArgs e)
2: {
3: var qry = ctx.CreateQuery<CustomerInfo>("CustomerInfoes").AddQueryOption("$filter", "LastName eq" + " \'" + "Griffith" + "\'");
4:
5: qry.BeginExecute(r =>
6: {
7: var query = r.AsyncState as DataServiceQuery<CustomerInfo>;
8:
9: try
10: {
11:
12: var result = query.EndExecute(r).First();
13: ctx.DeleteObject(result);
14:
15: ctx.BeginSaveChanges(changeUserInDB_Completed, ctx);
16: }
17:
18: catch (Exception ex)
19: {
20: MessageBox.Show(ex.ToString());
21: }
22:
23:
24: }, qry);
25: }
26:
27: private void changeUserInDB_Completed(IAsyncResult result)
28: {
29: ctx.EndSaveChanges(result);
30: }
Right off the bat you can probably tell, this looks exactly like the update code. You are correct except it has a ctx.DeleteObject where the update statement had a ctx.UpdateObject. Let’s take a look at the code anyways.
Lines 1-3 are setting up the query that we are going to pass to the “CustomerInfoes” object. As you can see, we are setting the filter to LastName equals Griffith. It will only going to return one record.
Lines 5-13 Starts an asynchronous network operation that executes the query that we created earlier. Line 11 will return the first element in the sequence. We then specify that we wish to delete the Customer that matches the filter.
Lines 15-30 Asynchronously submits the pending changes to the OData service collected by the DataServiceContext since the last time changes were saved. Now if we click the 1) “Delete” button from our second screen then hit 2) “Read” to refresh our screen we shall see that “Griffith” has been removed.
Conclusion
At this point, we have seen how you would produce and consume an OData Data Source using the web browser, LinqPad, Silverlight 4 and Windows Phone 7 pre-Mango and now Mango. We have learned how to do some basic sorting and filtering using all the same. Now that you are equipped with a solid understanding of producing and consuming OData Data Services, you can begin to use this in your own applications. I want to thank you for reading this series and if you ever have any questions feel free to contact me on the various souces listed below. I also wanted to thank SilverlightShow.Net for giving me the opportunity to share this information with everyone.
 Michael Crump is a Silverlight MVP and MCPD that has been involved with computers in one way or another for as long as he can remember, but started professionally in 2002. After spending years working as a systems administrator/tech support analyst, Michael branched out and started developing internal utilities that automated repetitive tasks and freed up full-time employees. From there, he was offered a job working at McKesson corporation and has been working with some form of .NET and VB/C# since 2003.
He shares his findings in his personal blog: http://michaelcrump.net and he also tweets at:@mbcrump