(X) Hide this
    • Login
    • Join
      • Generate New Image
        By clicking 'Register' you accept the terms of use .

Using the StackPanel control in Silverlight

(11 votes)
Martin Mihaylov
>
Martin Mihaylov
Joined Oct 29, 2007
Articles:   50
Comments:   70
More Articles
13 comments   /   posted on Apr 10, 2008
Categories:   Controls

This article is compatible with the latest version of Silverlight.

Introduction

In this article we are going to take a look at one of the layout controls in Silverlight – the Stack Panel. The name is not a coincidence. This panel behaves like a Stack. The controls are ordered one after another. The default order direction is vertical, but it can be changed to horizontal too.  Though this is just a panel after all and we will use it for placing and ordering our controls in the Silverlight player.

Overview

So, this is the Stack Panel:

    <StackPanel x:Name="Layout"></StackPanel>

 Let’s fill it with some controls.


    <StackPanel x:Name="Layout" Background="Black">
       
<Button x:Name="Button1" Content="Click me!"></Button>
       
<Button x:Name="Button2" Content="And me!" ></Button>
   
</StackPanel>


Let’s take a look now:

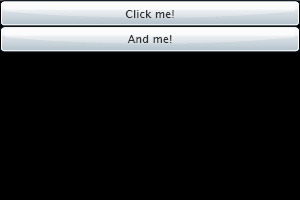
The dimensions of our user control are 300x200 pixels and we can see that the Stack Panel has taken all of them. We haven’t set the Width property of any of the buttons yet. So why are they stretched up to 300 pixels in width? This is because of the “stack”. The element fills its place and then comes the other and the other and so on. When no dimensions are specified, the control takes the whole available space. The same happens if the Orientation property is set to Horizontal:


    <StackPanel x:Name="Layout" Background="Black" Orientation="Horizontal">
       
<Button x:Name="Button1" Content="Click me!"></Button>
       
<Button x:Name="Button2" Content="And me!" ></Button>
    </StackPanel>


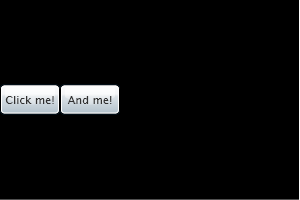
In this case the buttons are stretched in their height. We can easily set the height and the width of the buttons so they look normal again. And don’t worry even if you shrink the buttons - the ordering will preserve.


    <StackPanel x:Name="Layout" Background="Black" Orientation="Horizontal">
       
<Button x:Name="Button1" Content="Click me!" Width="60"
            Height
="30" />
       
<Button x:Name="Button2" Content="And me!" Width="60" Height="30" />
    </StackPanel>

don’t be surprised:

It’s analogical with the horizontal orientation.

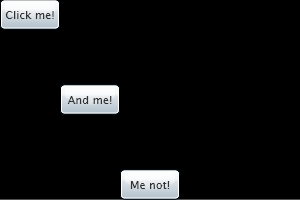
We can play a bit with the alignment of the buttons using their VerticalAlignment property for the horizontal and their HorizontalAlignment property for the vertical orientation:


    <StackPanel x:Name="Layout" Background="Black" Orientation="Horizontal">
       
<Button x:Name="Button1" Content="Click me!" Width="60" Height="30"             VerticalAlignment="Top" />
       
<Button x:Name="Button2" Content="And me!" Width="60" Height="30" />
       
<Button x:Name="Button3" Content="Me not!" Width="60" Height="30"                 VerticalAlignment="Bottom" />
    </StackPanel>

and it should look like that:

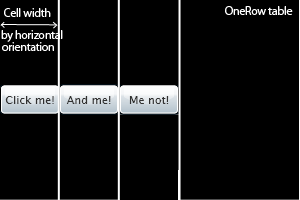
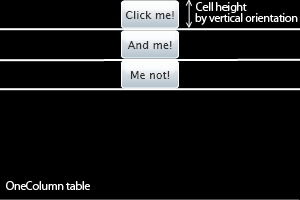
Same is with the vertical orientation - you can try it by yourself. Note that for vertical orientation the vertical alignment of the controls, respectively for horizontal orientation the horizontal alignment won’t work. Why’s that? Imagine the Stack Panel is a OneColumn/OneRow table where height/width of the cell corresponds to the height/width of the control in it.

See the following pictures for more clarity:

Let’s take a look at the HorizontalAlignment property of the StackPanel. The default value is Stretched. The controls are centered and the panel takes the entire UserControl.


    <StackPanel x:Name="Layout" Background="Black" Orientation="Vertical">
       
<Button x:Name="Button1" Content="Click me!" Width="60"
            Height
="30" />             
        <Button x:Name="Button2" Content="And me!" Width="60" Height="30" />
       
<Button x:Name="Button3" Content="Me not!" Width="60" Height="30" />
   
</StackPanel>


If we set the HorizontalAlignment to Right, Left or Center the panel takes the width/height (depends on the orientation) of the longest control and is aligned properly.


    <StackPanel x:Name="Layout" Background="Black" Orientation="Vertical"             HorizontalAlignment="Right">
       
<Button x:Name="Button1" Content="Click me!" Width="60"
            Height
="30" />
       
<Button x:Name="Button2" Content="And me!" Width="80" Height="30" />
       
<Button x:Name="Button3" Content="Me not!" Width="60" Height="30" />
   
</StackPanel>


The same applies to the horizontal oriented panel by using the VerticalAlignment property.

 
Conclusion

This article is just a brief description of the key features of the StackPanel control. It targets the developer who has just started with the Silverlight controls. Any comments are welcomed.


Subscribe

Comments

  • -_-

    RE: Using the StackPanel control in Silverlight 2 Beta 1


    posted by Minh on May 16, 2008 09:58
    Thank you! It's helpful for me
  • -_-

    RE: Using the StackPanel control in Silverlight 2 Beta 1


    posted by Raju on Jun 04, 2008 22:01

    Thank u  so much . now i am under stand the stack panel Use. it is help ful to me.

  • -_-

    RE: Using the StackPanel control in Silverlight 2 Beta 1


    posted by Arun Vijai on Jun 09, 2008 23:23

    A simple cute article on the basics of stackpanel, expecting the next article from you.


  • -_-

    RE: Using the StackPanel control in Silverlight 2 Beta 1


    posted by Terrence K. on Sep 17, 2008 17:29

    Look at your first example with Orientation="Horizontal" and notice how the boxes are tall and skinny.  Please show an additional example with three buttons where the middle button fills the space and the first/last buttons have a fixed width.

  • Enrai

    RE: Using the StackPanel control in Silverlight 2 Beta 1


    posted by Enrai on Sep 18, 2008 07:34

    If you want to do this using a StackPanel you must set the width of the three buttons to fixed values, calculating how much has left for the middle one, because it's not possible a control to take all the available width in a StackPanel with horizontal orientation. The StackPanel uses so much space for a control as it needs, for example the width of the button, if not set, depends on the lenght of its content, an empty Grid control is not displayed. The same goes for the height and the vertical oriented StackPanel. And I think that's a correct behavior, because the controls are placed one after another in the stack and after the second button is placed how can its width be determined when there are othere controls on the line waiting to be placed in the panel. But there is a Layout control that will do this job for you - the Grid control. You can use a grid with 3 columns and one row like this one:

        <Grid Background="Black" Width="400" Height="300">
            <Grid.ColumnDefinitions>
                <ColumnDefinition Width="80"></ColumnDefinition>
                <ColumnDefinition Width="*"></ColumnDefinition>
                <ColumnDefinition Width="80"></ColumnDefinition>
            </Grid.ColumnDefinitions>
            <Grid.RowDefinitions>
                <RowDefinition Height="*"></RowDefinition>
            </Grid.RowDefinitions>
            <Button x:Name="Left" Content="Left Button" Grid.Row="0" Grid.Column="0" ></Button>
            <Button x:Name="Middle" Content="Middle Button" Grid.Row="0" Grid.Column="1"></Button>
            <Button x:Name="Right" Content="Right Button" Grid.Row="0" Grid.Column="2"></Button>
        </Grid>

    The Grid control allows a column to take all the space available. You can do that by setting it's width to "*" and the same goes for the row and its height. The button also have no restrictions for its width and height by the Grid control so it takes all of the available place in the cell.

    Hope that helps you! ;)

  • -_-

    Using the StackPanel control in Silverlight 2 Beta 1


    posted by Sasko on Jan 25, 2009 19:44

    Thanks

  • Enrai

    RE: Using the StackPanel control in Silverlight 2 Beta 1


    posted by Enrai on Jan 27, 2009 07:03

    You're welcome ;)

  • -_-

    RE: Using the StackPanel control in Silverlight 2 Beta 1


    posted by Nabeel on Aug 12, 2009 14:26
    very useful article for newbies.
  • -_-

    RE: Using the StackPanel control in Silverlight 2 Beta 1


    posted by kabul_hussain@infosys.com on Oct 09, 2009 17:00
    Thank u very much.
  • -_-

    RE: Using the StackPanel control in Silverlight 2 Beta 1


    posted by Kareem on Apr 25, 2010 00:06
    Thank you for this tutorials
  • -_-

    RE: Using the StackPanel control in Silverlight 2 Beta 1


    posted by Doan Huynh on Jun 02, 2010 10:50
    Thanks, it is useful for me
  • -_-

    RE: Using the StackPanel control in Silverlight


    posted by Pragati on 14:21
    Very useful article and easy to understand....Thank you......
  • kendyosiro

    Re: Using the StackPanel control in Silverlight


    posted by kendyosiro on May 02, 2013 16:52

    Thanks, this article is clear and it is useful for me.

Add Comment

Login to comment:
  *      *