Welcome to part 4 in this article series on LightSwitch development. Now that we have deeply covered data and screens, the third fundamental, queries, is up next. Queries are used to get the data in screens; hence they are the missing link between these two. After we’ve looked at how we can influence the application by changing queries, we’ll start writing code in LightSwitch. In the previous part, we already wrote a couple of lines of code. In this part, we’ll see more places where coding is possible and in some cases, required.
The code for this article (as the solution is at the end) can be downloaded here.
Queries
Using a query, we can get data from the data source to the screen. When creating a new table, LightSwitch will automatically create 2 queries for us. The first one returns all items from the table (basically a SELECT * FROM TABLE). The second one returns a single instance (which effectively results in either 0 or 1 record being returned). In the screen designer, when clicking on the Add Data Item button, we can see these 2 queries, as shown in the screenshot below:
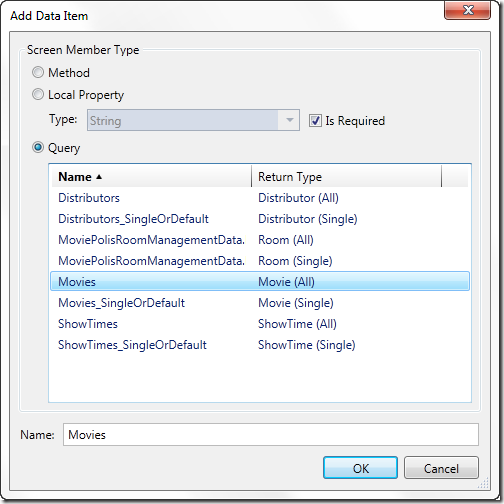
We can add these queries to a screen to return data. In fact, there are 2 types of queries in LightSwitch. As mentioned, each screen displaying data has a query. This is a local query, which is only used for one single screen. Secondly, we can create queries as part of the model. This query is more like a global query.
Local queries
When we create a new screen based on a table, LightSwitch will add a local query automatically. In the screenshot below where we are creating a new editable grid screen for Movies, the query is shown on the right.
By default, this is the “return me all the data you can find in the Movie table” query. However, with this screen, we want to show currently playing movies (in the Movie table, I’ve added a IsCurrentlyPlaying property without telling you…). To edit the query for this screen, we can click on the Edit Query link at the top of the right pane in the screenshot above. We now arrive in the query designer. This basically allows us to do filtering, sorting and adding parameters. For this demo, we can add a filter that says that only return Movies where the IsCurrentlyPlaying property is true as shown in the screenshot below. The results are shown ascending order based on the Title field.
Note that the query designer is smart enough to know what type the field has and based on that, it will show more or less options. Should we add a Filter based on the Id property, more options are possible since this field is of type Integer.
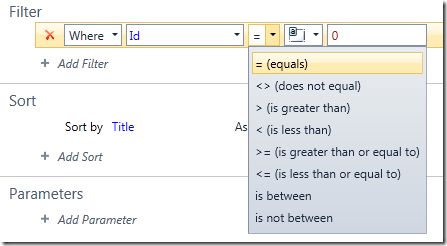
The query we have now created is bound to the screen we are using it in, it’s a local query. If we have put a lot of work in creating in, we’re basically stuck in terms of reusing it on another screen. If we want to build a query that we can reuse, we can do so.
Global queries
In the Solution Explorer, we can right-click on a table. One of the options that pops out, is the Add query one. When clicking this, we arrive again in the query designer. One important difference here is that the query now becomes part of the model: it can be seen directly linked to the table.
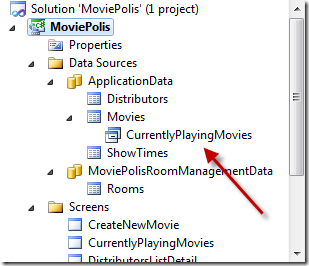
We can now use this query to base one or more screens upon. When adding a screen, we see this query pop up in the list together with the table entities. Note that you’ll see it appearing only with some templates, the Details template won’t show it for example.
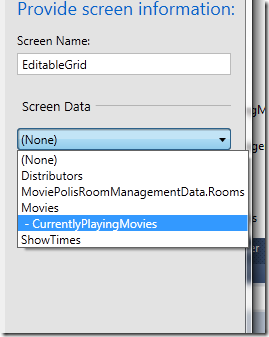
This screen will now automatically use this query to start with. If we want, we can again edit the query and add new filters.
This type of query is global for the entire application to be used.
Parameters in queries
Assume that we want to change the screen so that the user can use a checkbox to indicate whether he wants to see only the currently playing movies. Let’s look at how we can build this.
In the query designer, we’ll now use a parameter for the filter, as shown below.
The parameter should be added as well. The parameter is named IsCurrentlyPlaying (you can give it any name really).

Now, in the screen designer for the screen, add a Data Property. Select a Boolean value and give it a name.
Again in the screen designer, select the parameter in the query. In the Properties window, under Parameter Binding, you can select the Boolean value you just added. If done correctly, an arrow appears that points to the parameter as shown below.
Finally, we need to add this Boolean value to the screen. To do so, select the Rows layout (root of the screen) and click on the Add button at the very bottom. In the context menu, select the Is Currently Playing parameter.
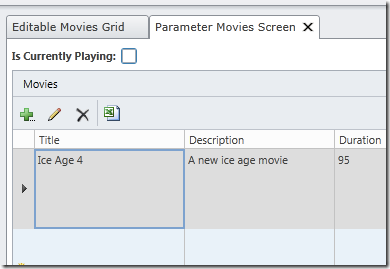
We can now see this parameter appearing as a checkbox in the screen.
Coding queries
The query designer only allows us so much; we can’t do all the things that we’re used with regular queries or LINQ (sum, top, count…). However, when we run into a limit here, we can start writing code.
Assume that we only want to return to the user a maximum of 100 movies in the grid. This is not possible with the query designer. However, inside the query designer, another Write Code button is winking at us:
In the PreProcessQuery method, we have access to the query before it is being executed. The query object is of type IQueryable, meaning that we can add an expression onto the object. This will then be combined with the normal query and the optimal query will be executed on the data source.
In the code below, we are adding to the query that we only want the top 100 results. Behind the scenes, LightSwitch will not fetch all records and then show only the first 100. Instead, the query that will be built includes a TOP 100 statement.
partial void CurrentlyPlayingMovies_PreprocessQuery(ref IQueryable<Movie> query)
{
query = (from q in query
select q).Take(100);
}
This last part was a good bridge to the next part, writing code in LightSwitch.
Coding in LightSwitch
Although one of the important principles of LightSwitch says “No code required”, quite often, real applications will be code to be written. The tools and designers can only take you so far. When it comes to writing validation or business logic, code is going to be required. That being said, the code written in most LightSwitch applications will be limited. There’s no need to start writing code that says how to build up the screen or fetch the data. All of that is handled by LightSwitch.
LightSwitch offers quite a lot of places in the code where we can hook into, in the form of partial methods. Most of the code that we have to write will go in these partial methods as we’ll see soon. The code we are writing is Silverlight code.
Validation rules
As said, validation is one place where very often, code is required. Let’s take a look at writing a rule. LightSwitch creates for each property a Validate partial method in the generated code. We can thus easily add our own code. Let’s add validation rules for the ShowTime table.
The end time for a ShowTime should always be later than the starting time.
To implement this rule, we can select the StartTime field and click on Write code à StartTime_Validate. In this method, we can add the following code:
partial void StartTime_Validate(EntityValidationResultsBuilder results)
{
if (EndTime < StartTime)
results.AddPropertyError("Start time should be earlier than end time");
}
Similarly, for the EndTime field, add:
partial void EndTime_Validate(EntityValidationResultsBuilder results)
{
if (EndTime < StartTime)
results.AddPropertyError("End time should be later than start time");
}
Note that both these methods are partial. They are guaranteed to be called by LightSwitch, we don’t need to write any logic for that. LightSwitch will call these when validation is required on these fields, i.e. when the value has changed.
LightSwitch offers feedback to the user automatically in the UI:
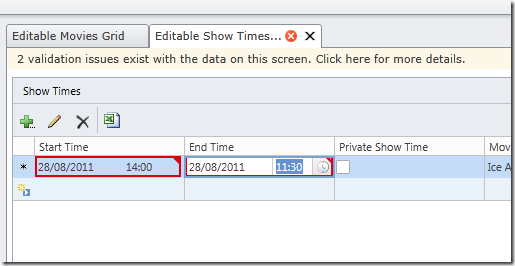
If the showing is private (PrivateShowTime is true), the EndTime should be before 4pm. This rule is enforced by MoviePolis management. We can add another rule using the following code:
partial void PrivateShowTime_Validate(EntityValidationResultsBuilder results)
{
if (PrivateShowTime.HasValue && PrivateShowTime.Value)
if (StartTime.Hour > 16 || EndTime.Hour > 16)
{
results.AddPropertyError("Private showings can't be after 4pm");
}
}
A validation error is shown in the UI when setting a time later than 4pm and checking the checkbox for PrivateShowTime, as can be seen below:
Business rules
When adding a new movie to the system, a new show time needs to be added automatically as well. MoviePolis has a rule that new movies should have their first showing on the next Friday at 8pm. We can add this business rule. For this, we have to hook into the save pipeline offered by LightSwitch. This pipeline can be seen as a series of events that happen after one another, for example when adding an entity. For this particular rule, we have to hook into the Inserting event of the Movie entity as follows.
In the table designer, with the Movie table open, click on the Write Code àMovies_Inserting (note that you should have the entity selected, not any of the fields).
In the partial method, we can write code that checks to find the next upcoming Friday and it will add a new instance of ShowTime for that day.
partial void Movies_Inserting(Movie entity)
{
var todayDayOfWeek = DateTime.Now.DayOfWeek;
DateTime nextFriday;
switch (todayDayOfWeek)
{
case DayOfWeek.Friday:
nextFriday = DateTime.Now;
break;
case DayOfWeek.Saturday:
nextFriday = DateTime.Now.AddDays(6);
break;
case DayOfWeek.Sunday:
nextFriday = DateTime.Now.AddDays(5);
break;
case DayOfWeek.Monday:
nextFriday = DateTime.Now.AddDays(4);
break;
case DayOfWeek.Tuesday:
nextFriday = DateTime.Now.AddDays(3);
break;
case DayOfWeek.Wednesday:
nextFriday = DateTime.Now.AddDays(2);
break;
case DayOfWeek.Thursday:
nextFriday = DateTime.Now.AddDays(1);
break;
default:
nextFriday = DateTime.Now;
break;
}
DateTime showTimeStart = new DateTime(nextFriday.Year, nextFriday.Month,
nextFriday.Day, 20, 0, 0);
var newShowTime = new ShowTime();
newShowTime.Movie = entity;
var room =
from r in DataWorkspace.MoviePolisRoomManagementData.Rooms
where r.RoomName == "Room 1"
select r;
newShowTime.Room = room.First();
newShowTime.StartTime = showTimeStart;
newShowTime.EndTime = showTimeStart.AddHours(2);
entity.ShowTimes.Add(newShowTime);
}
The result can be seen below:
Custom screens with code
To finish off this part on coding, we’ll take another look at building a custom screen from scratch but now including code (in the previous article, we already looked at creating screens from scratch as well).
For this demo, assume that we are building a custom screen where the user can enter showtimes. Assume for this demo that private show times should not have an end time filled in (the people from MoviePolis don’t want their best customers to be rushed out of the room!). To do so, we’ll add a checkbox for the IsCurrentlyPlaying. When true, the end time field is shown, otherwise, it’s hidden. Let’s look at how we can create this.
Create a new data screen, but don’t select any data to be added (we’re starting from scratch, remember). On this screen, we’ll add a local property of type ShowTime:
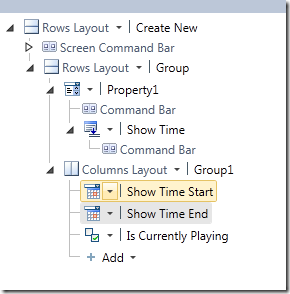
Next, add 2 properties of type DateTime and a third one of type Boolean. Your screen should now resemble the following screenshot:
Now, we’ll write some code.
In the InitializeDataWorkspace method, we’ll write some initialization logic:
partial void CreateNew_InitializeDataWorkspace(List<IDataService> saveChangesTo)
{
// Write your code here.
IsCurrentlyPlaying = true;
}
Now, we’ll add code for the Changed events of the ShowTimeStart and the IsCurrentlyPlaying property.
partial void ShowTimeStart_Changed()
{
ShowTimeEnd = ShowTimeStart.AddHours(2);
}
partial void IsCurrentlyPlaying_Changed()
{
this.FindControl("ShowTimeEnd").IsVisible = IsCurrentlyPlaying;
}
Using the FindControl method, we are able to search for a control on the UI and execute code on it.
When we change the value for the start time, the end time value will be updated as well.
When unchecking the Is Currently Playing field, the Show End Time field will be hidden as can be seen below:
Summary
In this article, we’ve taken a look at the options we have when using queries in LightSwitch applications. Next, we have seen several places where it’s required to write code, including validation, business rules and custom screens.
In the next article, we’ll be diving into deployment and security!
About Gill Cleeren
Gill Cleeren is Microsoft Regional Director (www.theregion.com), Silverlight MVP (former ASP.NET MVP), INETA speaker bureau member and Silverlight Insider. He lives in Belgium where he works as .NET architect at Ordina. Passionate about .NET, he’s always playing with the newest bits. In his role as Regional Director, Gill has given many sessions, webcasts and trainings on new as well as existing technologies, such as Silverlight, ASP.NET and WPF at conferences including TechEd Berlin 2010, TechDays Belgium, DevDays NL, NDC Oslo Norway, SQL Server Saturday Switserland, Spring Conference UK, Silverlight Roadshow in Sweden… He’s also the author of many articles in various developer magazines and for SilverlightShow.net. He organizes the yearly Community Day event in Belgium.
He also leads Visug (www.visug.be), the largest .NET user group in Belgium. Gill recently published his first book: “Silverlight 4 Data and Services Cookbook” (Packt Publishing). You can find his blog at www.snowball.be.
Twitter: @gillcleeren